Showing posts with label finishing. Show all posts

Saturday, January 08, 2011

Tunic shirt done!

Whoosh. Well, it wasn't difficult.
DSCN2261
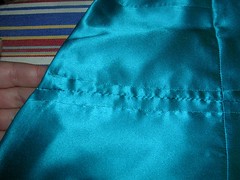
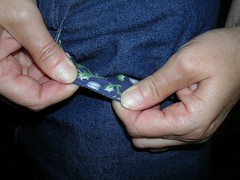
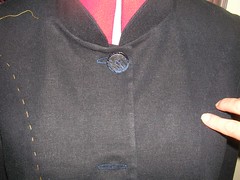
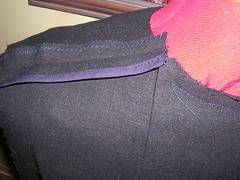
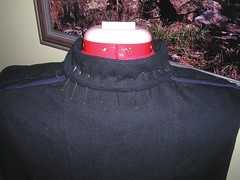
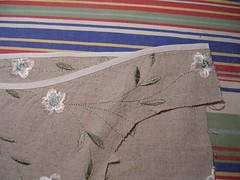
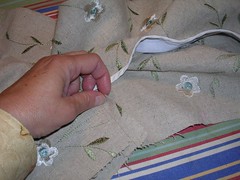
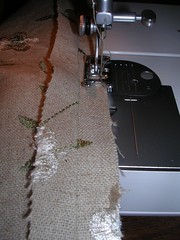
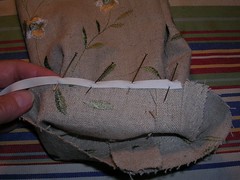
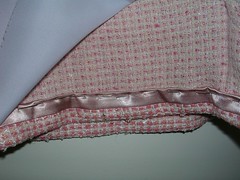
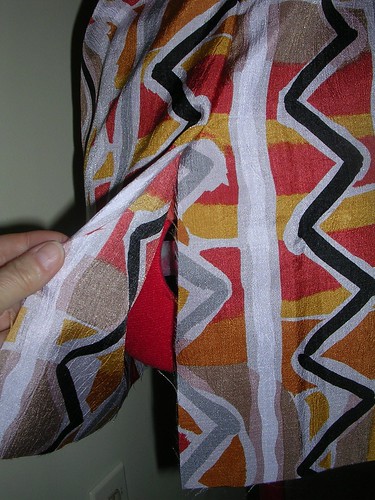
I usually flat fell my seams to finish them but I didn't want to do that on the light weight silk, so I thought I would use a French seam finish. I did that on the shoulders but zigzagged around the armholes. Then, I was going to French seam the underarm/side seams when I realized that wouldn't work with having vents on the sides. Instead, I sewed a "normal" right-sides-together seam and then ironed the seam allowance under, thus also making the vent edge finished.

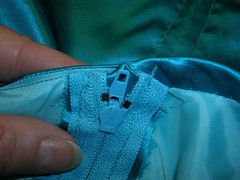
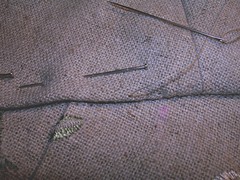
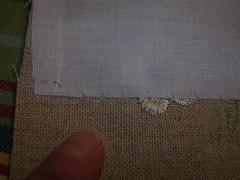
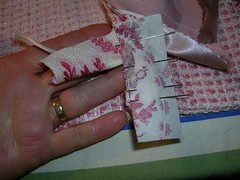
It was at this point that I decided to re-examine my sewing machine for why it was breaking threads. I have a follower who also works where I shop for groceries and we had a nice long talk this week, about threads breaking and people who fix sewing machines. She said something like, "of course, you have checked the throat plate for snags" and I said "of course". But when I was sitting there, this afternoon, staring at my machine, I realized that I had not looked at the throat plate (the plate with the lines on it for 5/8 seam allowances, where the needle goes through the hole into the bobbin area). So I took it out and looked at it and sure enough! There were tiny metal snags where needles have broken over the years. Well. I thought that the sewing machine guy might have said something to me, especially as when I took the machine in, I said "it is breaking the top thread". So I got a tiny piece of very fine emery paper for sanding metal and spent 10 minutes buffing the snags. Then I proceeded to sew rapidly, using straight and zigzag stitches and the thread didn't break once! I did not allow myself to feel elated yet. Then I made six buttonholes and the thread broke twice! Grr. I am going to sand the heck out of the throat plate again and make sure there is nothing snaggy on it and then start a new project and see what happens. I suppose I could also buy a new one.
DSCN2263
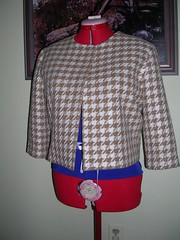
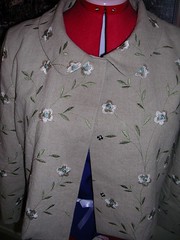
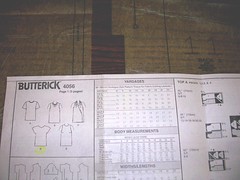
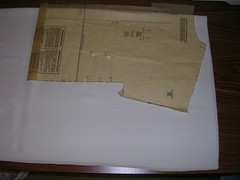
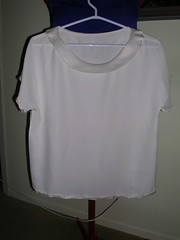
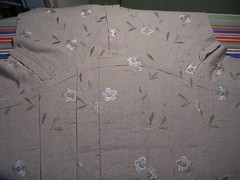
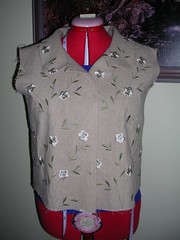
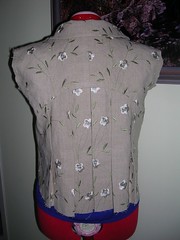
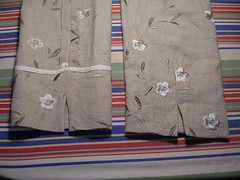
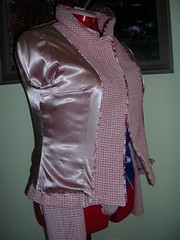
Anyway, here it is, a tunic length shirt with 3/4 sleeves. It fits and I am happy with the way it turned out. I'll want to wear it once to be sure but I think I have found the pattern for my gold silk. Now, for the sand paper...

Sunday, May 10, 2009

Prom dress finished!

I'm done! And it all came together smoothly, much to my relief. Not that I expected trouble but when you are sewing for someone else, you kind of hold your breath.
prom dress
Even when sewing the midriff lining down, on the inside, I tried to keep the stitches tiny and invisible.
prom dress
I put the zipper in exactly the way the instructions said and it went well too. In this photo, the zipper allowances are still basted together.
prom dress
This is what the zipper looks like on the inside, with the tops of the tape tucked in and the top edges of the bodice folded under. I took some tiny hand stitches to secure the edges even more and then added a hook and eye at the top.
prom dress
And here is the dress, on my judy. It doesn't zip up the back because my niece is narrower than I am. And it will look even cuter on her, as she is cute too! I am going to request a copy of a photo of the dress in action but that won't be until June. And now for the Vogue dress!

Thursday, August 28, 2008

Woolly jacket

Nearly done!
woolly jacket
I decided to topstitch around the back of the neck only. The fronts are all interfaced so I don't have to worry about the seams coming unravelled. But at the back of the neck, the thin lining fabric is sewn to the loosely woven woolly fabric and I feared an early dismantling of the neck due to fabric failure. I sewed a second line of stitching beside the first but then, after I had turned the jacket right side out, I put a line of topstitching on to reinforce everything.
woolly jacket
It fits and doesn't bind anywhere. Maybe they fixed the pattern after earlier complaints? Maybe that little side piece went missing? It is very small - a "jackette". The sleeves are 3/4 and the hem hits only a few inches below my waist. But I did only have 1.1 metres of fabric! But I like it. It's light and shouldn't make me too hot while I wave my arms about in the front of the classroom.
woolly jacket
Now I just have to choose the button. There's only one button at the neck. Carmen suggested yesterday in the comments that she liked the largest gold button, in the lower right in this pic. I like that big button too but I am also leaning toward the shiny plastic brown button in the lower left. The big gold one is really big and almost sparkly. Maybe I should go for the smaller, duller gold one in the upper right?

Tuesday, August 26, 2008

Woolly jacket

I had a lovely parental unit visit over the weekend, but with that and trying to squeeze that last of the Summer out of the last of Summer, and school starting next week (I teach), I have not been sewing!
jacket pieces
Even though this jacket is really a muslin (and if it doesn't work, it'll go to the Sally Ann), I am compelled to finish the inside as well as if it wasn't. And if it does work and I do wear it, then I will be glad I did finish the inside. I used pinking shears to cut the lining pieces. The "wool" is loosely woven so I have zigzagged all the edges that will be ironed open at seams. The shoulders will be zigagged and trimmed after they are sewn so I didn't do those ahead of the construction. The entire fronts are interfaced and I used iron-on interfacing so I didn't need to zigzag those edges. And the front facings are also interfaced. This is one of the few times I have put interfacing on the entire front (not just the facings) so I am looking forward to how that works and feels, assuming I end up wearing the jacket.

Monday, August 11, 2008

White jacket and other things finished

I got bored with sewing the white jacket and violated my Rule and made a navy denim skirt in the meantime. In my defense, I had had the navy denim hanging over the railing since Spring, planning to make the skirt. It was after I finished the white denim skirt and realized what a good job I'd done and how much I was already wearing it, that I caved and interrupted the jacket to make the other skirt.
navy denim skirt
It's like my navy denim jacket - something I have always wanted but never had until I made it for myself. It has pockets, a "waist"band, front fly and flat felled seams. A classic.
pocket lining
To cut down on bulk, I lined the pockets with some craft cotton I had, just for fun.
snaps
Since I was on a roll with finishing projects, I sewed three snaps to the embroidered linen jacket. I didn't cover them because, when I tried putting even the thin silk over the snap, it snagged and made the unsnapping difficult. I will probably always wear this jacket done up anyway. Now I just have to find new buttons.
pick stitch
Next, I pick-stitched the facings to the front of the navy linen blend jacket.
pick stitch
I used navy thread and you really can't see the stitching, which is what I wanted in this case.
white denim jacket
Finally, I also finished the white jacket. I really like the accent of the wood buttons. What next!?

Monday, July 14, 2008

Navy linen outfit

July 14
I have put the zipper in the navy skirt. (It doesn't look navy at all, but that's a trick of the light.)
navy linen outfit
As usual, I machine baste the opening edges together and then pin the zipper from the inside, pinning down the middle of the zipper tape. Then I baste down the outside edges of the zipper tape, because I sew down the middle from the right (outside) side and I don't want to try to pick basting thread out from machine sewed thread.
navy linen outfit
Here's the back of the jacket showing the one large pleat. I put the jacket on Rose inside out to show it from the wrong side.
navy linen outfit
Here's a close-up of the shoulder seam. I am putting seam binding on only one side of this seam to finish it. The other side, I zigzagged to make it more sturdy for future long-term wearing, but it will be covered by the front facing so I don't need to put seam binding on both sides of the seam.
navy linen outfit
And here is where I am tonight, hand sewing the collar facing in between the edges of the front facings. I often machine sew these things but when I am trying to achieve a more couture look, I will make the effort and hand sew with tiny stitches.

Thursday, June 26, 2008

Silk top

While I was (still am) thinking about the buttons for the linen jacket, I made the silk top.
silk top
I used a modified Butterick 4056 pattern. I found when I made this top the first time, that it had a wide enough neckline that it didn't need a seam and a button at the neck opening in the back.
silk top
I could cut both the back and the front on the fold and modify the back neck facing. I decided I would use a facing and not just some self-bias tape because I thought the interfaced facing would give the neck more structure.
silk top
It's an extremely simple top, even with the facing. You can see a little bit, how there is a sheen to the right side of this beautiful silk, when you look at the facing here, contrasted with the top itself which is wrong side out on the table. I also finished the seams by sewing a simple zigzag stitch and trimming the excess material.
silk top
After only about an hour from start to almost finish, the top is done except for the hems. I have decided to hand sew the cap sleeve and bottom hems, to give a higher tone, a more couture finish, to the top. This lovely silk demands it. But I have to wait until it cools down because I don't want to stain the silk with my sweat.

Wednesday, June 25, 2008

Linen outfit, jacket

On to finishing touches. I am hemming the skirt tonight but that's a simple proposition.
linen jacket
I have put on all the seam binding and hemmed up the jacket. Looking good!
linen jacket
Now I just have to figure out the buttons. The three I have are different from each other, with one having a dark brown spot on it, one medium and the third light.
linen jacket
I have to decide what order to place them. Should the darkest one be at the top, in the middle or at the bottom? Not a crisis either way, I am thinking.
linen jacket
I have discovered that the top buttonhole will have to go right through the middle of an embroidered flower. Nothing I can do about that now. I have made an experimental buttonhole through a flower and it's not bad. But I wonder if there might be anything else I could do?
linen jacket
After I made the sample buttonhole, I pinned it on the jacket, put it on Miss Pink, and stuck a button into it, to get a feel for the thing. I also have to calculate where I want to sew the buttonhole, because when done up, the buttons will stop at the shank (or where they are sewed) and I don't want them overlapping the edge of the front of the jacket. So the buttonhole has to stop about 1.5 cm from the edge of the jacket, which looks kind of far back to me, when the jacket is unbuttoned.

Thursday, June 19, 2008

Linen outfit, jacket

This just goes to show that even after sewing for 30 years, you can still miss stuff. You know how I mentioned that there was nothing in the instructions about seam finishing so I zigzagged the sleeve seams? And yet, the notions list called for seam binding? So I looked at the main instructions, before you get into the specifics of the garment and sure enough, there it was: " finish the raw edges of each seam as you make it." So I should have done the sleeves but I'm not worried that I didn't. In fact, it probably adds less bulk to the sleeve by just zigzagging the raw edge. And you never see in the insides of the sleeves even when you take the jacket off. That's my story and I'm sticking to it.
linen jacket
Here's how nicely the edge of the facing is finished now. And I didn't use a fancy stitch - I just stayed Very close to the edge of the seam binding and sewed carefully.
linen jacket
Now that I've attached the collar and the yoke facings, I see that part of the shoulder seam will be visible when I take the jacket off. But I decided Not to finish the one little bit of it by using seam binding. Instead, I simply folded under the raw edge and stitched it down. Now it's finished but practically invisible.
linen jacket
Here's the yoke and the pleated back, from the inside. I have put a temporary line of basting stitches across the middle of the pleats to keep them all together while I work with the garment. When it is time to hem the jacket, I will take the stitching out.
linen jacket
Here, I am sewing down the yoke facing on the inside. That bit of pink is a chalk mark for where the pleats go. I normally like to machine sew down things like facings but I decided to go more "couture" for this jacket. When I put my mind to it, I can sew with very nice, tiny stitches. Of course, this linen is very forgiving.
linen jacket
Here's the front so far, minus sleeves. Cute!
linen jacket
And the back! I may not want to ever sit down in a chair with a back while wearing this jacket. Not only would it wrinkle the pleats, no one could see how adorable they are!

Wednesday, June 18, 2008

Linen outfit, getting on with the sewing

Things are proceeding apace. Everything is cut out and things are going together.
linen outfit
Although I knew the jacket was unlined, it wasn't until I started sewing the two pieces of the sleeves together that I realized, it was unlined! The instructions call for using seam binding in the body of the jacket and there is a yoke and yoke facing but there is no call for finishing the raw edges of the sleeve seams. So I zigzag stitched the seams I'd already sewed, which made me think, I'd better zigzag the raw edges of the skirt as well. Normally, I do a flat fell of some sort but I don't think it will lend itself to this fabric.
linen outfit
Speaking of fabric, is linen ever nice and easy to sew. It doesn't move around or bunch up and it's not hard to puncture. It may wrinkle when you wear it but it's very pleasant to work with in the meantime. Above are the yoke and the yoke facing. I deliberately cut the facing into the non-embroidered area at the selvage so I would have less embroidery on the inside of the jacket. Not that it matters but I liked the idea of it.
linen outfit
The sleeves are 3/4 length with a V shape on the finished edge. In the instructions, it just says "sew hem in place" but since I dislike an unfinished raw edge, I decided to use some seam binding here.
linen outfit
I pinned the double-fold bias seam binding to the raw edge and stitched it on by machine, using a "fancy" stitch that did a zigzag every fourth stitch, just to be sure that I was catching the binding on the underside.
linen outfit
Here are the sleeves, wrong-side and right-side out. I hand sewed the hems up.
linen outfit
I also hand stitched the interfacing down the fold line on the jacket fronts. I chose sew-in interfacing because the pattern recommended it but also because I thought it would be best, given the natural fabric. I haven't decided yet if I will do any top stitching. The pattern doesn't call for it but sometimes, it gives a little more structure to the garment.

Friday, March 28, 2008

Raw silk suit almost finished

Almost there! This is the point where I start thinking about the next project and if I didn't have my Rule, I'd end up with UFOs all over the place.
raw silk suit, nearing the finish
Here, I've pinned the jacket shut to simulate buttons. Everything is done except for the sleeve hems. Peter thought I might want to put seam binding along the bottoms of the sleeves and I plan to pin some there to see what it looks like. He may be right. You might notice that I have put a row of pins down the fronts, to hold the fabric up and keep it from buckling at the bottom edge. I may take a few loose stitches in the shoulders to prevent this from happening in the finished jacket.
raw silk suit, nearing the finish
The skirt is complete. I decided to cut a few pieces of bias from the satin and finish the skirt hem in it. I sewed the satin on by machine to the raw edge of the hem and then I folded the other raw edge under and hand sewed the hem to the skirt. And no one will ever see this.
raw silk suit, nearing the finish
Back to finishing the inside of the hem on the jacket. Before I could sew down the lining to the hem, I wanted to finish that tiny bit of raw fabric at the bottom edge of the facing. The Threads magazine suggests putting a bit of bias tape on it and in this photo, I have pinned the tape to the edge. I sewed it to the edge by machine before folding it over to encase the raw edge of the facing. By machine sewing, I also was able to catch the end of the piping cord in the stitching, thus anchoring it even more than I had already.
raw silk suit, nearing the finish
Then I folded the tape around the edge of the facing and tucked the end under and sewed it down by hand. You might want to make this photo larger to see the detail. For someone who is picky about finishing the insides of her garments, even this may be a bit much for me for future jackets. The piping is nice but I wonder if it's worth it, especially with the fuss at the bottom because f the fold in the lining for ease. If I do this again, I may have to eliminate that fold. But I like the bit of bias over the raw edge.
raw silk suit, nearing the finish
Here is the jacket on Rose, inside-out. The lining hem is pinned up to the jacket hem. I suppose it looks a little more relaxed, now that I've sewed it but I'm not convinced the piping is worth the trouble.
raw silk suit, nearing the finish
I think the jacket does need more of the piping fabric as an accent on the exterior. That's why I'm going to test it around the bottom edge of the sleeves when I hem them, and that's why I'm going to use it on the buttonholes. I can't use my automatic buttonholer anyway, because of the thick piping at the front edge of the jacket. So I'm going to do some machine zigzaging to make the fabric sturdy and then do a bound buttonhole with the floral fabric. And then I am going to make fairly large covered buttons using the floral fabric to cover them! I can't imagine this jacket with any other buttons - plastic, pink, gold or whatever. I think they have to be covered in the floral. So that's next, after I make the trek to Fabricland for the button forms.