Tuesday, April 29, 2008

S.W.A.P. for a trip

I'm going on a 2 week trip to France in a warm month (i.e. soon) and all I'm taking is a 35 litre MEC backpack as carry-on (it's under travel packs called "the Shuttle" if the link doesn't work). I'm also allowed a purse type object and will take that too but most everything has to fit in the backpack. All winter long, when I walk everywhere because I don't ride my bike in the snow, I carry a smaller (about 25 litre) MEC book backpack (they don't have them any more I guess - I couldn't find the one I use on the site) so I prefer a backpack, am used to one and think they really work for carrying things. I carry groceries home nearly every day in it and sometimes have crammed as much as 10 kilos in there. Clothes and shoes won't weigh as much as bags of milk so I am not concerned about the weight in the pack on my trip. But now I am starting to consider what I should put in there. Of course, I can always wear five layers of clothing on the plane and kind of cheat a little that way. And I may buy an umbrella there. But we went for a bike trip for two weeks last August and carried everything in two panniers so I don't see why I shouldn't be able to do this.

Of course, all this planning is making me think about coordinating clothes and how, while I certainly do have some (okay, lots), I would like to have some more that coordinate well.
pre-packing
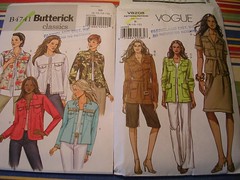
I have been buying some new patterns lately and have been looking for "the perfect jacket". I still have not found that one yet but I have been wanting to make different variations on my standard jean jacket pattern that I love but admit that it is a little boxy. I found these two, unlined jacket patterns and got them with no particular fabric in mind. The Butterick 4741 is more of a jean-type jacket, with the pockets and bands and such. I am planning to make view D (the red one on the envelope) for the trip. The Vogue 8208 is sort of a safari jacket and I think I will make it in the long sleeves but I am not sure I need the belt.
pre-packing
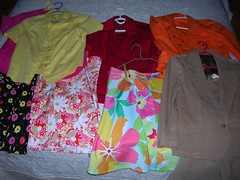
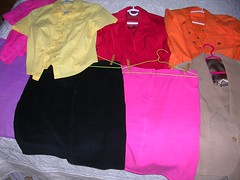
I have been thinking about what main colour I should have on the trip and since I like bright colours and have bright colours, I am thinking I will go with a red/yellow combination. Red will include pink and orange too so it's all warm colours. Here are some existing skirts and jackets. I have a red and an orange jacket and three printed skirts in those tones. And I have a yellow and pink shirt. I put the beige corduroy outfit I made recently on the bed as a neutral.
pre-packing
Then I put away the print skirts and placed three solid colour skirts I have had for years with the same jackets and shirts. I think I like a few prints in with the mix - all those solids are too much.
new twills
My idea when I went shopping today was to get two pieces of complimentary twill - one in a print and one in a solid, in warm colours. Unfortunately, I couldn't find such things and so I ended up buying two solids. That yellow is warmer - not so green as in the photo, and the brown is a warm fawn colour. I plan on making the Butterick jean-type jacket in the yellow twill. It is too sheer (yellow is like that) to make a skirt unless I line it so I just got enough for a jacket. The brown twill has 3% Spandex and is thicker with a nice peached finish and I plan to make the safari jacket and an unlined skirt out of it.

So now I am really SWAP - Sewing With A Purpose. Head down and nose to the feed dogs and go. I am rehearsing the phrase: "Je l'ai cousu."

Tuesday, April 15, 2008

Silk suit finished!

It only took me another 5 days! Please pardon the model in the pix - they were taken at 6:30 am with no make-up. Zzz.
silk suit finished
First: the buttonholes.
I realized, especially after thinking about what Lorna wrote about taking a lesson for bound buttonholes, that I was not making "real" bound buttonholes. I made real ones on my faux fur winter coat. You make the tiny welts and turn the welt fabric to the inside of the jacket front, which is inside where the interfacing is, between the front and the facing. Then you finish the buttonhole on the facing in a similar way and bind them together. I sewed the "welts" to my silk jacket, sewing through all layers at once and turning the welts to the inside but where they showed on the facing. The above photo shows one finished buttonhole at the top, from the outside. The second buttonhole has the welt fabric zigzaged to it from the outside. There is a line of basting in dark green thread running down the middle of the welt area. That's where I cut the buttonhole open.
silk suit finished
I know I showed this before but here is the buttonhole from the inside - the facing side. I have tucked under the raw edge on the short sides of the "welt" and pinned them down.
silk suit finished
Here, I have sewed the fold on the short ends down to the jacket facing. On your right side, I left the needle in to show the scale and the stitches. The stitches are very small but not invisible. But the silk fabric is very forgiving and doesn't show all sorts of insults. Then I had to tuck under the raw edges on the long sides of the "welt" and sew them down too. You can click on these pix and make them larger at Flickr for detail.
silk suit finished
Here it is on Rose last night. I am having an "issue" at the moment with the top button area not wanting to lie flat. I am not sure I will want to button it all the way up to the neck but I should press that and maybe it will work better.
silk suit finished
I decided to model it with a yellow t-shirt because, a) I haven't decided what shirt to wear as it is only -2C out there right now and b) the yellow suited the pink because if it's warm background - it is not a blue-pink.
silk suit finished
Here it is all buttoned up with the top button "issue".
silk suit finished
And here she is with the top button undone. Whew. I guess I should make the satin blouse next but I haven't decided.

Thursday, April 10, 2008

One finished buttonhole

I know what's holding me back - fear of doing the wrong thing. Because I haven't done this before, I'm not sure where I'm going. But I do know that once I've made a buttonhole, it's there forever.
four buttons
Here I am, laying out the jacket and thinking it should have only four buttons down the front and not the five I have put on previous jackets. The buttons are larger and the buttonholes will be more prominent so it may be too much to put all five buttons on. And no, I'm not doing this because I made one of them too dark - I can easily go get some more button forms to remedy that.
first finished buttonhole
So I made the first buttonhole at the neck. And it looks good on the outside! But if I don't always button the jacket up to the neck, you are mostly going to see the inside of it...
first finished buttonhole
... which looks huge, at least to me. I am thinking about running a bit of zigzag machine stitching around the buttonhole from the inside, knowing it will hardly show on the outside because of the type of fabric this is. The machine stitching will make the buttonhole sturdier and may cover up some of that floral fabric. Other than this issue, I have tried on the jacket and it fits nicely and feels even better, so I am pleased with it and I suppose I shouldn't worry about 4 buttonholes or 5.

Sunday, April 06, 2008

The sample buttonholes

I don't know where the time goes. But I went to the store on Thursday and got button forms to make the covered buttons. I had one at home and got a package of 4, as I needed 5. Then I went and covered them and...
buttons
I made one button dark red to see what it would look like, thinking I could take it apart once I made it. Wrong! You can't get these things apart without wrecking them!
buttons pinned on
So, I either need to go get some more forms, or I could use the dark button at the very top at the neck. I probably wouldn't button the jacket all the way up to the neck much, and if I did, it would be okay if the button at the top was different from the other four. But you really can't put the dark button in the middle. That's my rationale and I'm sticking to it. Anyway, I can just get another set of forms the next time I am at the store.
sample buttonhole with button
I took a scrap of fabric and ironed interfacing to the wrong side of it and then folded it over to make two layers. That's what the front of the jacket is like, with the front and the facing. Then I took a piece of the floral fabric and sewed it to the right side of the jacket scrap, trying to stay in a straight line with the weave of the fabric. That's hard to do on both sides. I used a zigzag stitch and went around where the buttonhole will be. Then I sliced open the buttonhole and put a button halfway through for a visual.
sample buttonhole back
I turned the scrap over and pulled the floral fabric through the buttonhole to the other side - what will be the inside of the facing on the jacket. I played around with tucking under the tiny folds of floral fabric in preparation for hand stitching them to the facing. That's going to be a fiddly job! I think when I'm done hand sewing, I will reinforce it with machine sewing. I am lucky and can do that with this fabric because it is loosely woven and stitching just doesn't show on it.
sample buttonhole
Here's what it will sort of look like from the right side or outside of the jacket. I haven't sewed the facing side. The buttonhole looks like a tiny welt pocket. Now to actually DO it.