I'm kind of bummed. As you know, all last winter, I lay around the house feeling like death warmed over from the chemo. It was while I was lying on the couch, watching reruns of "The Dog Whisperer", that I conceived the idea of a reward holiday. I said, "I want a reward for going through this slow motion hell and I want to go to California and meet Cesar Millan!" And so our trip to California in August was born.
I wrote Cesar a letter, explaining my circumstances and wondering if I could meet him, or just his dogs if he wasn't going to be there. I wrote it on real stationery with a fountain pen, so it would stand out as well as look sincere. If nothing else, I AM sincere! I wrote it on the computer first, so I could redraft parts, so I'll include what I wrote at the bottom here. I had even seen that episode with the teenaged girl who got to see him about her dog because she went through the Children's Wish Foundation and since I am way too old for that, I determined that I would grant my own wish.
After a while and no answer, I went to his web site and to the "contact" page and sent my letter as an email. It was interesting that the contact pages asks for fewer than 500 words and I had only written about 360 to begin with (it was small stationery). At the contact page, there are drop down menus to identify the subject matter of your inquiry. The first one I choose was "The dog psychology centre" and the second one that arose from that had "Can I visit the D.P.C.?" as an option.
The next day, I got this response by email:
"Thank you for contacting the Dog Psychology Center. This is an auto-reply.
We appreciate your interest in Cesar and the dedicated staff at the Dog Psychology Center. Unfortunately, at this time, the center is not open to the public, and no visitors or tours are permitted on the grounds."
Well, I do understand that he must get millions of inquiries every year and that there are lots of crazies out there (I have seen some on his show!). But this is why I am bummed, because the entire impetus for going to California (as opposed to say, Spain to watch Lance on the Tour this year) was to see Cesar and tell him how much his show meant to me last winter. *sigh*
Here is my original letter:
"I am writing to see if I may visit the Dog Psychology Centre and meet you. I checked your web site and there are no "public tours" that I can see, so I realize this sort of visit would have to be arranged particularly for me.
This last winter, I was having chemotherapy for breast cancer and I found myself lying on the couch every day at 5 pm, watching "The Dog Whisperer" on the National Geographic channel. I'd seen all the shows before but I watched them again anyway because I love the message that is in each episode and I think you are a genius when it comes to dogs. I also had finally come to understand what you mean about the energy that people have and how it affects dogs. When I was first diagnosed and I told people, I would often feel a wave of negative energy coming off them, in the form of fear and pity. It was very interesting to see how I became so attuned to feeling energy and that's when I clicked with your message in the show.
So there I was, lying on the couch, enduring until I finished my treatments, and I turned to my husband and said, "when I am done this, my reward will be to go to California and meet the Dog Whisperer!" I know kids can get such things through the Children's Wish Foundation but as someone past 50, I will have to give this wish to myself. Now we have booked our tickets and we will be spending some quality time with wine and food in Napa, seeing San Francisco, driving down through Monterey and ending up in Los Angeles on August 17-19. I am hoping you will be in town at that time because I would love to meet you. But even if you are not, I would like to visit the Centre and meet some of the dogs I have seen on your show, like Junior, who must be fully grown now!
Please let me know if it will be possible for us to visit the Centre in August."
I'm only posting this because I'm a bit blue about the results of the inquiry and I hope by getting it off my chest (pun?) it will make me feel better. It would have been great to visit with Cesar, or his lovely wife, or Daddy or Junior. I know, I should just get a dog already! Soon...
More sewing shortly!
Friday, July 24, 2009
Saturday, July 18, 2009
Gala dress muslin creeps along
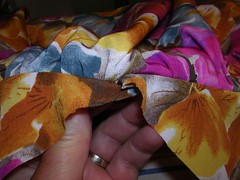
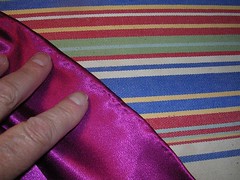
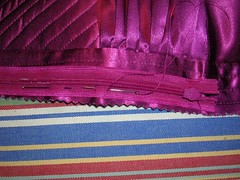
Here are the French seams.
First you have to sew the pieces together, wrong sides together, with a seam allowance of about 1/4 inch. Then you trim the raw edges down to less than 1/4 inch. Then you iron the seam and fold the pieces with the right sides together, encasing the raw edges.
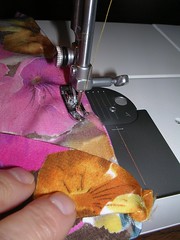
Then you sew the seam again, at about 3/8 of an inch, so you get the full 5/8 seam allowance, with the right sides together, so you end up with the raw edges enclosed in the seam itself.
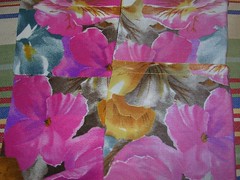
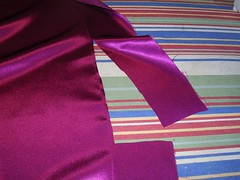
Here's what it looks like, finished and pressed, from the right and the wrong sides.
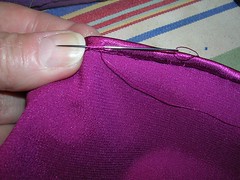
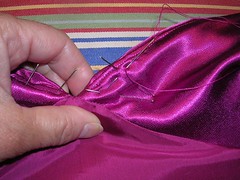
The bodice is gathered where it meets the midriff and from what I learned with the prom dresses, I now gather by hand. I simply sew a long, running stitch along the gather line and it is just easier to gather up than a machine sewn line.

The bodice also gathers into the yokes that form the shoulders. This is the back, which has a Vee where the yokes meet the gathered part of the bodice. I've got one of the yokes up and one down, just to show the construction a bit.

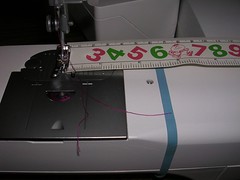
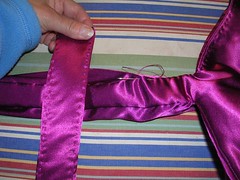
I am also noticing that I am going to have to be a lot more picky when I make the real gala dress. I put the ruler in the photo because the stitching line is supposed to be 5/8 inch (1.5 cm) from the end of this point on the yoke and from each edge and I am out of alignment. I think I will have to make accurate tailor tacks on the real dress, to ensure that the dots all line up.
This looks like a jumble of pieces (there are three) all coming together at one point.

Here is the bodice with the yokes coming together at the gathered parts from another angle. This time, I have got the yoke facings sew on as well, so now I have all sorts of pieces all converging.

I have sewn the yoke facings down by hand on the inside. This is what the bodice looks like, draping on the judy, from the back.
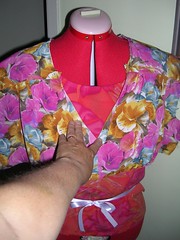
Here is the bodice from the front. It looks like the Vee in the front will be quite low. I am not sure if this will be too low. For this dress (muslin), should I wear it, I may have to put a triangle of fabric in the front, like a camisole - or just wear a camisole under it. I am now thinking of how I would alter the pattern to prevent this from happening when I make the real dress. I can't just hike it up at the shoulder seams because then the midriff will be too high. I want the seam line where the midriff meets the bodice to be right at the bra band line.
First you have to sew the pieces together, wrong sides together, with a seam allowance of about 1/4 inch. Then you trim the raw edges down to less than 1/4 inch. Then you iron the seam and fold the pieces with the right sides together, encasing the raw edges.
Then you sew the seam again, at about 3/8 of an inch, so you get the full 5/8 seam allowance, with the right sides together, so you end up with the raw edges enclosed in the seam itself.
Here's what it looks like, finished and pressed, from the right and the wrong sides.
The bodice is gathered where it meets the midriff and from what I learned with the prom dresses, I now gather by hand. I simply sew a long, running stitch along the gather line and it is just easier to gather up than a machine sewn line.
The bodice also gathers into the yokes that form the shoulders. This is the back, which has a Vee where the yokes meet the gathered part of the bodice. I've got one of the yokes up and one down, just to show the construction a bit.
I am also noticing that I am going to have to be a lot more picky when I make the real gala dress. I put the ruler in the photo because the stitching line is supposed to be 5/8 inch (1.5 cm) from the end of this point on the yoke and from each edge and I am out of alignment. I think I will have to make accurate tailor tacks on the real dress, to ensure that the dots all line up.
This looks like a jumble of pieces (there are three) all coming together at one point.
Here is the bodice with the yokes coming together at the gathered parts from another angle. This time, I have got the yoke facings sew on as well, so now I have all sorts of pieces all converging.
I have sewn the yoke facings down by hand on the inside. This is what the bodice looks like, draping on the judy, from the back.
Here is the bodice from the front. It looks like the Vee in the front will be quite low. I am not sure if this will be too low. For this dress (muslin), should I wear it, I may have to put a triangle of fabric in the front, like a camisole - or just wear a camisole under it. I am now thinking of how I would alter the pattern to prevent this from happening when I make the real dress. I can't just hike it up at the shoulder seams because then the midriff will be too high. I want the seam line where the midriff meets the bodice to be right at the bra band line.
Tuesday, July 07, 2009
The gala dress muslin
Remembering the 52 people killed in London on this day, 4 years ago.
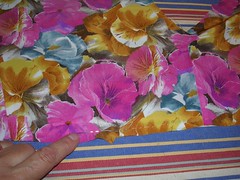
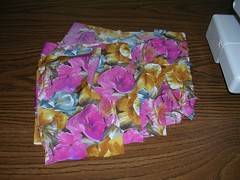
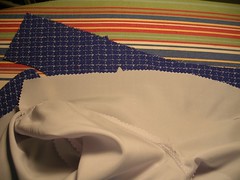
It rained on and off all day too, which I always find appropriate. And since it was raining, I didn't even go out at all. I got some reading done and then I cut out the muslin. It was easy because I didn't cut a single layer but allowed the fabric to be double thickness, saving myself a lot of time and fussing. And I didn't use pinking shears, as all the seams will be finished in some way.
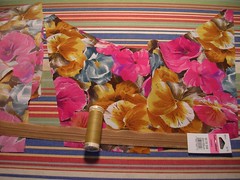
Then I fused on the interfacing to the yoke and midriff. I may go with sew-in interfacing on the actual dress, depending on the fabric. I often find fusible interfacing eventually bubbles in some fashion. I looked at the over-all colour of the fabric and decided on the ocher colour for the thread and zipper. It was a toss up, really, but I figured the ocher colour was the most muted and least likely to stand out.
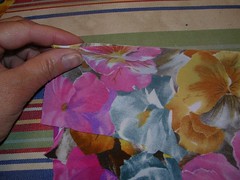
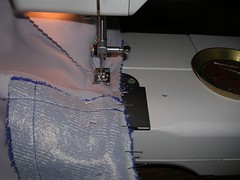
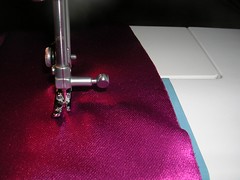
I have started to stack up the pieces to be sewed together. You can't really tell from this photo but the instructions call for french seams and I have pinned the pieces together, wrong sides together. That always goes against the grain (whoo, all these sewing metaphors!) as the pieces are usually right sides together. I have to double check each one before I stick it under the needle and get going.
It rained on and off all day too, which I always find appropriate. And since it was raining, I didn't even go out at all. I got some reading done and then I cut out the muslin. It was easy because I didn't cut a single layer but allowed the fabric to be double thickness, saving myself a lot of time and fussing. And I didn't use pinking shears, as all the seams will be finished in some way.
Then I fused on the interfacing to the yoke and midriff. I may go with sew-in interfacing on the actual dress, depending on the fabric. I often find fusible interfacing eventually bubbles in some fashion. I looked at the over-all colour of the fabric and decided on the ocher colour for the thread and zipper. It was a toss up, really, but I figured the ocher colour was the most muted and least likely to stand out.
I have started to stack up the pieces to be sewed together. You can't really tell from this photo but the instructions call for french seams and I have pinned the pieces together, wrong sides together. That always goes against the grain (whoo, all these sewing metaphors!) as the pieces are usually right sides together. I have to double check each one before I stick it under the needle and get going.
Monday, July 06, 2009
Starting something new (finally)
I have given up (for now, at least) on the blue coat.
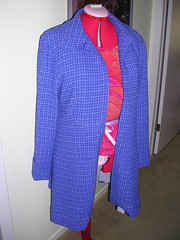
I noticed that the front (interfaced) edges curled in. This made me avoid working on it, as I knew I was going to have to do something to fix it.
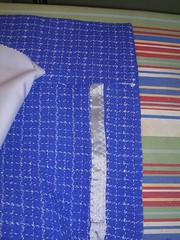
I decided to hem it, to see if this would help. I finished the raw edge with seam binding and sewed it up by hand. The lining hangs free all around the bottom.
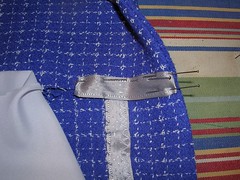
I even sewed on a little bit of seam binding on the raw edge of the facing.
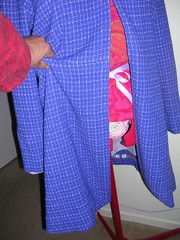
I hemmed up the sleeves and had to cut off several inches. When I hung it on my judy it became clear that the fabric was sagging. In this photo, I am holding up the waist seam and the curved-in fabric on that side corrects itself. I have therefore given up for now and won't continue to struggle with this. In fact, I wasn't so much struggling as avoiding. It seems a shame to put so much time into something and then pitch it. But it is a good lesson for me, not to buy mysterious cheap fabric. The clothes I have made recently that I wear a lot and love to wear are the ones I made with quality fabric or at least known quantities, like 100% cotton that I washed and dried and it survived.
So! In the meantime, I have become a volunteer member of the board of Breast Cancer Action and they have several fund raising events, one of which is a Gala in November. So I went looking for patterns!
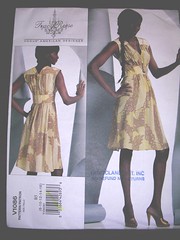
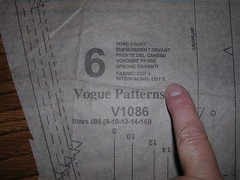
After seeing the same dress over and over in other books, I got this pattern from Vogue (V1086). It is a designer (Tracy Reese) pattern but it seems quite straightforward. It has the things they keep mentioning on "What Not To Wear", such as a high midriff and a skirt that floats away from the body. Of course, I was seduced by how lovely this model looks and I will never be that thin, but it might still work well on me.
Her dress appears to be made of batiste and as such, it is not as "fancy" as a gala dress. But I wanted to go short, not long, and I had had enough of the red carpet type dress after my last creation! It may be, after I make the muslin, that I will think the pattern itself is not fancy enough but time will tell.
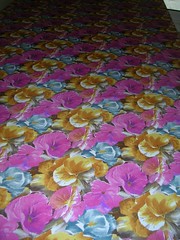
Now in spite of what I just wrote about mystery fabric, I got some $3/yard stuff in pure polyester but that is to make the muslin for this pattern. It is even possible that I might get a wear or two out of it, if it turns out to fit me and doesn't look too horrible. But the main goal is to fit the pattern properly.
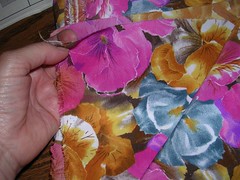
In spite of the polyester pansies, this fabric actually doesn't feel too bad and the weight is probably good for whatever, better, fabric I end up buying. Which will probably be at
Darrell's.
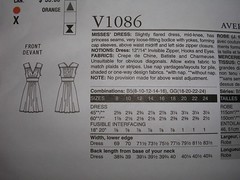
I like the fact that it looks like there is a fair bit of detail in the dress, even though it should not be that difficult to sew. The bodice is gathered which is nice for ease and so is the skirt. The most fitted part will be the midriff and the shoulders, which are yokes. It has a side, invisible zipper so it does not pull over the head.
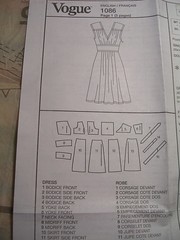
There's only one version of the dress, so I will be using all the pattern pieces, and there aren't that many of them.
The only interfacing is in the yoke, on the pieces that you have to cut four of, and the midriff, which is double thickness.
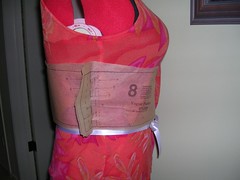
I have pinned the midriff to the judy and I think I will cut on the safe side, at size 14, and then take in where necessary. I have to say, it is a relief to have decided to move on to something else, even if it does violate my "Rule" about having no UFOs.
I noticed that the front (interfaced) edges curled in. This made me avoid working on it, as I knew I was going to have to do something to fix it.
I decided to hem it, to see if this would help. I finished the raw edge with seam binding and sewed it up by hand. The lining hangs free all around the bottom.
I even sewed on a little bit of seam binding on the raw edge of the facing.
I hemmed up the sleeves and had to cut off several inches. When I hung it on my judy it became clear that the fabric was sagging. In this photo, I am holding up the waist seam and the curved-in fabric on that side corrects itself. I have therefore given up for now and won't continue to struggle with this. In fact, I wasn't so much struggling as avoiding. It seems a shame to put so much time into something and then pitch it. But it is a good lesson for me, not to buy mysterious cheap fabric. The clothes I have made recently that I wear a lot and love to wear are the ones I made with quality fabric or at least known quantities, like 100% cotton that I washed and dried and it survived.
So! In the meantime, I have become a volunteer member of the board of Breast Cancer Action and they have several fund raising events, one of which is a Gala in November. So I went looking for patterns!
After seeing the same dress over and over in other books, I got this pattern from Vogue (V1086). It is a designer (Tracy Reese) pattern but it seems quite straightforward. It has the things they keep mentioning on "What Not To Wear", such as a high midriff and a skirt that floats away from the body. Of course, I was seduced by how lovely this model looks and I will never be that thin, but it might still work well on me.
Her dress appears to be made of batiste and as such, it is not as "fancy" as a gala dress. But I wanted to go short, not long, and I had had enough of the red carpet type dress after my last creation! It may be, after I make the muslin, that I will think the pattern itself is not fancy enough but time will tell.
Now in spite of what I just wrote about mystery fabric, I got some $3/yard stuff in pure polyester but that is to make the muslin for this pattern. It is even possible that I might get a wear or two out of it, if it turns out to fit me and doesn't look too horrible. But the main goal is to fit the pattern properly.
In spite of the polyester pansies, this fabric actually doesn't feel too bad and the weight is probably good for whatever, better, fabric I end up buying. Which will probably be at
Darrell's.
I like the fact that it looks like there is a fair bit of detail in the dress, even though it should not be that difficult to sew. The bodice is gathered which is nice for ease and so is the skirt. The most fitted part will be the midriff and the shoulders, which are yokes. It has a side, invisible zipper so it does not pull over the head.
There's only one version of the dress, so I will be using all the pattern pieces, and there aren't that many of them.
The only interfacing is in the yoke, on the pieces that you have to cut four of, and the midriff, which is double thickness.
I have pinned the midriff to the judy and I think I will cut on the safe side, at size 14, and then take in where necessary. I have to say, it is a relief to have decided to move on to something else, even if it does violate my "Rule" about having no UFOs.
Tuesday, June 16, 2009
Working on the blue coat (still)
Why does my life seem so busy and I am not even "gainfully employed outside the home"?
I have been working back on the blue coat since I finished the dresses but I still have not managed to finish it yet.
I finished putting the lining pieces together and then attached the lining to the coat.
Then I machine sewed seam tape to the hem and hand sewed the hem up. I am doing it this way because the lining hem is not going to be attached to the coat hem - it will float separately because of the pleat in the middle of the back. I have to press the heck out of it now and finish the lining hem. Next will be some top stitching and then the buttons and I'll be done.
Monday, June 08, 2009
Matching purses
At last! I can allow myself to think about something ELSE.
I spent all day Sunday (off and on) sewing up the two matching purses. So cute!

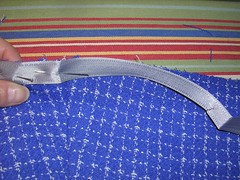
It is almost like making baby clothes, because they are so small. But there is still a fair bit of construction. I used Butterick 6371, the middle silver purse on the right.
It calls for buckram on the bottom oval piece but I used two layers of the hair canvas (because I had it) on both the lining and the purse oval pieces. So there are six layers on the bottom, which is still one less than in the bodice of that dress!
I cleverly discovered that my pressing ham is the perfect size and shap for pressing out the side seams on the purse.
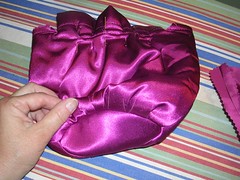
The bottom looks complicated with all the pleats and easing the sides onto the oval, but it is surprisingly easy.
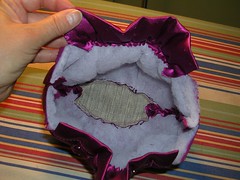
There is a layer of quilt batting between the outside and the lining but it is just held in around the edges or the seams - there is no actual quilting going on.
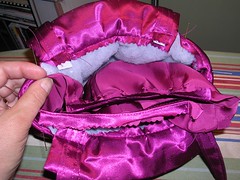
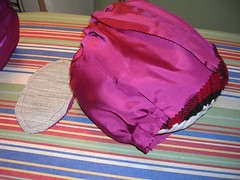
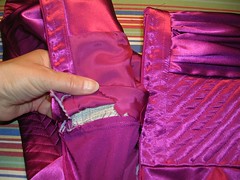
Once you have the inside and outside done and the handles attached to the outside, you put the lining inside and sew it around the top edge.
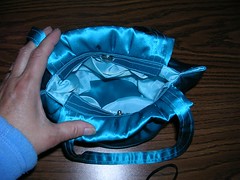
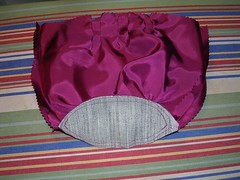
The oval piece on the lining is supposed to be made out of lining fabric but I used the outside fabric for a fun, finishing touch.
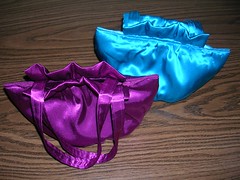
And there they are!
I spent all day Sunday (off and on) sewing up the two matching purses. So cute!
It is almost like making baby clothes, because they are so small. But there is still a fair bit of construction. I used Butterick 6371, the middle silver purse on the right.
It calls for buckram on the bottom oval piece but I used two layers of the hair canvas (because I had it) on both the lining and the purse oval pieces. So there are six layers on the bottom, which is still one less than in the bodice of that dress!
I cleverly discovered that my pressing ham is the perfect size and shap for pressing out the side seams on the purse.
The bottom looks complicated with all the pleats and easing the sides onto the oval, but it is surprisingly easy.
There is a layer of quilt batting between the outside and the lining but it is just held in around the edges or the seams - there is no actual quilting going on.
Once you have the inside and outside done and the handles attached to the outside, you put the lining inside and sew it around the top edge.
The oval piece on the lining is supposed to be made out of lining fabric but I used the outside fabric for a fun, finishing touch.
And there they are!
Friday, June 05, 2009
Prom dress finished!
The day before D-Day! I spent 2 and a half hours last night, hand sewing a hand rolled hem. This morning, I put on the finishing touches and now I just have to make the two matching purses (one for the turquoise dress too).
It started with having to rip out some of the back of the dress. The bodice fit great around the shoulder blades, where I had added the quilted "design feature" but it bagged out at the waist so I had to take it in. So I had to rip out the zipper too. I had not put it in properly with the proper zipper foot so I had to rip it out anyway, but it was sewn and basted in so there was much ripping.

Once I had ripped it all out, I decided to reinforce the skirt back with two pieces of lining fabric. I had not been able to cut the back exactly on the straight of grain and it bagged a little, so by reinforcing the edge with lining fabric, I was able to get a clean look on the back.
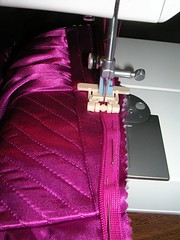
I also trimmed the quilted "design feature" so it would come in at the waist. Here is the zipper, ready to be installed.
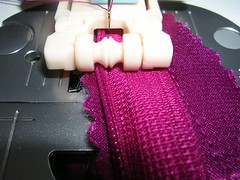
This is how that zipper foot pushes out the rolled zipper teeth as you sew. It is still fussy and you have to be slow and careful but it works.

Once I had the zipper installed, I had to gently press the quilted part of the back to get the fat edges to meet properly. It was especially fat around the bottom of the bodice because I was into all those layers of hair canvas. I don't know how the zipper would have worked if all I'd had to work with was that heavily constructed part, so I am glad I put in the "design feature".
Then it was time to hem. I had to take it up about 2 and 1/2 inches so I set a rubber band on my machine at 2 and 3/8 inches.
Then I sewed all around the hem so the line of stitching was at 2 and 3/8 inches.
I trimmed off 2 and a quarter inches of fabric, leaving an eighth of an inch outside the line of stitching.

About an inch at a time, I rolled the fabric over at the stitching line and then rolled it again to conceal the raw edge.
Alternating tiny stitches in the fabric and small stitches in the hem, it took me as I said, about 2 and a half hours to sew around the bottom of the dress.
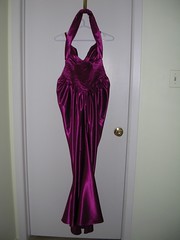
Here's what it looks like on the outside.
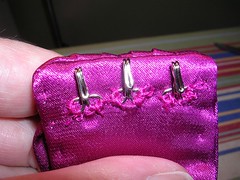
I sewed on the hooks and eyes for the halter top part.
And I sewed on the hangers on the inside.
I'll try to get pictures of her wearing it at the prom! And now for purses...
It started with having to rip out some of the back of the dress. The bodice fit great around the shoulder blades, where I had added the quilted "design feature" but it bagged out at the waist so I had to take it in. So I had to rip out the zipper too. I had not put it in properly with the proper zipper foot so I had to rip it out anyway, but it was sewn and basted in so there was much ripping.
Once I had ripped it all out, I decided to reinforce the skirt back with two pieces of lining fabric. I had not been able to cut the back exactly on the straight of grain and it bagged a little, so by reinforcing the edge with lining fabric, I was able to get a clean look on the back.
I also trimmed the quilted "design feature" so it would come in at the waist. Here is the zipper, ready to be installed.
This is how that zipper foot pushes out the rolled zipper teeth as you sew. It is still fussy and you have to be slow and careful but it works.
Once I had the zipper installed, I had to gently press the quilted part of the back to get the fat edges to meet properly. It was especially fat around the bottom of the bodice because I was into all those layers of hair canvas. I don't know how the zipper would have worked if all I'd had to work with was that heavily constructed part, so I am glad I put in the "design feature".
Then it was time to hem. I had to take it up about 2 and 1/2 inches so I set a rubber band on my machine at 2 and 3/8 inches.
Then I sewed all around the hem so the line of stitching was at 2 and 3/8 inches.
I trimmed off 2 and a quarter inches of fabric, leaving an eighth of an inch outside the line of stitching.
About an inch at a time, I rolled the fabric over at the stitching line and then rolled it again to conceal the raw edge.
Alternating tiny stitches in the fabric and small stitches in the hem, it took me as I said, about 2 and a half hours to sew around the bottom of the dress.
Here's what it looks like on the outside.
I sewed on the hooks and eyes for the halter top part.
And I sewed on the hangers on the inside.
I'll try to get pictures of her wearing it at the prom! And now for purses...
Sunday, May 31, 2009
Prom dress continues, stuck at the zipper
Well, I thought I could fake the invisible zipper as I have done once before, without the proper invisible zipper foot, but I was wrong. sigh. Let's start where we left off last time.
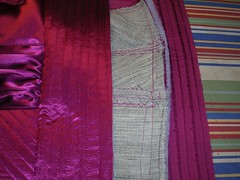
I added the vertically quilted pieces to the back, where I needed a little extra width. They were quite a bit wider than I needed but I wanted to give myself wiggle room. I also noticed that putting the zipper in might be easier with the simply quilted piece, rather than trying to sew the zipper to all those layers of hair canvas interfacing, so I think that part turned out for the best.
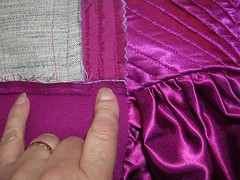
I trimmed those pieces up a bit more and here, I am illustrating what it will look like once the zipper is in. I have been hoping this "fix" will look like a "design feature" and I think it will!

This is just one panel of how odd the construction of the skirt seemed, before I actually followed the instructions and sewed all four of the skirt pieces together.
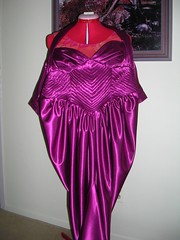
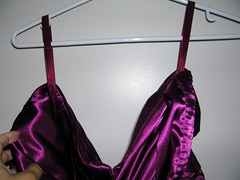
Here is the dress, just hanging around the neck of my judy, which is why the skirt looks oddly wide (because it's not actually ON the judy). But it does look exactly like the pattern instructions.
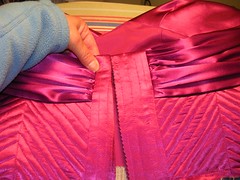
Once the skirt is sewn onto the bodice, you have to press the seam allowance UP, into the bodice, so that it can get concealed by the lining. This is difficult because of the layers of interfacing that have to be folded up. So I decided to sew up the seam allowance by hand (instead of just pressing it up), taking some internal stitches here and there but also making pick stitches right through to the quilting on the outside. This is turning into a true couture garment, with all this hand sewing.
The instructions also called for understitching the top edge of the bodice as much as possible by machine, which I did. But it still tended to roll out so I pick stitched the entire thing around the inside, including the two "drape" pieces (the things that go around the neck to make the halter).
These pick stitches are all on the inside and never show on the outside.
So then it came time to put in the invisible zipper. I basted it all in by hand first (of course!). Then I tried cheating with a non-invisible zipper foot and couldn't get the zipper teeth to roll out far enough to give it the proper "invisible" effect. So now I have to call my sister (my niece's mother) and see if she has this foot attachment on her machine. If so, I can go over and first do a fitting and then sew it up. If not, I will have to go find one. But I'm almost done!
I added the vertically quilted pieces to the back, where I needed a little extra width. They were quite a bit wider than I needed but I wanted to give myself wiggle room. I also noticed that putting the zipper in might be easier with the simply quilted piece, rather than trying to sew the zipper to all those layers of hair canvas interfacing, so I think that part turned out for the best.
I trimmed those pieces up a bit more and here, I am illustrating what it will look like once the zipper is in. I have been hoping this "fix" will look like a "design feature" and I think it will!
This is just one panel of how odd the construction of the skirt seemed, before I actually followed the instructions and sewed all four of the skirt pieces together.
Here is the dress, just hanging around the neck of my judy, which is why the skirt looks oddly wide (because it's not actually ON the judy). But it does look exactly like the pattern instructions.
Once the skirt is sewn onto the bodice, you have to press the seam allowance UP, into the bodice, so that it can get concealed by the lining. This is difficult because of the layers of interfacing that have to be folded up. So I decided to sew up the seam allowance by hand (instead of just pressing it up), taking some internal stitches here and there but also making pick stitches right through to the quilting on the outside. This is turning into a true couture garment, with all this hand sewing.
The instructions also called for understitching the top edge of the bodice as much as possible by machine, which I did. But it still tended to roll out so I pick stitched the entire thing around the inside, including the two "drape" pieces (the things that go around the neck to make the halter).
These pick stitches are all on the inside and never show on the outside.
So then it came time to put in the invisible zipper. I basted it all in by hand first (of course!). Then I tried cheating with a non-invisible zipper foot and couldn't get the zipper teeth to roll out far enough to give it the proper "invisible" effect. So now I have to call my sister (my niece's mother) and see if she has this foot attachment on her machine. If so, I can go over and first do a fitting and then sew it up. If not, I will have to go find one. But I'm almost done!
Subscribe to:
Posts (Atom)