Tuesday, February 28, 2006

Sleeves and Cuffs

The jacket has really come together in the last day and I am almost done. First, I finished the sleeves. The term for the “arm hole” is the armscye which is hard to find in dictionaries but shows up when Googled but only at sewing sites. I’m going to call it the armscye to be more specific. The first photo shows the sleeve laid on top of the armscye. You can see that they are opposite shapes and so there is going to be a lot of fitting and pinning in order to get the two pieces flat against each other for sewing.
sleeve/arm hole
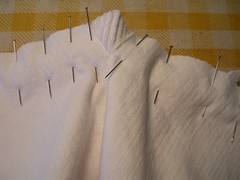
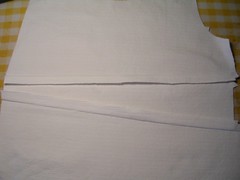
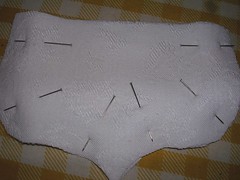
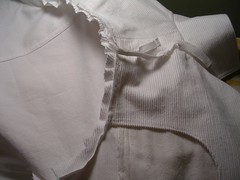
Next, I pin the two pieces together at the dots and notches. This evenly distributes the sleeve fabric around the armscye and starts the shaping process.
sleeve dots pinned
When I have the two pieces pinned together at dots and notches, it allows me to work between each set of pins on a smaller area, in order the continue fitting the sleeve into the armscye. As I have mentioned before, I rarely baste sleeves and this jacket will be no exception.
sleeve pinned
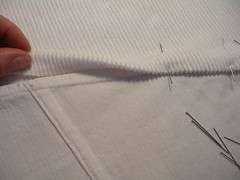
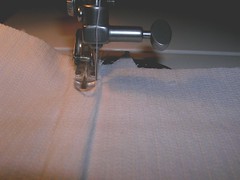
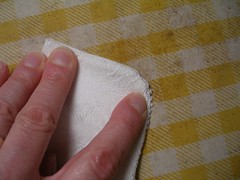
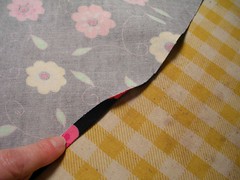
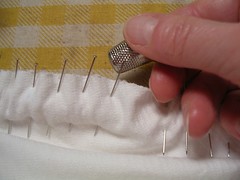
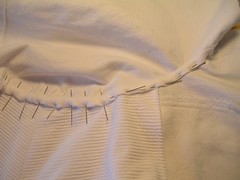
I am illustrating here the thickness of the fabric and how I had to resort to using a thimble to get the pins through it.
thimble
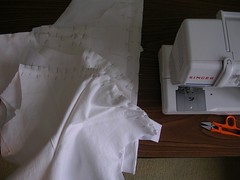
I sewed VERY slowly around the armscye (you can’t take pins out as you go because then the fabric will shift and bunch). Often times, I was guiding the fabric under the needle with my left hand while my right hand was manually turning the wheel on my machine that makes the needle go up and down. I know - you’re saying, “wouldn’t it be faster if you basted?” but I still don’t think so. But by all means - if you want to baste, please do!
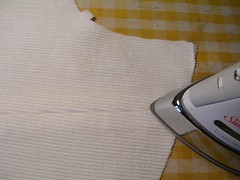
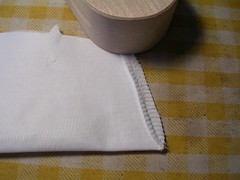
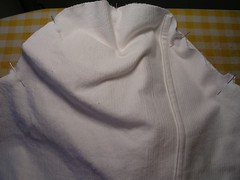
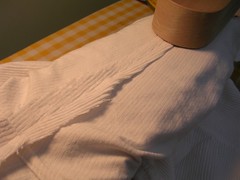
Once I was finished sewing the sleeve on, I trimmed the jacket side of the seam allowance in order to prepare for the flat fell. I then pressed the seam allowance toward the jacket from the outside, checking after I was done on the inside, to make sure I had ironed properly and not folded over any bit of the seam allowance.
shoulder trimmed
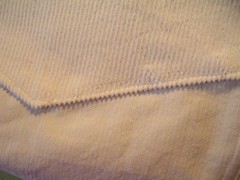
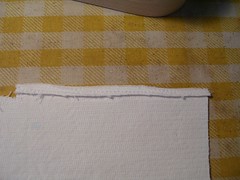
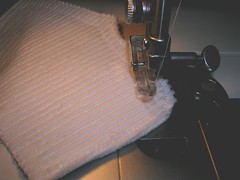
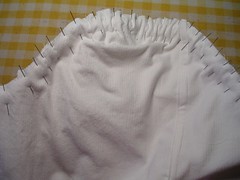
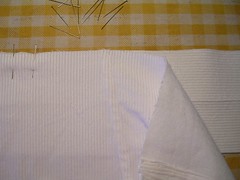
Once I was done pressing, I folded the untrimmed seam allowance (the part that belonged to the sleeve) over the trimmed seam allowance and pinned down the fold. There is more fabric to tuck in between the dots than there is near the underarm and I put the pins in perpendicularly at that section. This time, as I sewed around the armscye with my zipper foot, sewing down the fell, I took the pins out as I went. I was sewing through more layers of fabric and so I had to use more force on the needle, thus risking breakage every time I got near a pin. Plus, because I was sewing down the fell on the inside, it didn’t matter if I ended up with little tucks of fabric because it wouldn’t show.
shoulder seam
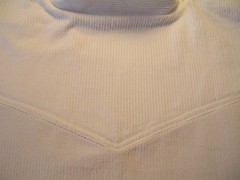
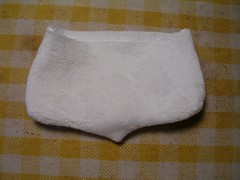
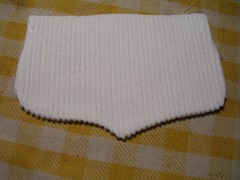
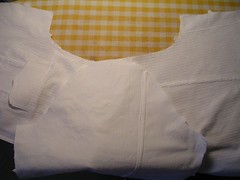
After sewing on the sleeves, I sewed the underarm seam and then made a modified flat fell, where I press OPEN the seam allowance and tuck under EACH side of the seam allowance. I start sewing at the jacket bottom edge and proceed into the sleeve, turning 180 degrees at the cuff end of the sleeve and sewing my way out again (I showed this on the shirt I made first on this blog). This time, it was tough to do because I was working with thick and stiff fabric.
underarm seam felled
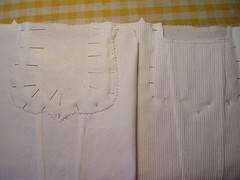
Next, I put on the bottom band and cuffs. The pattern instructions call for sewing the right side of the band next to the wrong side of the jacket. Then you fold the band up and sew the folded edge to the right side of the jacket. I used to sew waistbands on skirts the opposite way - right sides together and then you have to sew the folded edge to the wrong side or inside BY HAND so it won’t show. Since I learned the method used on this jacket, I haven’t looked back and sew all my cuffs and things on this way.
bottom band
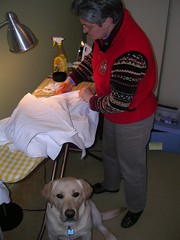
Once the band is sewed to the inside or wrong side of the jacket, you trim the seams so there is less bulk in the finished band (or cuff, as they are made the same way). I was trimming seams when Peter got this nice photo of Rockwell not really observing my work.
trimming seams
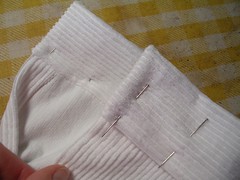
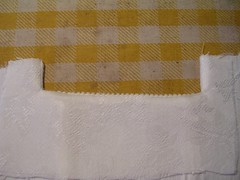
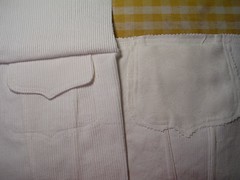
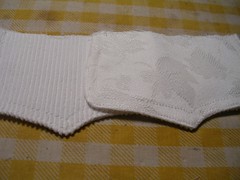
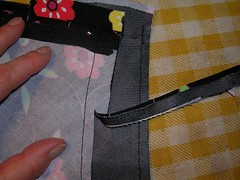
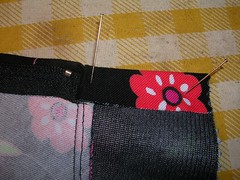
In the next photo, I am sewing the end of a band - in this case, a cuff. You fold over the long edge and trim its seam allowance off. Then you match the ends right sides together and sew across the end, ever so slightly outside the edge of the sleeve vent opening (or jacket fronts, depending on the piece being sewed).
cuff end sewn
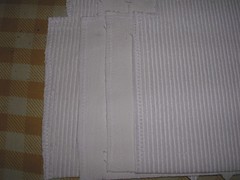
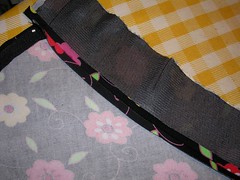
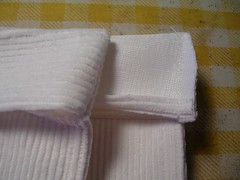
Because you are sewing just slightly outside the edge of the rest of the jacket, it will be easier to turn the band or cuff and get everything tucked in. In the next photo, I have one cuff turned and one not. Of course, I have first ironed the seam allowances toward the band and cuffs.
cuff ends
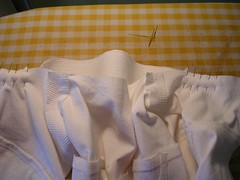
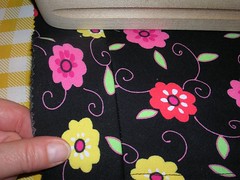
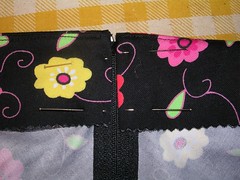
Because you are going to be sewing the cuff shut and finishing it off with the machine, you have to get all the trimmed ends tucked neatly inside so they won’t ever show when you are done. This next photo shows all those trimmed bits that are going to get sewn inside the cuff.
cuff inside
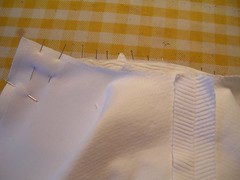
Now, in the next photo, I show how I am folding the bit of the sleeve vent UP and over the seam allowances on the cuff. This doesn’t always work (and didn’t on the other three ends of the cuff) but it does make for a smoother “catch” of the seam allowances. The alternate way which I didn’t show is folding in the vent and then folding the cuff on top of it. This way just leaves you with the possibility of showing all those seam allowance bits if you don’t sew down the fold really tightly.
cuff inside 2
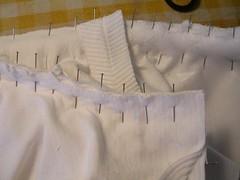
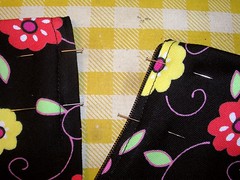
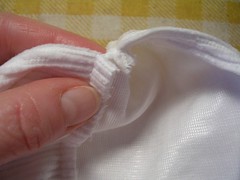
In the next photo, having tucked in all the trimmed raw edges, I am pinching the folded, finished edge of the cuff over the sewing or seam line on the outside of the cuff.
cuff folded over
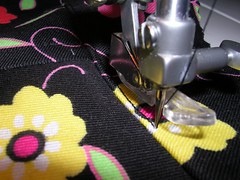
In this last photo, I have put my pins in and am showing both side of the cuff in preparation for sewing. The sewing I will be doing is effectively topstitching and I will be sewing from the right side or outside.
cuff pinned

Saturday, February 25, 2006

Collar and Facings

Today - the collar. I have already sewed the back to the front at the shoulders, on both the facings and the jacket. Next, lay out the collar on the ironing board and put the jacket neck edge on top of it. I start pinning at the front edges and work my way in to the notches on both ends of the collar. Then I decide how much clipping I need to do to the jacket neck edge to stretch it gently to fit the collar.
collar
Once I have the collar pinned to the jacket, I confess I don’t baste it like the instructions say. I just lay the facings on top of the jacket and collar combo and pin them to the whole thing. At points, I am pinning through four layers of thick fabric, not including the interfacing and it is tough to get those pins in.
collar facing
Once I have the whole thing pinned, I look at the top side and the underside where I am going to sew, to see where I may run into difficulty in having the fabric fold over and get caught in tucks that are unintended. Around the shoulder seams, there is more fabric to work into the seam and I know I will have to sew slowly and smooth the fabric top and bottom just before I get to it with the machine needle. I will also take pins out as I go because I have to make the machine work hard to get through all those layers of fabric and if I step on the gas hard when the needle comes down and hits a pin, I know I will break something. For example, at the shoulder seam, I will sew through 6 layers of corduroy and two of interfacing.
collar pinned
Once the collar is sewed on, I trim the seams and turn things right side out. Lots of pressing and pounding with the clapper later, I can sew two lines of topstitching around the front edges of the jacket. Now it’s time to sew the yoke facing to the jacket. I have already ironed up the seam allowances for the yoke and the jacket back. I trimmed them a little bit too. Next, I smooth the yoke facing down and fold the raw edge under to finish the inside.
back yoke facing
I am going to sew the yoke facing down from the outside or right side of the jacket so I make sure that the folded edge overlaps the seam by enough that I won’t fail to catch it in the topstitching. This excess means that I have a larger folded edge on the inside than if I sewed it from the inside, but it also means that my topstitching which will be only seen from the outside will look neat and tidy on the outside. Here’s what the yoke looks like from the inside:
yoke facing inside
and here’s what it looks like on the outside after topstitching:
yoke outside
I also machine baste the yoke around the shoulders and down the front armhole in preparation for sewing the sleeves on, which comes next. Here is the jacket hanging up, before I put the sleeves on. It is starting to look like a real jacket!
jacket

Friday, February 24, 2006

Yokes and Pockets

I am still assembling the millions of pieces that make up this jacket.
First, I attached the back yoke to the back body of the jacket. The only tricky thing there was to get the points right. The pieces are “V” shaped but the points get sewed to each other facing the opposite way. This means you have to clip the interior “V” on the back so you can spread it out to accommodate the “V” of the yoke. In the photo, you are looking at the wrong side of the jacket back pinned to the yoke underneath it. I have clipped the jacket back piece to the small dot which I marked in blue chalk. You have to work with the excess fabric on the jacket back piece but once you are sewing up to the dot at the point, you just leave the needle down in the fabric, lift the presser foot and rotate the piece slightly so you are lined up for the second half and then continue sewing. Once you turn it over and press the seam allowances up, it looks perfect.
back yoke point
I like this next photo because I took the macro setting off the camera and stood back and used available light. It is just all the pieces I have pinned together, piled up and waiting for the next big “sewing in batches”. [“Batches? We don’t need no stinkin’ batches!”]
pieces lined up
Next: pockets. These front pockets look cool but they really aren’t that difficult if you just follow the directions. Of course, I don’t exactly follow them because I finish all the raw edges to avoid fraying after washing and there is no mention of any of that. The “pocket bag” is the shaped piece that goes on the inside of the jacket. You don’t see it and so I made it out of the damask. I pinked the edge and then I zigzagged it just to be sure. Anyway, the next photo is about the pocket facing which finishes off the interior edge of the pocket. I also used the damask and finished its edges (after I had sewed the piece on and ironed it on the right side after turning it and realizing I had not pinked or zigzagged it). The photo shows the pocket facing from the inside or wrong side, after I have turned it and ironed it.
pocket facing
The next comment comes before you sew on the pockets flaps. I have already decided to use snaps for fastenings and therefore, what follows doesn’t apply this time. However, I have also made this jacket using buttons as fasteners and I realized after the first one that it is MUCH easier to make the buttonholes before you sew the flaps on. I use a Singer with an automatic buttonholer and it doesn’t work at all well with layers of fabric sandwiched in between its metal parts. The next photo shows a jacket I have already made (using snaps, sorry) and it shows where the fasteners go on the pocket (the buttonhole would be in the flap itself and the button would be sewed to the pocket). Imagine trying to squeeze that pocket flap into a buttonholer the way it looks there.
pocket red jacket
Next, I show the pocket bags pinned on, from the inside and the outside. I’m going to sew around the contour of the pocket bag from the inside to make sure I get the shape right and sew two lines of stitching which makes a decorative pattern on the right side of the jacket. I can do this because the thread tension on both upper and bobbin threads on my machine works and the stitching is nice and even. I also use a slightly longer stitch so it shows. However, I am not using contrasting thread because I don’t have that much confidence in my ability to make perfect lines of stitching. I know, they don’t have to be perfect. But for a white jacket, I’m using white thread! Maybe some day I will use contrasting thread.
pockets
Finally, I have attached the pocket flaps and the yoke for the front and sewed them all together. This photo shows the fronts from the wrong and right sides. I have trimmed the seam with pinking shears AND zigzagged the raw edge. I have made this jacket before and washed it too and I know this seam frays. It gets covered up by the front facings but you can still peek underneath and see at the fraying and that just makes me crazy so I finish the edges.
pockets 2

Saturday, February 18, 2006

Nap and Topstitching

A word about nap. Corduroy has a nap. When you brush your hand down the cords or wales, it feels smooth one way and slightly rough the other way. I cut out most fabric with nap so that it feels smooth as I run my hand down the garment from top to bottom. When sewing with nap, it is better to get into the practice (if you can) of sewing down the nap as well, i.e. form top to bottom on each seam. If you sew UP the nap, and the nap is thick enough, you run the risk of getting the nap caught up in the stitching so that it looks rough along the line of stitching. This is most important when topstitching. This corduroy isn’t THAT “nappy” but I thought I would sew it properly anyway.

First, I completed the sleeve vent finishing. I had zigzagged the raw edge last time. This time, I ironed over a tiny fold so that the zigzag stitch would be on the underside of the vent edge and sewed it down. When you are wearing the jacket, you can’t see any of this which may be why the instructions don’t call for it. But I like to know that most of the inside of my garment is finished so I don’t get any raveling later or if it DOES ravel, it won’t ravel right into the structural stitching of the garment. In this photo, I have ironed the edge and am about to stitch it.
sleeve vent finish
Last time, I had pinned several of the seams together and so I sewed them all, including the ends of the collar, the tabs and the pocket flaps. When I ironed the seams open on the body of the jacket, I made sure to iron down or with the nap, from the top of the piece to its bottom. In this photo, the iron is poised at the top of the back on the outside and I will iron down (from right to left in the picture).
iron down nap
Because I am making flat felled seams, there is a lot of ironing. First on the inside to open the seam up, then on the outside, then trim one side of the seam allowance on the inside and iron the untrimmed side over, both from the inside and the outside. Whew. Finally, iron the flat fell down. In the next photo, I am showing how I have chosen to fall the seams over toward the middle piece in the three pieces that comprise each front of the jacket. The top is at the right side of the photo and the untrimmed seam allowances have been pressed toward the small, centre piece.
flat fell front
Now I will fold each seam allowance under and then sew it down. In the next photo, I have started sewing down the flat fell from the top of the jacket front, so that I sew WITH the nap. I am sewing with the wrong or inside up but I am still concerned about the nap.
sew down nap
Now, for pieces that you have to sew AROUND like pocket flaps, you just have to sew and not worry about the nap. The instructions call for making a double line of topstitching on the collar, flaps and tabs before you sew them to the jacket, so that is what I have done. First I turn them all right side out, after trimming the excess seam allowances. The collar is a big enough piece that I can press open the end seams a little before I turn it.
collar press
The tabs are a jolly pain to turn because they are so narrow. I spent several minutes pulling them right side out bit by bit. The pocket flaps are easier but you still have to work at getting the outside or right side of the flap so that the underside doesn’t roll out and show.
flap underside
After I’ve turned them right side out, I put the underside of the flap facing up on my ironing board and I work at the edge with my fingers. I roll the edge so that the seam is flat and then I roll the underside (the damask) out to the edge but leave a tiny bit of the upperside or the corduroy showing and then press it.
flap turned
flap pressed
Once I have all these pieces pressed flat, then I topstitch them. The next photo shows me making the turn on the curved part of the pocket flap. I am on the second line of topstitching and have lifted the presser foot so I can make the turn bit by bit. On some curves, you take a couple of stitches then lift the foot and turn a tiny bit, put it down and take another stitch or two, and repeat until the curve has been stitched.
flap topstitched
In the final photo, I have both flaps finished and have turned one to the wrong side or underside to show what it looks like.
flaps topstitched

Friday, February 17, 2006

Getting started after cutting

I forgot how corduroy sheds! There are little white balls of fluff everywhere. Oh well.

I found some very slightly off-white 100% cotton damask that I am going to use for the underside of the flaps and tabs. It isn’t very heavy and it has a woven pattern on it - I used it for a shirt that I still wear. I am hoping for the best.
flap with damask
I have been unpinning and marking (using blue chalk) all those pattern pieces. And then I have been using my clothes shaver (thanks Mum!) to get all the pills off the wrong side of the fabric. I hand picked them off the pieces to which I ironed the interfacing but it would have been too tedious to do that for all the other pieces. Then I have started pinning as many pieces together as I can get pinned without having them be sewed to other pieces. Hmm, that sounds odd. For example, each front of the jacket has three pieces to it. There will be two vertical seams and I have pinned those seams together. The back is composed of one central piece and two side pieces and I pinned them all together. I pinned the damask to the pocket flaps and tabs.
pinned pile
I was going to pin the sleeve seams together (the sleeves are two pieces each) but then I remembered that the vent openings need their edges finished because they ravel. I am embarrassed to admit how many times I have made this pattern before (okay, six) so I hung one finished jacket up in my sewing room to remind me of things along the way.
sleeve vents
The plan with all this pinning, out of the order stated on the pattern instructions, is so that I can make the jacket a little bit faster, like on an assembly line. I do a lot of sewing and then I do a lot of ironing, and so on. If however, you are making something for the first time (or even the second or third, depending on how long it has been between makings) you should probably follow the instructions. On the other hand, these instructions don’t call for finishing the sleeve vent or the armhole seam and I make real flat fells on all the seams except the underarm seams. Sometimes experience and personal preference trumps instructions.

Thursday, February 16, 2006

New Project - Jean Jacket, Corduroy

A jean jacket.

jean jacket
One of the remnants I picked up last week was about 1.5 meters of white corduroy. I thought right away that, if there was enough, I could make a jean jacket with it. After I got it home, washed and dried and shrunk it, I saw that it was 144cm wide and 1.57m long. I also ironed it as as I was doing so, noticed it had a small hole in it. I marked the hole with a piece of blue thread so I wouldn’t miss it while cutting.
flaw marked
(That’s the wrong side of the fabric - there are little pills everywhere from when I washed it - and I’ve left a tail of thread on both sides.)

I started laying out the pattern pieces, wondering if I could get the whole jacket out of it. I remembered some jackets I have seen in catalogues like LLBean, where the underside of the collar and cuffs and other parts were made in a contrasting fabric, so I thought I could do that if I ran short of the corduroy. However, in rummaging through my boxes of left-overs, I didn’t find anything that I thought would be suitable for a contrast. As it turned out, I had just enough for most of the jacket, except for a few bits.
jacket layout
(That gap where there is no pattern piece is where the second layer of the yoke will go. You use the same pattern piece on the fold to cut out two pieces for the yoke. I put the pattern piece in the space and pinned other pieces around it. Then I moved it to another place on the fabric.)

Those “few bits” were the underside of the pocket flaps and the tabs on the waist, as well as the internal parts of the front pockets. I ended up cutting those little pieces out of some white broadcloth I had lying around but now I realize that this is not heavy enough fabric and I must look for something else.
broadcloth
The corduroy is heavy with the wales on it and I thought that using a lighter weight fabric as the underside would make the pieces less bulky. However, broadcloth is way too light and I won’t be happy with the end result if I don’t use a mid-weight cotton like a drapery weight, rather than the broadcloth. Last night, I also got the interfacing ironed on so now I just have to find some other cotton for the flaps. All in all, I cut out 24 pattern pieces (that includes the interfacing too) and I have dents in my fingers from sticking pins through the corduroy, as well as all that cutting. Quite a contrast to 4 pieces for the skirt!

Wednesday, February 15, 2006

Finished the skirt already!

I'm done again! I can’t help it - the pattern was dead easy and I really enjoyed sewing with the cotton twill so this skirt is done! I almost finished last night but at 9pm, House came on and I wanted to watch it as it was a new episode.

First I finished the zipper. I had sewed in the one half of it, to the 1/2 inch wide turned-under seam allowance. So I sewed the other half down to the other seam allowance and then I finished the seam in a flat fell.
zip finished
Next, I did the hem. I went with the narrow hem folded double and sewed by machine. This photo just shows the first fold as I went around the hem. I folded it again a second time and then sewed it.
hem
Finally, I put the facings on. I sewed the front and back together at the right side and then sewed the whole thing to the skirt. Once it was sewed on, I trimmed the seam allowance down to reduce the bulk.
facing trimmed
Pressing is important for anything you turn and this includes the facing. First I pressed the seam allowances open to flatten them.
facing pressed
Then I pressed the seam allowances up toward the facing from the wrong or inside. Then I pressed them up from the right side and used the clapper to make it good and flat.
facing final press
Once the seam allowances were in place, I understitched them to the facing. This keeps the facing from rolling to the outside, plus it keep the seam allowances tight to the facing. In this photo, I have raised the presser foot (note that the needle is still down in the fabric to keep it in place) so that you can see where I have stitched.
understitch
Now all I have to deal with is the ends of the facings. They come out by the zipper and you have to tuck them under and then sew them some way so they stay put. In the first photo, I have tucked or folded the end of the facing toward the underside of the facing so that all the raw edges will be hidden once I am done. I stuck two pins in to hold it down for the picture.
facing end
This photo shows how I have folded the ends of the facing in and then folded the facing itself down the inside of the skirt. I have zipped up the zipper to make sure the upper edges are even with each other. You can see the left hand one as you look at it is a tiny bit higher than the right and this is easily adjustable - you just fold it a little bit lower on the left or higher on the right. I have also put the pins in so that the points don’t go into the zipper area because I want to be able to work the zipper without getting stuck by a pin.
facing end pinned inside
Once I have decided exactly where I am going to fold the facings, I turn the skirt over to the right side and sew by machine down the existing line of stitching, catching the facing as I go. As I have done before, I also machine sew the folded facing to the skirt at the other three seam lines and give it a final press with the clapper.
facing outside
Here it is, hanging up on the door.
skirt finished
It is designed to sit below the waist, which is why it looks so wide at the top. I tried it on and it fits, especially because it stretches slightly because it is cut on the bias. I can now hardly wait to wear it!