Friday, March 28, 2008

Raw silk suit almost finished

Almost there! This is the point where I start thinking about the next project and if I didn't have my Rule, I'd end up with UFOs all over the place.
raw silk suit, nearing the finish
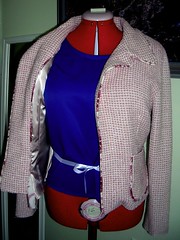
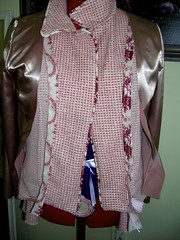
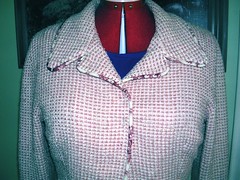
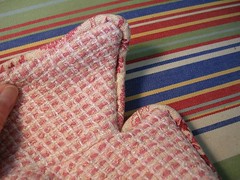
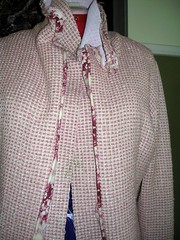
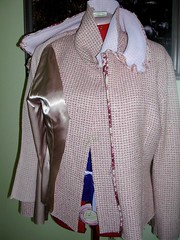
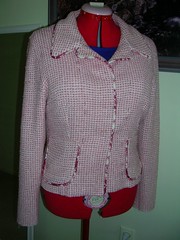
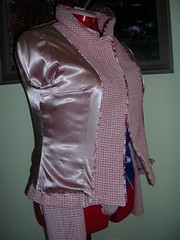
Here, I've pinned the jacket shut to simulate buttons. Everything is done except for the sleeve hems. Peter thought I might want to put seam binding along the bottoms of the sleeves and I plan to pin some there to see what it looks like. He may be right. You might notice that I have put a row of pins down the fronts, to hold the fabric up and keep it from buckling at the bottom edge. I may take a few loose stitches in the shoulders to prevent this from happening in the finished jacket.
raw silk suit, nearing the finish
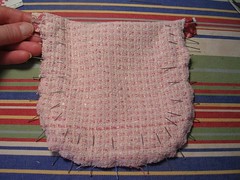
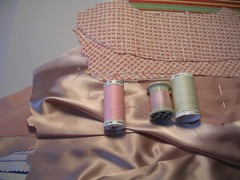
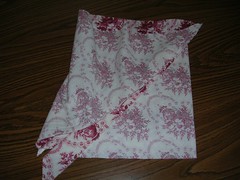
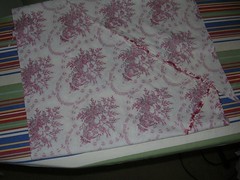
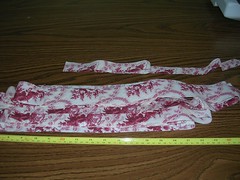
The skirt is complete. I decided to cut a few pieces of bias from the satin and finish the skirt hem in it. I sewed the satin on by machine to the raw edge of the hem and then I folded the other raw edge under and hand sewed the hem to the skirt. And no one will ever see this.
raw silk suit, nearing the finish
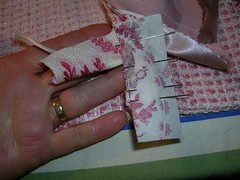
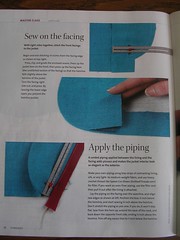
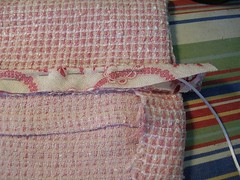
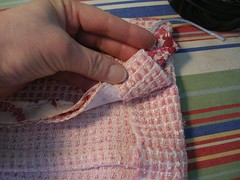
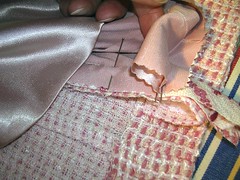
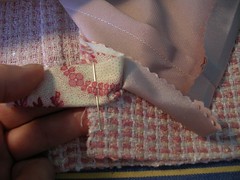
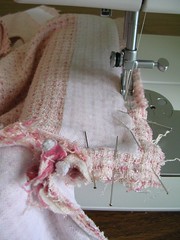
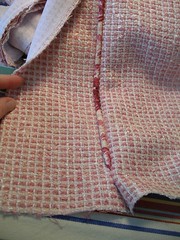
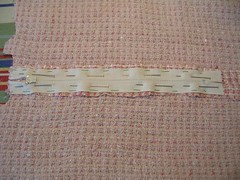
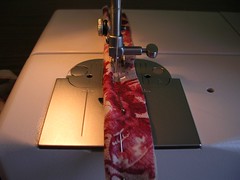
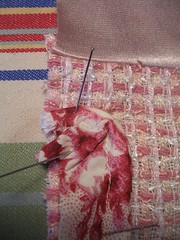
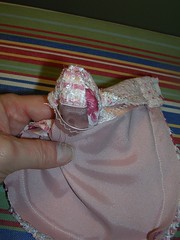
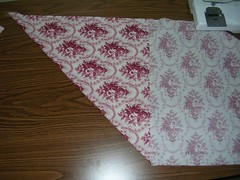
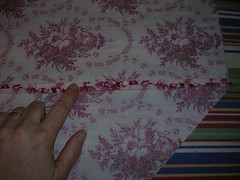
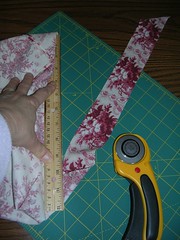
Back to finishing the inside of the hem on the jacket. Before I could sew down the lining to the hem, I wanted to finish that tiny bit of raw fabric at the bottom edge of the facing. The Threads magazine suggests putting a bit of bias tape on it and in this photo, I have pinned the tape to the edge. I sewed it to the edge by machine before folding it over to encase the raw edge of the facing. By machine sewing, I also was able to catch the end of the piping cord in the stitching, thus anchoring it even more than I had already.
raw silk suit, nearing the finish
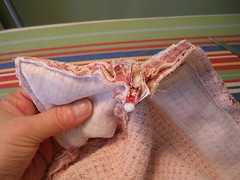
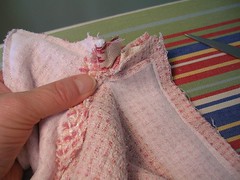
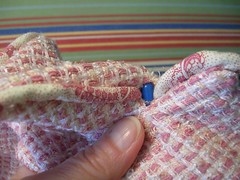
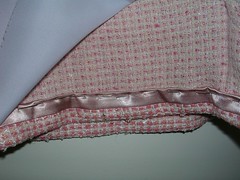
Then I folded the tape around the edge of the facing and tucked the end under and sewed it down by hand. You might want to make this photo larger to see the detail. For someone who is picky about finishing the insides of her garments, even this may be a bit much for me for future jackets. The piping is nice but I wonder if it's worth it, especially with the fuss at the bottom because f the fold in the lining for ease. If I do this again, I may have to eliminate that fold. But I like the bit of bias over the raw edge.
raw silk suit, nearing the finish
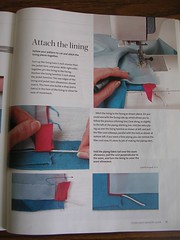
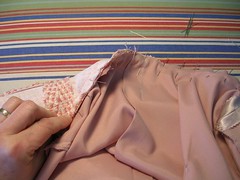
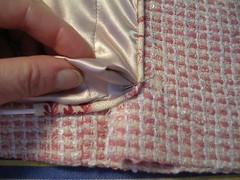
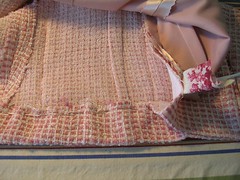
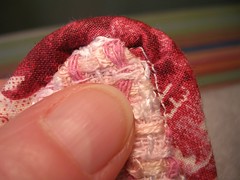
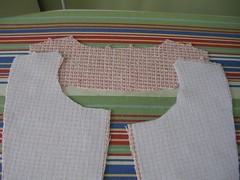
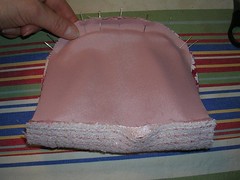
Here is the jacket on Rose, inside-out. The lining hem is pinned up to the jacket hem. I suppose it looks a little more relaxed, now that I've sewed it but I'm not convinced the piping is worth the trouble.
raw silk suit, nearing the finish
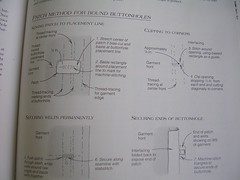
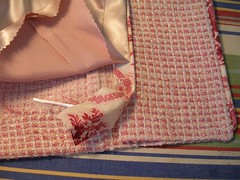
I think the jacket does need more of the piping fabric as an accent on the exterior. That's why I'm going to test it around the bottom edge of the sleeves when I hem them, and that's why I'm going to use it on the buttonholes. I can't use my automatic buttonholer anyway, because of the thick piping at the front edge of the jacket. So I'm going to do some machine zigzaging to make the fabric sturdy and then do a bound buttonhole with the floral fabric. And then I am going to make fairly large covered buttons using the floral fabric to cover them! I can't imagine this jacket with any other buttons - plastic, pink, gold or whatever. I think they have to be covered in the floral. So that's next, after I make the trek to Fabricland for the button forms.

Saturday, March 22, 2008

Piping between the facing and the lining

Happy Easter all. It is nothing like Spring out there right now, at -11C or 13F. Brr! The sun is nice and bright, so at least there's that.
piping the silk jacket
To put piping between the facing and the lining, I am using instructions from the March 2006 Number 123 issue of Threads Magazine (pages 77-80). You can go to www.threadsmagazine.com and look for specific issues but instead of giving you the article, they ask you to buy that issue. As it turns out, it's not too complicated but I had to make modifications and there was some confusion until I actually was turning the fabric in my hands. But I wouldn't have had the idea to do this if it weren't for Threads Magazine.
piping the silk jacket
I'm putting these photos here so you can get the idea about how the magazine did the tutorial but you can't read what is written there so I don't think I'm violating copyright.
piping the lining
Here's what the jacket looks like at the moment. All the pieces are now together and I have even put the pockets on. I haven't quite finished the internal piping at the bottom but that's because I haven't sewed the hem which has to be done first.
piping the lining
Back to the beginning. First I had to attach the piping to the raw edge of the facing. That was pretty straightforward and I left a fair bit (about 2 inches from near the top of the jacket hem) at the bottom in case I needed it. I am also using a thinner cord for the piping. It is about a third of the thickness of the exterior piping cord.
piping the lining
The article suggests leaving the facing free at the bottom by a couple of inches and I have done that. And don't forget that you are only going to sew the piping to the lining and so you will keep the hems free.
piping the lining
Once I had the piping sewn on to the facing, I draped the jacket over Rose and draped the lining over it too. The lining in the photo just confuses things, sorry. But what I find interesting was how different the piping is, depending on what diagonal I cut it on. In the photo, the right side is dark pink and the left side is totally pale. There is a bit of this unevenness of colour around the collar - one side is slightly darker than the other - but I am glad that this amount of contrast is now on the inside of the jacket. I think I planned it that way. :)
piping the lining
Once the piping was on, I pinned and then sewed the lining to the facing. I had already assembled the lining with the sleeves and everything so it was just a matter of sewing it to the facing which was pretty straightforward.
piping the lining
I didn't sew the lining all the way to the bottom of the hem. In a regular lining, you are supposed to leave the bottom 6 inches free and sew it down later by hand. This is where the modifications and some confusion came in. In the Threads model, there does not appear to be that extra fold of fabric in the lining at the bottom. Because I had not modified my pattern, I still had the fold of fabric (for ease) that most lined jackets have and now I had to figure out what to do with it.
piping the lining
I fiddled around with keeping the fold free and sewing down to where I would be hand stitching the lining to the jacket but then I caught the very bottom of the lining in the machine stitching and realized that it wouldn't work that way and had to rip it out.
piping the lining
I left the lining sewed down to very near where the lining hem will be, but not to the very bottom. Then, I bent the piping off to the side, along the line of where I will be hand sewing and machine stitched it into place. I like the sturdiness of machine stitching, especially on loosely woven fabrics, and I wanted to also make sure the piping cord was well anchored by stitching.
piping the lining
Here, I've pinned the lining to where I will be sewing it and you can see how the fold will work now (at least, I can). This is where I realized that I cannot finish it yet until I have sewing the jacket hem, which has to be done by hand.
piping the lining
So the bottom edge of the piping is on hold while I finish the jacket hem. And then I will also show what the Threads magazine suggested for the tiny raw edge of the hem. Assuming it all falls into place!

Tuesday, March 18, 2008

Piping the silk jacket

So cute, so far!
piping the silk jacket
When I sewed (basted) the piping to the jacket, I used a slightly contrasty pink thread in the bobbin so that I might be able to see it and follow that line when I sewed the facing to the jacket. It worked here and there but blended in too much with the fabric to be really useful.
piping the silk jacket
In the end, it didn't really matter because I could following the fat piping cord pretty well with the zipper foot except for one collar corner that I had to unstitch and re-sew. In this shot, I am sewing up the front toward the lapel corner. You might also notice that I have ironed on a but of interfacing to the jacket front (in addition to the facings which is normal). I am anticipating buttonhole issues.
piping the silk jacket
First of all, it looks like a jolly mess at the inside corners, where the lapels meet the collar.
piping the silk jacket
And it IS a mess - you sort of have to feel your way like Yoda. You have to trim some of the excess fabric and piping cord but not TOO much, otherwise the ends will pull out. And don't sew too far into the corners because you could catch more fabric than you want. Better to sew less and then stitch it up by hand when it is turned right-side out.
piping the silk jacket
Here's what the piping looks like down the front. It is turned into the seam allowance 1 and 1/2 inch above the bottom because that is where the hem will be.
piping the silk jacket
Here's one collar corner turned right side out but not yet pressed. Looks okay but...
piping the silk jacket
When you poke around in there, it is clear that there is a big gap where I didn't machine sew too closely into the inside corner. That's the blue handle on my seam ripper, showing through the gap.
piping the silk jacket
Also, at quite a few places along the piping, you can see some of the basting stitches because I didn't press closely enough to the piping cord as I sewed the true seam. I think I am going to sew by machine, a topstitching type of line down the piping to flatten the fabric and to compensate for missing some of these basting stitches.

Monday, March 17, 2008

Continuing with the Chanel suit

Boy time flies when you're doing other things! I have been working on the suit but haven't been blogging. I am taking a course which is now over except for the exam which will be on March 30. The course was every Sunday, all day, for four Sundays. It was about how to be a personal trainer - not sewing related. You can check it out here. Anyway, back to the suit.
silk suit
I can always tell when I am making progress when the various pieces of fabric suddenly get sewed together and they are not all over my sewing room. I have almost finished the skirt. It is the pattern I make over and over so I can do it in my sleep. Here, I am just showing the zipper, how I pin it on and then baste it.
silk suit
Especially with loose fabric like this, you want to be careful that the fabric doesn't get rucked up one side and down the other when you sew in the zipper. Because the "stripes" are so close together and because they aren't uniform anyway, I am more concerned with making sure the vertical threads line up than the horizontal. I take the pins out before I sew with the machine, of course.
silk suit
I sewed just the facings together and did not then attach the lining to the facings. I am going to be putting a thin line of piping between the facing and the lining and will do that after I attach the facings to the jacket. All will become clear soon!
silk suit
I've attached the sleeves to both the jacket and the lining and draped everything over the dummy. I have also basted the piping on to the front edges and around the collar of the jacket. In the photo, I've tried to tuck the raw edge of some of the piping under, so you get a glimpse of what it will look like.
silk suit
Here, I've pulled back the jacket to show the lining and the facings draped over the dummy. That sure is shiny smooth satin! I will be making a blouse out of it but later. Next, I will sew the facings to the jacket and sandwich the piping between them into its finished position.

Tuesday, March 11, 2008

Pockets on the raw silk

Pockets! I had forgotten about pockets until I was looking at the photo of the real Chanel jacket and saw them there. So I went and cut out pockets.
pockets on the raw silk
I used a template from another pattern and decided to line the pockets and pipe the edges. I'm using the satin for the lining, not the other stuff I'm using for the skirt. I have left a small gap where the lining is sewn to the pocket to facilitate turn it right side out when it's time.
pockets on the raw silk
I had to make some piping for around the edges of the pockets. Just sew down the cord wrapped up in the bias tape.
pockets on the raw silk
The seam allowances are a tiny bit more than the 5/8 usually used because of the width of the bias tape. I'm not concerned by this little discrepancy. I could always trim it but I think I'll just eyeball it instead.
pockets on the raw silk
I have to visualize how the cord will disappear into the pocket (into the seam allowance) once it is turned right side out.
pockets on the raw silk
First, I machine basted the piping to the pocket to fix it in place. Then I pulled the lining down to the pocket seam allowance and pinned it together, putting the pins in from the pocket, not the lining side.
pockets on the raw silk
Once I had wiggled the ends of the piping out to where they would be sewn into the seam, I sewed the pocket to the lining form the pocket side because I could use the line of basting I had already put on the fabric as a guide. I sewed slightly inside the basting to make sure the piping was not too loose.
pockets on the raw silk
I started to turn the pocket before I realized I had to trim the seam allowance. So I started over, trimmed the excess fabric and then turn the pocket through the little gap I had left.
pockets on the raw silk
Here's the pocket, turned but unpressed and the gap is still not stitched up. I have been thinking about putting trim on the outside of the pocket, across the top as they do in many of the Chanel suits but I have decided against it, thinking it will be too busy for me. I think the contrast piping is enough. I am still not sure where to place the pockets on the jacket and will have to assemble it enough so I can put it on the dummy and then figure out the best placement.

Sunday, March 09, 2008

Sewing the raw silk

Today's a snow day (check out my husband's new/old blog - that's me shovelling! Hey! Why isn't he?) so I don't have to go to my class so I'm going to get some sewing done. (I'm taking classes in how to be a personal trainer - there's no such thing as too much education!)
raw silk suit (a collection of pink)
I was looking through my thread collection and saw that I didn't have a very pale pink for the lining. I'm going to sew the seams and darts in the off white that I'm using for the silk and figure out the quilting later.
raw silk suit
I have been doing all the prep work - zigzagging the long seams so they won't ravel, ironing on the interfacing, sewing the darts. There are a lot of darts - two long vertical ones in the back, two verticals in the front and two bust darts, times two for the lining too. But when I had the sleeves out side by side, I suddenly noticed that they looked completely different! Of course, I had cut them out individually, not two at a time on folded fabric, but I hadn't noticed how different the weave in the fabric was until now. And now that I'm writing about it and you have pictures, it really doesn't look as bad as I thought initially. But the fabric is woven much "tighter" on the sleeve on the right in the photo. The pink threads are much closer together than the pink threads on the left. Good thing it's sleeves and not fronts. But I'll just keep moving when I'm wearing it and no one will notice. :)

Saturday, March 08, 2008

Making bias tape

I've been thinking ahead to making bias tape for the piping and it's a conceptual thing. You have to imagine how those pieces of fabric have to go together so you can make a tube and then cut out one continuous strip of fabric on the bias. To help me with the imagining, because it has been a long time since I've done this, I went to the internet and Googled "making bias tape". All the hits on the first page dealt with cutting many strips of cloth diagonally and sewing them all together, end to end, one after the other. Ack! What is that? A make-work project? No, no, no. You can make a tube of fabric by sewing two pieces together (only two seams), press those seams open and then start cutting. Here's how to do it.
making bias tape
Start with a square of fabric. You can probably use a rectangle but it's easier with a square. I had bought about a half a yard of the quilting cotton. When I measured it along the selvage edge it was 21 inches. I folded this selvage edge along the cut edge and cut the fabric lengthwise, making a 21 inch square.
making bias tape
Then I carefully cut along the diagonal fold, making two triangular pieces.
making bias tape
Next, I put the two triangular pieces right sides together, pinning them together along the straight or selvage edges and then sewing the first seam.
making bias tape
Once the seam was sewed, I had this parallelogram shaped piece of fabric.
making bias tape
I pressed the first seam open.
making bias tape
The next step is the only difficult part and it's not that bad. You have to bring the bottom edge of the parallelogram up to the top edge and pin the edges together, right sides together. At this point it doesn't really look like a tube.
making bias tape
If you relax the edges and just lay the fabric on the table, you can see that it will become a tube when the other two edges are sewn together.
making bias tape
However, when lining up the edges to make the tube, make sure you off-set the edges by the width of the tape you want to make. I want to make 1 and 3/4 inch wide tape, so I set the one corner back by 1 and 3/4 inches, pinned the edges together and then sewed them.
making bias tape
Once the second seam is sewed, press it open.
making bias tape
And now for the self-healing cutting mat and rotary cutter! I used to cut the bias tape out with regular scissors, eyeballing the width. Now I have this mat.
making bias tape
Once I got the hang of it, I was away to the races. You line up the diagonal (bias) edge with one of the lines on the mat. Then you lay your straight edge along the other line (hidden by the fabric) and carefully push the rotary cutter long the straightedge. This is where I discovered that if you don't pay attention and don't cant the cutter in slightly toward the edge, you can wander off into the bias tape and make it narrower than planned. However, that wasn't a crisis, as I really don't need a full 1 and 3/4 inches of tape.
making bias tape
You can only cut about a foot at a time and then you have to reposition the fabric. I wasn't limited by the size of the mat but by the size of the tube of fabric.
making bias tape
When I got to the end of the tube of fabric, I had a left over piece of bias tape that was about 20 inches long and one inch wide. But from the 21 inch square piece of fabric, I got over 6 yards of 1 and 3/4 inch bias tape. Much easier than cutting eleventy-seven pieces of bias strips and then sewing each one of them to the next one, over and over again. I learned this trick from my sister when we were sewing curtains and pillows back in the 80s. Thanks Norah!