Start with a square of fabric. You can probably use a rectangle but it's easier with a square. I had bought about a half a yard of the quilting cotton. When I measured it along the selvage edge it was 21 inches. I folded this selvage edge along the cut edge and cut the fabric lengthwise, making a 21 inch square.

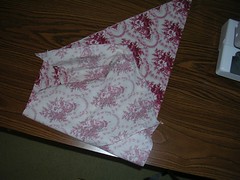
Then I carefully cut along the diagonal fold, making two triangular pieces.
Next, I put the two triangular pieces right sides together, pinning them together along the straight or selvage edges and then sewing the first seam.
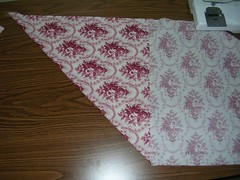
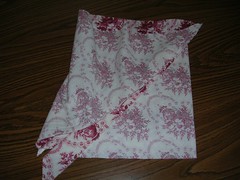
Once the seam was sewed, I had this parallelogram shaped piece of fabric.
I pressed the first seam open.
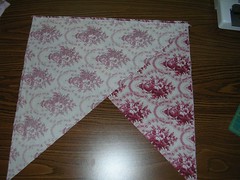
The next step is the only difficult part and it's not that bad. You have to bring the bottom edge of the parallelogram up to the top edge and pin the edges together, right sides together. At this point it doesn't really look like a tube.
If you relax the edges and just lay the fabric on the table, you can see that it will become a tube when the other two edges are sewn together.

However, when lining up the edges to make the tube, make sure you off-set the edges by the width of the tape you want to make. I want to make 1 and 3/4 inch wide tape, so I set the one corner back by 1 and 3/4 inches, pinned the edges together and then sewed them.
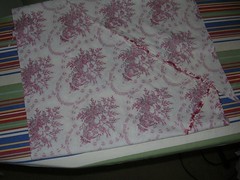
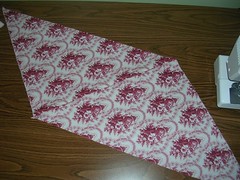
Once the second seam is sewed, press it open.
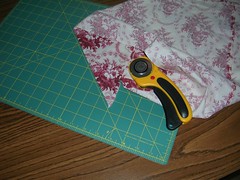
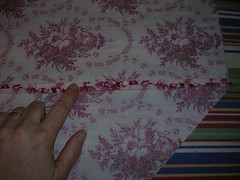
And now for the self-healing cutting mat and rotary cutter! I used to cut the bias tape out with regular scissors, eyeballing the width. Now I have this mat.
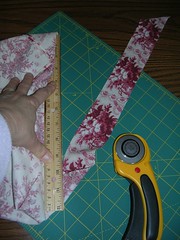
Once I got the hang of it, I was away to the races. You line up the diagonal (bias) edge with one of the lines on the mat. Then you lay your straight edge along the other line (hidden by the fabric) and carefully push the rotary cutter long the straightedge. This is where I discovered that if you don't pay attention and don't cant the cutter in slightly toward the edge, you can wander off into the bias tape and make it narrower than planned. However, that wasn't a crisis, as I really don't need a full 1 and 3/4 inches of tape.

You can only cut about a foot at a time and then you have to reposition the fabric. I wasn't limited by the size of the mat but by the size of the tube of fabric.
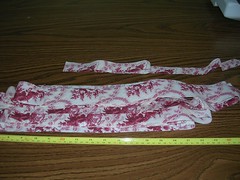
When I got to the end of the tube of fabric, I had a left over piece of bias tape that was about 20 inches long and one inch wide. But from the 21 inch square piece of fabric, I got over 6 yards of 1 and 3/4 inch bias tape. Much easier than cutting eleventy-seven pieces of bias strips and then sewing each one of them to the next one, over and over again. I learned this trick from my sister when we were sewing curtains and pillows back in the 80s. Thanks Norah!
18 comments:
This is great! I'm bookmarking it. Thank you for sharing this great tutorial!
You are welcome, Gerbers! I thought it might be useful.
I make my bias tape by cutting strips and sewing them together. I find it less onerous than doing the tube of fabric way, probably because I've been doing it that way for 20 years. It is easier for me to deal with little pieces than big long ones.
Neefer, I wondered why people would want to use small strips but I can see that it would be easier some times. I used to use yards and yards of the stuff in drapery and cushions and would often use a tube a whole yard on a side. And now I suppose I have way more than I need for this project! :) But it is one way of making lots and it wasn't on the web so I thought I'd do the tutorial.
Thank you! I tried figuring this out from one of the free flyers from Jo-Ann's fabrics and I just couldn't. Not enough pictures. This is really helpful!
You're welcome Sandy!
This is brilliant! Thank you sooo much, now I'll not have to use massive amounts of fabric to get all the bias tape I want, I can just make a smaller square if I want less!
Glad I could be of help, Melissa!
thanks for the information and I realized you did not draw the lines did you?
Hey Barbara, no I don't draw lines on the fabric. I have always just eyeballed it and cut freehand. This time, I also had the assistance of the lines on the cutting mat and used a ruler to guide the cutting wheel.
Thank you, my husband, an engineer was helping me and he said this was much too easy. I normally cut one strip at a time and you have made this extra easy for me. Any more sew tips?
Jenny
Jenny, glad this "tutorial" could help! I haven't done a single post like this before but I think if you just browse the blog once a week or so, you might see other helpful tips. It depends on what I am sewing at the time. If you want, you can ask specific questions too.
thank you for the great tip!! i have a question i have some of that same fabric, but i got the last of it and need more could you please post where you got it???? thank you
You are welcome Anon. I got the fabric at Fabricland but it was on sale and who knows if there is any left!
Thank you! i just learnt making bias tape using small strips and joining them.. your technique is such a breeze.
I learned this 25 years ago and forgot which edge met which edge. Thank you for sharing!
Thanks Julia, as you know I'm a "beginner" quilter. Mastering this technique will definitely help me with quilt bindings. As I pick up skills in my new hobby, it sure is handy having a "master seamstress" as a neighbour!
You are welcome Grasshopper. You can even have a tutorial in person, if you like! Just let me know.
Post a Comment