Last day of June and my Dad's 80th birthday! Happy birthday, Dad (even though I am pretty sure you are not reading my sewing blog). I am making up a batch of shirts (you can never have too many white shirts) and may post a little about it but since they are just shirts, I thought I would direct traffic over to my other blog. I have been writing about our trip to France over on my guru blog and I am enjoying the writing, as well as re-reading. If you want to start at the beginning, you have to go to the archives and start at May 31 and then read forward. Here is the May 31 entry but then you'll have to get into the blog and move through the entries anyway so you might as well just go to May in the archives. Or whatever -- you can figure it out, I know.
If you click on most of the pix, they are at my Flickr site, so you can go there just to look at the slideshow. Some pix, I took from Peter's Flickr site but those I tended to just link to like this. If you really want to be dazzled, go to his sets at Flickr and enjoy.
Happy Canada Day for tomorrow!
Monday, June 30, 2008
Thursday, June 26, 2008
Silk top
While I was (still am) thinking about the buttons for the linen jacket, I made the silk top.
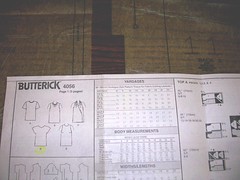
I used a modified Butterick 4056 pattern. I found when I made this top the first time, that it had a wide enough neckline that it didn't need a seam and a button at the neck opening in the back.
I could cut both the back and the front on the fold and modify the back neck facing. I decided I would use a facing and not just some self-bias tape because I thought the interfaced facing would give the neck more structure.

It's an extremely simple top, even with the facing. You can see a little bit, how there is a sheen to the right side of this beautiful silk, when you look at the facing here, contrasted with the top itself which is wrong side out on the table. I also finished the seams by sewing a simple zigzag stitch and trimming the excess material.
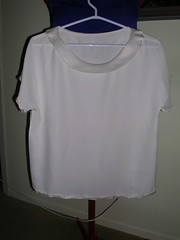
After only about an hour from start to almost finish, the top is done except for the hems. I have decided to hand sew the cap sleeve and bottom hems, to give a higher tone, a more couture finish, to the top. This lovely silk demands it. But I have to wait until it cools down because I don't want to stain the silk with my sweat.
I used a modified Butterick 4056 pattern. I found when I made this top the first time, that it had a wide enough neckline that it didn't need a seam and a button at the neck opening in the back.
I could cut both the back and the front on the fold and modify the back neck facing. I decided I would use a facing and not just some self-bias tape because I thought the interfaced facing would give the neck more structure.
It's an extremely simple top, even with the facing. You can see a little bit, how there is a sheen to the right side of this beautiful silk, when you look at the facing here, contrasted with the top itself which is wrong side out on the table. I also finished the seams by sewing a simple zigzag stitch and trimming the excess material.
After only about an hour from start to almost finish, the top is done except for the hems. I have decided to hand sew the cap sleeve and bottom hems, to give a higher tone, a more couture finish, to the top. This lovely silk demands it. But I have to wait until it cools down because I don't want to stain the silk with my sweat.
Wednesday, June 25, 2008
Linen outfit, jacket
On to finishing touches. I am hemming the skirt tonight but that's a simple proposition.

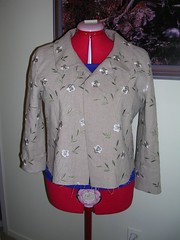
I have put on all the seam binding and hemmed up the jacket. Looking good!

Now I just have to figure out the buttons. The three I have are different from each other, with one having a dark brown spot on it, one medium and the third light.

I have to decide what order to place them. Should the darkest one be at the top, in the middle or at the bottom? Not a crisis either way, I am thinking.
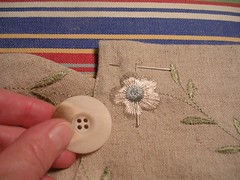
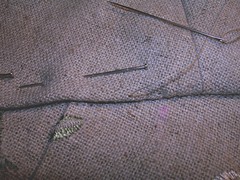
I have discovered that the top buttonhole will have to go right through the middle of an embroidered flower. Nothing I can do about that now. I have made an experimental buttonhole through a flower and it's not bad. But I wonder if there might be anything else I could do?
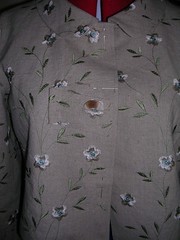
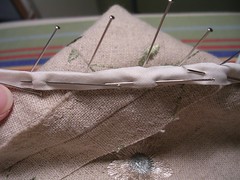
After I made the sample buttonhole, I pinned it on the jacket, put it on Miss Pink, and stuck a button into it, to get a feel for the thing. I also have to calculate where I want to sew the buttonhole, because when done up, the buttons will stop at the shank (or where they are sewed) and I don't want them overlapping the edge of the front of the jacket. So the buttonhole has to stop about 1.5 cm from the edge of the jacket, which looks kind of far back to me, when the jacket is unbuttoned.
I have put on all the seam binding and hemmed up the jacket. Looking good!
Now I just have to figure out the buttons. The three I have are different from each other, with one having a dark brown spot on it, one medium and the third light.
I have to decide what order to place them. Should the darkest one be at the top, in the middle or at the bottom? Not a crisis either way, I am thinking.
I have discovered that the top buttonhole will have to go right through the middle of an embroidered flower. Nothing I can do about that now. I have made an experimental buttonhole through a flower and it's not bad. But I wonder if there might be anything else I could do?
After I made the sample buttonhole, I pinned it on the jacket, put it on Miss Pink, and stuck a button into it, to get a feel for the thing. I also have to calculate where I want to sew the buttonhole, because when done up, the buttons will stop at the shank (or where they are sewed) and I don't want them overlapping the edge of the front of the jacket. So the buttonhole has to stop about 1.5 cm from the edge of the jacket, which looks kind of far back to me, when the jacket is unbuttoned.
Friday, June 20, 2008
Linen outfit, jacket
The sleeves are on!
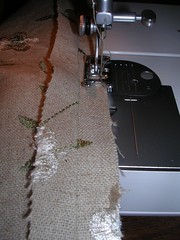
After I sewed them on, I finished that seam with bias tape. It was kind of fiddly work. There were places along the seam where the fabric was several layers thick (at the back yoke seams) where I had to pin the bias to the inside and then pin it around the outside too. With pins on the upper and lower sides of the seam as it is feeding through the sewing machine, you have to go slowly and carefully so as not to jam your needle on all those pins, or catch the pins under the plate where the feed dogs are. (That unfinished looking seam on the above photo is the zigzagged one inside the sleeve.)
It doesn't look too beautiful but it is on the inside of the jacket and won't be seen except as a flash when I take the jacket off.
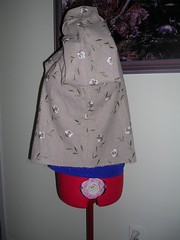
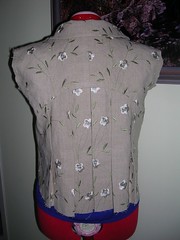
Somebody asked in a previous comment if I'd lengthened the jacket (no) and if the back was longer than the front (also no). This photo sort of shows that the jacket is the same length all around. (The blue top on Pinky isn't on straight.) And the jacket is pretty short - it will just stop at my waist when hemmed - but that's the style so I didn't change the length.
Here's the front with sleeves. I have turned one up just to see what it might look like because of the V detail on the bottom of the 3/4 sleeve.

Here it is from the back, with one sleeve turned up. The pattern doesn't call for any turning up of the sleeves but I didn't shorten them when I made them and they are a tad longish. Next time I make this, I will shorten the sleeve pattern piece by about 3/4 of an inch. My arms are not weirdly short and they don't look funny but I usually have to take up regular length sleeves and I wondered what would happen with the 3/4 sleeve if I didn't take it up, since it was short to begin with. It's all about proportion.
After I sewed them on, I finished that seam with bias tape. It was kind of fiddly work. There were places along the seam where the fabric was several layers thick (at the back yoke seams) where I had to pin the bias to the inside and then pin it around the outside too. With pins on the upper and lower sides of the seam as it is feeding through the sewing machine, you have to go slowly and carefully so as not to jam your needle on all those pins, or catch the pins under the plate where the feed dogs are. (That unfinished looking seam on the above photo is the zigzagged one inside the sleeve.)
It doesn't look too beautiful but it is on the inside of the jacket and won't be seen except as a flash when I take the jacket off.
Somebody asked in a previous comment if I'd lengthened the jacket (no) and if the back was longer than the front (also no). This photo sort of shows that the jacket is the same length all around. (The blue top on Pinky isn't on straight.) And the jacket is pretty short - it will just stop at my waist when hemmed - but that's the style so I didn't change the length.
Here's the front with sleeves. I have turned one up just to see what it might look like because of the V detail on the bottom of the 3/4 sleeve.
Here it is from the back, with one sleeve turned up. The pattern doesn't call for any turning up of the sleeves but I didn't shorten them when I made them and they are a tad longish. Next time I make this, I will shorten the sleeve pattern piece by about 3/4 of an inch. My arms are not weirdly short and they don't look funny but I usually have to take up regular length sleeves and I wondered what would happen with the 3/4 sleeve if I didn't take it up, since it was short to begin with. It's all about proportion.
Thursday, June 19, 2008
Linen outfit, jacket
This just goes to show that even after sewing for 30 years, you can still miss stuff. You know how I mentioned that there was nothing in the instructions about seam finishing so I zigzagged the sleeve seams? And yet, the notions list called for seam binding? So I looked at the main instructions, before you get into the specifics of the garment and sure enough, there it was: " finish the raw edges of each seam as you make it." So I should have done the sleeves but I'm not worried that I didn't. In fact, it probably adds less bulk to the sleeve by just zigzagging the raw edge. And you never see in the insides of the sleeves even when you take the jacket off. That's my story and I'm sticking to it.
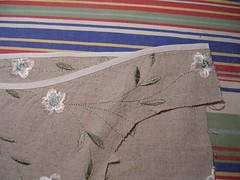
Here's how nicely the edge of the facing is finished now. And I didn't use a fancy stitch - I just stayed Very close to the edge of the seam binding and sewed carefully.
Now that I've attached the collar and the yoke facings, I see that part of the shoulder seam will be visible when I take the jacket off. But I decided Not to finish the one little bit of it by using seam binding. Instead, I simply folded under the raw edge and stitched it down. Now it's finished but practically invisible.
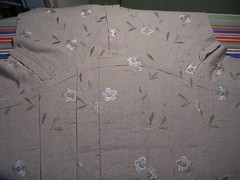
Here's the yoke and the pleated back, from the inside. I have put a temporary line of basting stitches across the middle of the pleats to keep them all together while I work with the garment. When it is time to hem the jacket, I will take the stitching out.
Here, I am sewing down the yoke facing on the inside. That bit of pink is a chalk mark for where the pleats go. I normally like to machine sew down things like facings but I decided to go more "couture" for this jacket. When I put my mind to it, I can sew with very nice, tiny stitches. Of course, this linen is very forgiving.
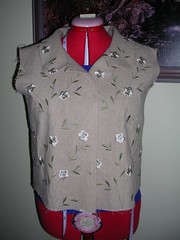
Here's the front so far, minus sleeves. Cute!
And the back! I may not want to ever sit down in a chair with a back while wearing this jacket. Not only would it wrinkle the pleats, no one could see how adorable they are!
Here's how nicely the edge of the facing is finished now. And I didn't use a fancy stitch - I just stayed Very close to the edge of the seam binding and sewed carefully.
Now that I've attached the collar and the yoke facings, I see that part of the shoulder seam will be visible when I take the jacket off. But I decided Not to finish the one little bit of it by using seam binding. Instead, I simply folded under the raw edge and stitched it down. Now it's finished but practically invisible.
Here's the yoke and the pleated back, from the inside. I have put a temporary line of basting stitches across the middle of the pleats to keep them all together while I work with the garment. When it is time to hem the jacket, I will take the stitching out.
Here, I am sewing down the yoke facing on the inside. That bit of pink is a chalk mark for where the pleats go. I normally like to machine sew down things like facings but I decided to go more "couture" for this jacket. When I put my mind to it, I can sew with very nice, tiny stitches. Of course, this linen is very forgiving.
Here's the front so far, minus sleeves. Cute!
And the back! I may not want to ever sit down in a chair with a back while wearing this jacket. Not only would it wrinkle the pleats, no one could see how adorable they are!
Wednesday, June 18, 2008
Linen outfit, getting on with the sewing
Things are proceeding apace. Everything is cut out and things are going together.
Although I knew the jacket was unlined, it wasn't until I started sewing the two pieces of the sleeves together that I realized, it was unlined! The instructions call for using seam binding in the body of the jacket and there is a yoke and yoke facing but there is no call for finishing the raw edges of the sleeve seams. So I zigzag stitched the seams I'd already sewed, which made me think, I'd better zigzag the raw edges of the skirt as well. Normally, I do a flat fell of some sort but I don't think it will lend itself to this fabric.
Speaking of fabric, is linen ever nice and easy to sew. It doesn't move around or bunch up and it's not hard to puncture. It may wrinkle when you wear it but it's very pleasant to work with in the meantime. Above are the yoke and the yoke facing. I deliberately cut the facing into the non-embroidered area at the selvage so I would have less embroidery on the inside of the jacket. Not that it matters but I liked the idea of it.
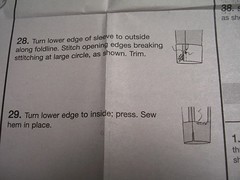
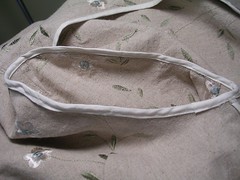
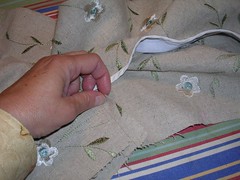
The sleeves are 3/4 length with a V shape on the finished edge. In the instructions, it just says "sew hem in place" but since I dislike an unfinished raw edge, I decided to use some seam binding here.
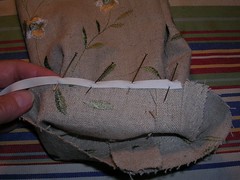
I pinned the double-fold bias seam binding to the raw edge and stitched it on by machine, using a "fancy" stitch that did a zigzag every fourth stitch, just to be sure that I was catching the binding on the underside.
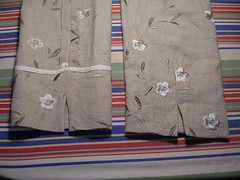
Here are the sleeves, wrong-side and right-side out. I hand sewed the hems up.
I also hand stitched the interfacing down the fold line on the jacket fronts. I chose sew-in interfacing because the pattern recommended it but also because I thought it would be best, given the natural fabric. I haven't decided yet if I will do any top stitching. The pattern doesn't call for it but sometimes, it gives a little more structure to the garment.
Although I knew the jacket was unlined, it wasn't until I started sewing the two pieces of the sleeves together that I realized, it was unlined! The instructions call for using seam binding in the body of the jacket and there is a yoke and yoke facing but there is no call for finishing the raw edges of the sleeve seams. So I zigzag stitched the seams I'd already sewed, which made me think, I'd better zigzag the raw edges of the skirt as well. Normally, I do a flat fell of some sort but I don't think it will lend itself to this fabric.
Speaking of fabric, is linen ever nice and easy to sew. It doesn't move around or bunch up and it's not hard to puncture. It may wrinkle when you wear it but it's very pleasant to work with in the meantime. Above are the yoke and the yoke facing. I deliberately cut the facing into the non-embroidered area at the selvage so I would have less embroidery on the inside of the jacket. Not that it matters but I liked the idea of it.
The sleeves are 3/4 length with a V shape on the finished edge. In the instructions, it just says "sew hem in place" but since I dislike an unfinished raw edge, I decided to use some seam binding here.
I pinned the double-fold bias seam binding to the raw edge and stitched it on by machine, using a "fancy" stitch that did a zigzag every fourth stitch, just to be sure that I was catching the binding on the underside.
Here are the sleeves, wrong-side and right-side out. I hand sewed the hems up.
I also hand stitched the interfacing down the fold line on the jacket fronts. I chose sew-in interfacing because the pattern recommended it but also because I thought it would be best, given the natural fabric. I haven't decided yet if I will do any top stitching. The pattern doesn't call for it but sometimes, it gives a little more structure to the garment.
Sunday, June 15, 2008
Linen outfit
It takes me a while to get comfortable enough with the fabric to start cutting it. The linen was draped over my cutting table for a few days before I started eyeballing it to see what would be best. The flowers are obviously directional so which way was "up" was no problem.
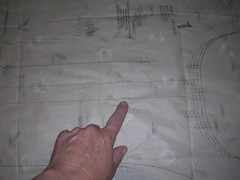
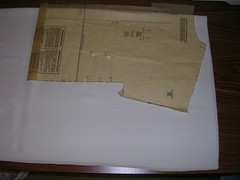
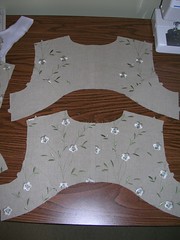
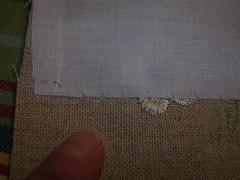
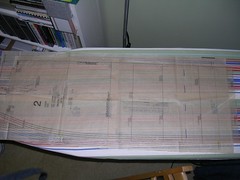
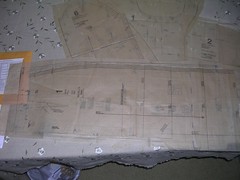
I started with the two front pieces of the jacket. As usual, I am cutting one piece at a time. I decided to focus on the place where the facing folded, as opposed to centre front.

My index finger is pointing down the line where the fold will be. I choose this line because there was almost no embroidery along it. I didn't want the fabric to fold over a flower and have a big bump there.

You may have to click on the above photo to make sense of it by going to Flickr and looking at the notes. I have cut out one jacket front and have laid it face down on the fabric which is right-side-up. I have also folded over the facing part on the jacket from so that I get the same non-embroidered part on the fabric along the foldline, for the other jacket front.
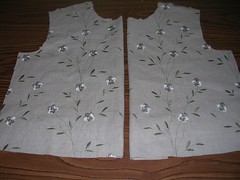
Here are the two jacket fronts, cut out, with the facings folded back under them. They look pretty much the same, thank goodness.
I started with the two front pieces of the jacket. As usual, I am cutting one piece at a time. I decided to focus on the place where the facing folded, as opposed to centre front.
My index finger is pointing down the line where the fold will be. I choose this line because there was almost no embroidery along it. I didn't want the fabric to fold over a flower and have a big bump there.
You may have to click on the above photo to make sense of it by going to Flickr and looking at the notes. I have cut out one jacket front and have laid it face down on the fabric which is right-side-up. I have also folded over the facing part on the jacket from so that I get the same non-embroidered part on the fabric along the foldline, for the other jacket front.
Here are the two jacket fronts, cut out, with the facings folded back under them. They look pretty much the same, thank goodness.
Friday, June 13, 2008
Linen outfit
I've ironed the linen and it looks great. I took out and ironed the pattern pieces for the jacket and noticed for the first time that not only are the sleeves "below elbow" (or three quarter) but they have a little V-detail on the hem which is nice. The 3/4 length is even nicer because then I don't have to wonder how much to take them up for my short arms.
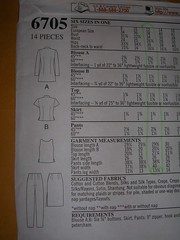
Now I am comparing skirt pattern pieces. I am using a New Look pattern (#6705) I have had for some years. I have only made the top before, with its faux-Mandarin collar.
Then I am superimposing the pattern pieces for that skirt I always make on top of the new pattern, to make sure that it will fit width-wise but also that it works for length. I lined up the marks that say "natural waistline" and the New Look skirt is only a few inches higher in the waist so it won't be like a giant sash or something. And it doesn't have a waistband either, but uses petersham or grosgrain ribbon for the facings.
The New Look pattern calls for a side zipper and a side slit, so the back is cut on the fold. I am going to change that so I get a back zipper and a back vent. I think the vent will look more formal than a side slit. I also plan to line the skirt, even though the fabric is thick enough that I probably won't need to. But a skirt hangs better when it is lined and it sticks to hose is it isn't lined. By lining it, it will look more formal and work under all leg situations.
Wednesday, June 11, 2008
Linen outfit
I want to thank everyone for their great guesses as to what the ceramic cigale was for. I think it is too small to put water and flowers in but the small hole is probably for hanging it up. Maybe for silk flowers, especially because the lack of glaze on the underside would allow water to seep out. I think it would need a second main hole (not just the hanging-up hole) for it to be a flute. But anyway, it's a fun souvenir!
After I posted the last post, I got really sick with some stupid but virulent cold virus. It even gave me a temperature of 101F (38.5C)! I couldn't even read, I felt so crummy - all I could do was watch tv and that was no joy, I can tell you. So I've been thinking about my next project and you probably won't be surprised, but it doesn't involve Provencal fabrics!

I have no idea if I am going to get this particular job interview that I really, really want but if I do get a call soon, I decided I wanted a new, summer interview outfit. My wool outfits are great but way too warm, especially with this heat we've been having.
So today I had to bike over to have my annual medical check-up and I knew Darrell Thomas was having a sidewalk sale so I carried on after the medical to Darrell's and shopped. And I found some linen. Now, I have always been wary of linen, being small and looking like an unmade bed when wrinkled. But my friend Carmen loves the stuff. And there were some comments made over on A Dress A Day's packing hints entry that have made me rethink linen. Plus, I found this stuff on sale for only $19.99 a meter and figured I could NOT go wrong.

I am going to make this adorable jacket (Vogue V2956) with the swing back and a high-waisted skirt that will go to about mid-calf. In the first photo, I also show some cream coloured sanded silk that I am going to make into a simple top for under the jacket. You can't tell from the photo but the cream silk looks good enough to eat, it is so lush.
I am hoping it will be like lighting a cigarette and having the bus arrive. By making this outfit, I will get the call for the interview. (I think I wrote that before, in an entry on making an "interview suit" but what the heck - I'm eternally hopeful.)
After I posted the last post, I got really sick with some stupid but virulent cold virus. It even gave me a temperature of 101F (38.5C)! I couldn't even read, I felt so crummy - all I could do was watch tv and that was no joy, I can tell you. So I've been thinking about my next project and you probably won't be surprised, but it doesn't involve Provencal fabrics!
I have no idea if I am going to get this particular job interview that I really, really want but if I do get a call soon, I decided I wanted a new, summer interview outfit. My wool outfits are great but way too warm, especially with this heat we've been having.
So today I had to bike over to have my annual medical check-up and I knew Darrell Thomas was having a sidewalk sale so I carried on after the medical to Darrell's and shopped. And I found some linen. Now, I have always been wary of linen, being small and looking like an unmade bed when wrinkled. But my friend Carmen loves the stuff. And there were some comments made over on A Dress A Day's packing hints entry that have made me rethink linen. Plus, I found this stuff on sale for only $19.99 a meter and figured I could NOT go wrong.
I am going to make this adorable jacket (Vogue V2956) with the swing back and a high-waisted skirt that will go to about mid-calf. In the first photo, I also show some cream coloured sanded silk that I am going to make into a simple top for under the jacket. You can't tell from the photo but the cream silk looks good enough to eat, it is so lush.
I am hoping it will be like lighting a cigarette and having the bus arrive. By making this outfit, I will get the call for the interview. (I think I wrote that before, in an entry on making an "interview suit" but what the heck - I'm eternally hopeful.)
Subscribe to:
Posts (Atom)