Okay, I’ve been thinking I have to refine my dress pants pattern. I keep hearing on “What not to Wear” that dress pants that go straight down are the most flattering cut. I really like the casual jeans pattern I have and it fits but the legs are tapered AND it doesn’t look dressy. I have several pants patterns (included in patterns with whole outfits of jackets, skirts and stuff) that have no waistband. Some have a side zipper or a back zipper or even a front fly but the key is that they don’t have the waistband AND they go straight down. Not only can you tell from the pattern piece, but you can tell because the width at the bottom of the leg is wider than on the jeans. My pants are 13 inches wide at the bottom of the leg on tapered pants and jeans, but they are 18 inches wide on the dress pant.
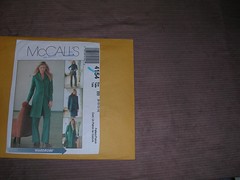
I have made the pants in McCalls pattern 4154 once before and they fit nicely. I rarely wear them because I used some material that was very flowing and bright blue with flowers on it. But they did fit well. So I am making them again.
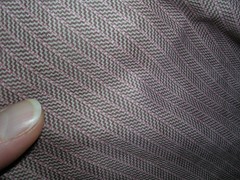
Speaking of being challenged about fabric, I was going to use some plain grey stuff I didn’t even remember buying but instead, went with this really odd stuff I do remember buying because it was on sale - probably $2/meter. It has Lycra in it too - a bonus! But it really is odd. The wrong side is plain white and looks like a knit. At last I will be making something where you can tell the right from the wrong side. The right side is a subtle stripe with a sort of herringbone look to it. The main colours are brown and off white and there is a red thread running through it too. Overall, it has a pinkish look to it. It also has a nap. The finish is more than peached - it is brushed and so I had to cut all the pieces facing the same way “up”.
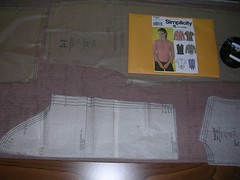
When I laid out the fabric with the pants pattern pieces on it, I realized I had enough extra to make something else so I decided on a shirt. This shirt pattern has facings on the front and a spread collar so I am thinking I could wear a t-shirt or turtleneck under it, so it works more like a jacket than a shirt. I think it would be entirely TOO much of the fabric to ever wear both the pants and the shirt at the same time, however. I have made this shirt before on several occasions and I usually leave out the darts in the back so it fits more loosely. I am also making the 3/4 length sleeves.
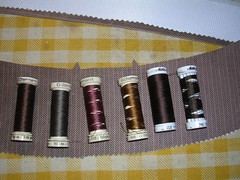
Next, I had to decide on the thread colour. With white on the back and brown and red on the right side, it was difficult. I laid out six spools of brown thread I already had to see what looked best. I refuse to buy new thread while I am sewing with “ugly” fabric that I am merely trying to use up. I eliminated the three spools on the right and plan to use up the three on the left. I am also going to use white thread in the top or the bobbin, depending on what piece I am sewing.
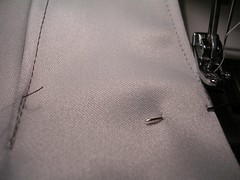
I ironed on the interfacing where required and started assembling the pieces for sewing. I was going to sew all the darts at once, so I decided on brown thread for the bobbin and white for the top thread. The brown would show up on the inside which wouldn’t matter for the pants but might show on the top. But I decided not to worry about it.
The next photo shows two darts made in one side of the pants back. The first one has the brown bobbin thread showing and the one I have just finished shows the white top thread.
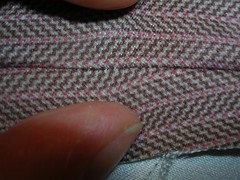
When I used the same thread combo on the split dart on the shirt front, I opened up the “seam” and took a picture of what the threads will look like once the seams have been pressed open. You can see two colours of thread but you really have to look closely.
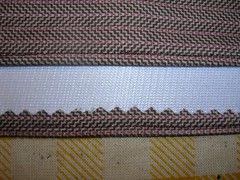
Finally, I finished the raw edge on the facings for the front of the shirt. I already pinked the edge to prevent fraying but I also ironed over the raw edge and sewed it down. In the last photo here, you can see what brown thread looks like as topstitching. I changed the top thread to brown and sewed the facing edge with brown on both threads. Although I didn’t make a big effort to sew totally straight, it doesn’t look too bad.
10 comments:
Don't give up on the blog! I have been looking around for other sewing-related blogs and haven't been very successful. I found yours a week or so ago, and I think it's lovely. I do mostly Elizabethan re-enactment sewing, and I am a self taught seamstress - which means, not a very good one. Tips and advice are always appreciated
Welcome to my blog Sandy and thanks for being one of the few to actually comment. I have a little beginner's sewing book that I am trying to find a publisher for and the blog will eventually be a support mechanism for those beginners who buy the book (well, and anyone else who comes by). In the meantime, I am having fun blogging about my various projects because it makes me think before I sew something because I know someone will be reading about it. I am pretty well self-taught too and I know practise makes perfect. So don't say you're not very good! I am sure you sew just fine.
Julia: I just found your blog through a post on www.patternreview.com and love it. You certainly are an accomplished sewer with lots of helpful information. Please keep posting.
Welcome to my blog, Cynthia! I am about to post a new project today - I hope you enjoy following it too.
Stacy, welcome to my blog and thanks for the compliment. I have this Rodale book called "Fantastic Fit for Every Body" and it tells you everything about altering patterns. I am lucky and don't need to alter mine much. A short answer would be if you make the pants at the waist bigger, you would have to make the facing bigger by the same amount.
Hi, I am attempting to sew a pair of wool slacks because I am blessed in the behind area, and am rather pear shaped, so I have the devil's own time finding a pair of pants that fit well. Do you have any tips on how to fit them to my body better? Thanks!
Hi Anon, I am really lucky in that I don't have to alter patterns much at all. So I never got into it, or making my own patterns either. I did get the bible on fitting patterns called "Fantastic Fit for Everybody" by Gale Hazen by Rodale (they sell it through Amazon) so even though I haven't used it much, I would recommend it.
There's also a blog about fitting pants specifically and she offers a booklet about it at http://1ststeptosewingsuccess.blogspot.com/
Good luck!
Julia, have you given up this blog? I just found it and love it! Please do more....even if it's to promote your book, it'll keep your blog and name in the search engines until you are ready! I'd love to read more new stuff from you.
Hi Mary! That was a nice compliment about my blog, thanks! I haven't really given it up, but I have discovered that I love philosophy and so I am enrolled at Carleton U. taking philosophy courses, which keeps me so busy that I have not sewed anything since the last time I blogged. I have a white shirt with French cuffs half made and it is a constant rebuke to my lack of tenacity, that the shirt hangs there, sleeveless. I will finish it. But I am only in week 2 of this semester and already swamped with readings. All this to say... I will blog from time to time, but I am consumed with philosophy for now. However, there are tons of archives to keep you busy for a while!
Hi Julia, glad I saw your reply! Life changes and so we must change with it, doesn't mean you won't finish that blouse. I have had sewing come in and out of my life over the past years. Sewed like a maniac when I started a home and family. Then...concentrated on my painting, my true focus of creativity. BUT I still adore fabric and sewing, packing up my house to move to England, and finding the disgusting amount of fabric I had....kind of got me hooked again!! hahaha...I sold a lot of fabric etc...but stashed away my favorites...can't part with the wools...just can't do it! hahaha. I cut way way back on patterns I kept and am determined to stick to like one favorite pants pattern etc just so I can sew quicker. I'll expand into my other patterns but for now this is what works.
I'm very tall so making pants I guess would be great...sick of jeans from Walmart! I also love jackets and vests; vests being my next thing to make a slew of...with all that wool! My fiance (who's British) love wool waistcoats so I can't wait to make him some too.
I was bummed to see the vests were the last thing you posted and not more :-(
If I were you, put the blouse away for now, don't let it guilt you. If it needs to come out someday it will. In the meantime there may be some other simple project that you will sew to satisfy your creative side. That's my advice!
(ps. I'm working on illustrating my own children's stories and poems now, so I know how it feels to change paths. If you want to see my art website it's http://www.marymcandrew.com)
Talk soon
Post a Comment