Sunday, October 28, 2007

Peach (in more ways than one) cotton shirt and skirt

I decided that I will make a shirt next, because I can use another plain shirt (as opposed to yet another one made from a print). I have several from the olden days but they are the kind that you tuck in and that isn't the style these day. Plus my skirts are without waistbands and that look doesn't lend itself to having shirts tucked in either. And when I got the raw silk, I also picked up for next to nothing this peach coloured cotton with 3% Lycra in it and it has not been put away and so is begging to be made into something.
Peach cotton
The right side has a subtle tone-on-tone stripe and when I was smoothing out the fabric on the table, getting ready to pin the pattern pieces on it, I felt a slight nap to it too.
Peach cotton
When I washed it with the silk, even though I also put the cotton in the dryer, it came out covered in lint. I had to use the lint brush over every inch of the fabric, on both sides. So I ironed it also, on the one side, after I had taken off the lint.
Peach cotton
It is quite a substantial cotton and I had just enough of it that I could get a skirt out of it too, although I have decided to line the skirt as the cotton isn't that substantial. I am using tried and true Simplicity patterns, 9877 for the shirt and 9825 for the skirt.
Peach cotton
I had purchased some pale pinky-beige lining for the silk but when I decided to make a skirt too, I looked through my stash and rediscovered some pale orangey lining that seemed to match wonderfully. So everything is cut out now and it's time to iron on the interfacing and start pinning pieces together.

Wednesday, October 24, 2007

Green wool suit finished

Green wool suit
I really had very little left to do, in order to finish the jacket in the green wool. Here is the lining, being stitched in by hand.
Green wool suit
Here's the interior of the jacket before I sewed on the buttons.
Green wool suit
Here's a close-up of the running dog buttons I choose.
Green wool suit
And here's the jacket, all finished! I like it. But I haven't worn it yet. Maybe tomorrow. I didn't wear it today although it was cool enough, because I wanted to take a yoga class and that meant scrunching up my work clothes into my backpack after class and walking home in my exercise gear.
Alterations
Finally, I had bought a pair of pants at Winners and they were too long, so I needed to do some alterations. I still don't have a pants pattern I like and these were such a bargain at $35 - lined wool! - that I bought them. Now I've just discovered that there's a flaw in the zipper but if I need to, I can put in a new zip and still I couldn't have made them for less.

Thursday, October 18, 2007

The jacket continued

green wool suit skirt
Today, I added some notes to my pix at Flickr, so if you want to see detail and have it pointed out, click on the pix and then you can see more at Flickr. As you can see, I have finished the skirt - that's the easy bit. I made it shorter than the long skirt that I often make for Winter and longer than the skirt I have been making that hits above the knee cap. Once a woman reaches a certain age, I don't think many people want to see more kneecap, even if mine still look pretty good. Also, it's about proportion.
green wool jacket
So I knew going in, because I have made this jacket a few times before, that I was going to have a struggle with the front facings. And I did. As usual, when it came time to pin the facings to the jacket, the facings were more than a quarter inch shorter. But, again I followed instructions and eased the jacket front along the facing edge.
green wool jacket
In this photo, I've exaggerated the easing up of the jacket - it wasn't that much ease. I pinned it down using LOTS of pins (so it wouldn't shift and pile up) and then sewed the whole thing.
green wool jacket
You sew one seam around the collar and then you sew another seam down the front. These two seams meet at the point where the collar and lapels meet. I never can quite match all those "large dots" and so I have to turn the garment over and see on the other side where I went wrong and then sew it again. It usually works out in the end.
green wool jacket
Sometimes, after I am finished the jacket and it's all pressed, I might decide to take a few small stitches by hand to close up the tiny hole where my seams didn't quite meet.
green wool jacket
Pressing is everything! I can't emphasize that enough. Once the facings are on, I press the seams open from the wrong side, even though they eventually get pressed back together. By pressing the seams open, you flatten the sewed part along the stitching line and so, when you turn it right side out, it comes out to where it should be, instead of caving in to a dent. If you haven't ever pressed a seam like, this, it may be hard to understand. But if you have done this before, next time, press it open from the wrong side and see how easy it becomes to press it once you get to the right side.
green wool jacket
Here is the edge of the lapel, just before I press it. It's a bit hard to see the seam line but it's there and with my fingers, I'm about to "roll" it slightly (or push it into place) just as I come in with the iron. This way, the seam line ends up exactly on the fold.
green wool jacket
Unfortunately (and as usual) the front of the jacket has ended up being pulled slightly to the inside of the jacket by the slightly shorter facings. I'm going to let the jacket rest on the dummy for now (tonight's an "Ugly Betty" night anyway) and then fix it with judicious pressing, but I am always annoyed that it doesn't work out better than I think it should.

Monday, October 15, 2007

Green suit continues

I have attached sleeves to both the jacket and the lining. I have added the collars too and am about to sew the lining to the jacket - big excitement! In the meantime, I needed some hand sewing to do while I watch Heroes so I added seam binding to the bottom edge of the skirt and turned it up 1 and 3/4 inches to give me a nice generous hem that stops right below the kneecap.
green wool suit details
I take up one or two threads of the weave of the fabric at a time and move forward about 1/4 inch at a time (maybe 3/8) so the stitches are firm and sturdy but invisible on the right side.
green wool suit details
Prior to this, I lined the skirt by sewing the lining to the top raw edge of the skirt, before attaching the facing. Here is the inside of the skirt, showing the lining on one side of the zipper and not on the other. I also decided to convert darts into ease (which concept I got years ago from my couture sewing book) and so the lining is eased also (i.e. ruffled a bit to fit into the skirt).

Saturday, October 13, 2007

The green suit continued

Forging ahead with the green suit, now that I have incentive to sew with the cheap raw silk.
green wool suit
I have sewn together all the body pieces of both the lining and the jacket and have also sewn on the patch pockets. You can see a little bit of the silver thread sparkle here but it shows up better if you click on the photo and make it bigger at Flickr. Of course, it looks even better in real life. The sleeves (all four of them) are sewn together and the skirt also, including the lining. Now for more assembly.

More fabric - imagine that

Okay, call me crazy. Yesterday, I wanted to get my hair cut which meant biking over to Merivale Road. Since I was already all the way over there and I had the bike, I thought, "why not continue on to see what Fabricland might have for sale?" I had just got the green wool and am only halfway through making the suit but I thought I would toddle over there anyway. When I got there, I remembered that my stamp-and-save card was full and so whatever I might buy might not cost that much.

I looked at the Butterick patterns which were on sale for only $3.49 that week (every week, one of the pattern manufacturers is on sale) but I didn't find any that turned my crank. Then I wandered back to the "get rid of it fast" tables at the back, where the fabric is piled and you have to dig to find anything. Right away, I found a bolt of peach coloured cotton with 3% Lycra and I snatched it up in a hurry. I have been thinking I would like to have more solid coloured shirts because all the patterns I have are too hard to match to the patterned skirts and things. And then I saw this other, funny-looking fabric. Initially, I didn't realize that it was the wrong side of the fabric but something drew me to it anyway. I looked at the label on the bolt and it said "80% silk" and I couldn't recall ever having seen this fabric in the store before. I unfolded it and looked at the right side and it spoke to me. It was marked down to $5 per meter and I glanced from side to side to see if anyone else was interested in it. No one was. I took it to the cutting table, together with the peach cotton. It was 140 cm (55 inches) wide and when measured, came to 2 meters in length. I smelled it and it smelled like raw silk. I took what was left on the bolt. (I also bought the 2 meters of cotton left on that bolt.)

The when I got it home, I washed it. Yes! Raw silk, into the washing machine on the delicate cycle. When it was finished, I took it out and it looked a little "fluffier" but still good. I hung it on the rack to dry and later, put it into the dryer for only ten minutes. It still looked okay. When I took it upstairs to iron it today, I discovered that it had shrunk mightily, and just from the washing. Where it had been 55 inches wide, it was now only 45 inches wide! That's what I call shrinkage. But now I can cut a suit out of it (or at least a jacket) and clean it very carefully but not with the fear that it will be ruined.
some raw silk
I got 2 m of cotton, 2 m of silk, 2 m of lining and 2 zippers and 2 threads, all for $21.45. Because of all the stamp-and-save points, the whole thing cost me $1.45. Amazing.

Tuesday, October 09, 2007

Continuing with the green suit

It took quite a while to get ALL the pieces cut out, as there was lining and interfacing too. Then I had to iron on the interfacing and finally I was ready to start the assembly.
green wool suit
I did my usual thing which is to say I pinned together as many pieces as I could, regardless of where they were in the order of instructions. Once I had used up all my pins, I sewed all the pieces I had put together in one big assembly line, spitting them out the back of the feed dogs and running a new piece in. Then I ironed all the seams I had made and started in with more seams.
green wool suit
Because the sleeves are two-piece and there is no matching underarm seam on the sleeve to correspond with the body of the jacket, I have to make the sleeves into tubes and then fit them into the jacket. I do this with both the jacket and the lining sleeves. I also make the outer jacket and the lining jacket and then put them together around the front edge, which we'll get to later. I also zigzag stitched all down the seam allowances on the skirt because I will be pressing the seams open and not finishing them in a flat fell. The skirt is also fully lined so I don't feel the need to finish the raw edges more than that.

Thursday, October 04, 2007

Green Wool Suit

green wool suit
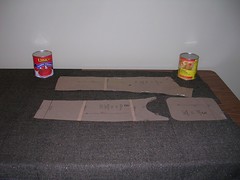
I finally put away some patterns I had scattered all over my sewing room and found the jacket and skirt patterns I want to use for the green wool. I ironed the paper pieces and organized them and then I looked at the fabric, which I had laid out on my cutting table, folded in half lengthwise. I knew then I should cut out each piece in a single layer, not two pieces at a time as it would be if the fabric were folded in half. So I unfolded the fabric and staked it down with 48 oz. cans to prevent it from sliding off the table.
green wool suit
I was going to write about how much extra work it was, to cut out each piece twice, but as I cut, I realized that it was just a bit of extra time and not extra work, really. As I cut each piece, I realized how nice and precise it felt, to only cut one layer at a time. I knew that each piece lined up exactly with the stripes in the fabric, and that the under piece (because there wasn't one) wouldn't be slightly skewed. I also knew that each piece would be flaw-free.
green wool suit
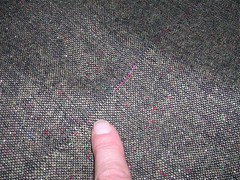
There were several flaws in the fabric, which I noticed and marked with contrasting thread as I ironed the fabric originally. Now that I'm cutting out each piece, one at a time, I can position the pattern piece carefully to avoid the flaws. It's actually less stressful to do it this way, than to cut two pieces out at once, on folded fabric. And easier on the hand too, because you are only cutting one layer of fabric. Which is not to say that I won't ever cut two layers at a time, ever again. But I am not minding this step at all, this time.
green wool suit
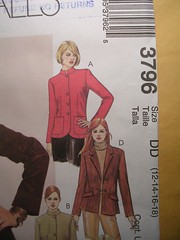
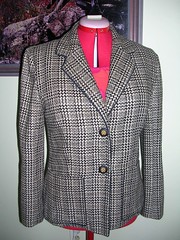
I know I've posted this jacket before, but it was easier to take a new photo, rather than find the old one. This is the McCall's 3796 pattern made in a raw silk. I won't be doing piping with the green wool but everything else will be the same.
green wool suit
For fun, I draped the front jacket pieces on the dummy, over the silk jacket, just to see how they will hang. I am quite happy with the fabric so far.