Showing posts with label muslin. Show all posts

Tuesday, July 07, 2009

The gala dress muslin

Remembering the 52 people killed in London on this day, 4 years ago.
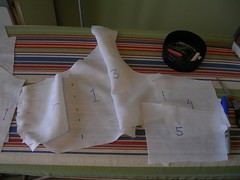
It rained on and off all day too, which I always find appropriate. And since it was raining, I didn't even go out at all. I got some reading done and then I cut out the muslin. It was easy because I didn't cut a single layer but allowed the fabric to be double thickness, saving myself a lot of time and fussing. And I didn't use pinking shears, as all the seams will be finished in some way.
gala dress muslin
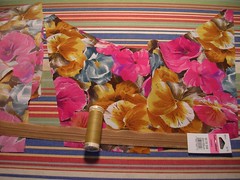
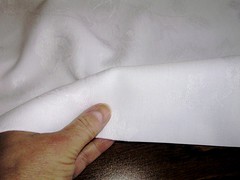
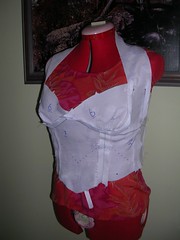
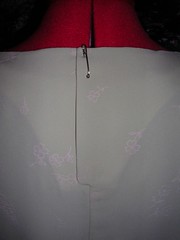
Then I fused on the interfacing to the yoke and midriff. I may go with sew-in interfacing on the actual dress, depending on the fabric. I often find fusible interfacing eventually bubbles in some fashion. I looked at the over-all colour of the fabric and decided on the ocher colour for the thread and zipper. It was a toss up, really, but I figured the ocher colour was the most muted and least likely to stand out.
gala dress muslin
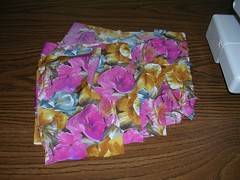
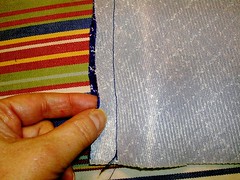
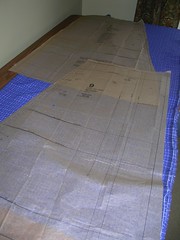
I have started to stack up the pieces to be sewed together. You can't really tell from this photo but the instructions call for french seams and I have pinned the pieces together, wrong sides together. That always goes against the grain (whoo, all these sewing metaphors!) as the pieces are usually right sides together. I have to double check each one before I stick it under the needle and get going.

Friday, April 17, 2009

Some muslins

I put the coat on hold so I could get the muslins done.
blue coat
I am not loving the coat (yet - we'll see) and the fabric walks around a little so I have to use lots of pins when putting pieces together. This photo shows that one side of the seam allowance ended up narrower than the other, even those these pieces were backed with interfacing. This is the under collar.
blue coat
Even though the pattern (like most) calls for the sleeves to be set-in, I am sewing the sleeves on first around the shoulder and then I will sew up the underarm seam.
blue coat
This is the stage the coat has been left at - I haven't even done up the underarm seams. The sleeves look awfully long but I think that's because the bodice has an empire waist. The front facings are "self facings", as opposed to separate pieces.
bodice muslins
In the meantime, I cut out the bodices on both prom dress patterns. I got this fabric for $3/metre and it feels like it - it is some sort of polyester, I think. But it drapes okay as a stand-in for whatever will be the real thing. For the bubble dress, I am thinking a silk charmeuse.
bodice muslins
I've never made a real muslin before so I went to town with the Sharpie! I wrote the pattern piece number on each and did all the markings, whether I'd need them or not for just the muslin. It was kind of fun. I pinned the pieces together wrong side to wrong side so that I would have the seams showing on the right side for fitting this weekend.
bodice muslins
This is the one-shoulder model that I am leaning toward, not the least of which because it is a lot less fiddly sewing. It is inter-lined and then lined but it is not as fussy as the Vogue pattern. I cut this one out in the size 14 to give myself room to manoeuver in the fitting.
bodice muslins
I stupidly bought the Vogue only up to size 12 and could not return it for a pure exchange, even though I asked very nicely. So we'll have to see in the fitting what work may need to be done. The bodice is also lined but there is, in addition, draping fabric on the outside for a third layer. And the midriff can be made of contrast fabric (like velvet, say) and it is all topstitched with batting and everything. I'm going to get together with my niece this weekend and we'll do fitting and discuss which pattern and fabric.

Sunday, April 05, 2009

Belaboring the blue coat, and prom time

Okay, this time, it is taking me so long to blog because the coat was NOT speaking to me. I somehow did not want to be bothered cutting it out. And when I started, it kind of slid around on me and the selvages would not line up and behave and I felt discouraged. So I left it alone for a while and it mocked me from the sewing room every time I went by. So I kept on cutting it out, bit by bit, and now all the blue pieces are done and I even discovered I had enough lining in my stash to completely line it.
blue coat
I did however, have to make the second shortest view (View B) because the skirt is wide enough that I couldn't overlap the pieces with the fabric that I had. I'm still going to make the pockets on the side seam, not the patch pockets.

In the meantime, I have promised my niece that I will make her prom dress and so today, we went looking for patterns. She had seen some nice dresses on the internet and leaned toward a one-shoulder style (no pun intended). Unfortunately, there were hardly any one-shoulder style patterns out there (in the books that we looked at). In the end, we bought two very different patterns and she is going to talk to her friends and think about which one she would prefer for the prom.
prom time
This one is cute and young and because it is short, she may be able to wear it somewhere else, later. We'd make the pink view bodice and band, with the yellow view bubble skirt.
prom time
It will take about 2.7 metres of fabric.
prom time
This one is much more sophisticated but I still think it wouldn't look too old on her, as long as she didn't make it in black (and she is not wanting black - we looked at some lovely turquoise silk charmeuse).
prom time
It will take 3.8 metres of fabric. Both dresses are fully lined so she can choose any fabric and not worry about revealing anything. The Vogue dress is much more structured and the midriff is all top-stitched. Plus it has the effect of two skirts and a small train.

I don't want to influence her one way or the other. This is a once in a lifetime event and she should be happy with her dress without feeling like she "should" choose one sort of style over another. It may even turn out that we will look at more patterns after I make the bodices in a muslin for fitting. This will be the first time I have made a muslin! Patterns generally fit me right out of the envelope so I never bother with a muslin. But sewing for someone else is a different proposition.

Sunday, December 30, 2007

Comparing patterns and making a muslin

Since I just have hand sewing and the buttons to go on the brown jacket (and therefore I am not really breaking my rule), and since New Years Eve is Monday and I don't have anything to wear that I haven't worn already (we go to the same party every year), I decided to see if I could still sew "quick like a bunny". I also wanted to see if I had a pattern in my collection that would work for this shiny sort-of-knitty gold fabric I bought on a whim several years ago. I didn't think I wanted to make a regular blouse/shirt with the shiny gold fabric because I thought the structure of the collar and plackets wouldn't work. I have a lot of patterns and from many of them, I have only tried one view. I also have issues with shirts where the sleeves dig into my upper arms. I don't think my arms are fat necessarily but I have these issues. Anyway.
blouse patterns
Here are the two patterns I wanted to compare. I have used the tank pattern on the Vogue Tamotsu #2454 many times. It is simple and fits. There are no facings (you cut some bias strips of fabric instead) and I can get it over my head so I don't even put the button opening at the back. I have only used the B view (the mauve tank with the neck gathers) in the Butterick pattern (#4056) once and it was fine. However, I have decided as the years go by that once one reaches a "certain age", slightly covered up is better than bare. So I wanted to see how the D view (the pink one) in the Butterick would work.
It has a round neck which is not very low and cap sleeves which cover a little but don't bind like set-in sleeves. I rummaged around and found some polyester (I don't know why I ever buy it) but in a pretty pale green colour. It also has these raised flowers printed on it which act like plastic when you iron it. Man! Polyester is annoying enough to iron but when you add sticky plastic flowers, it's a good thing I was treating this as a muslin.
comparing patterns
I laid the Vogue tank pattern piece over the cap sleeve piece and saw that it should fit nicely. I cut two inches off the bottom of the Butterick pattern piece because I don't want to have to tuck in the blouse when I wear it.
back placket
I had a feeling that I would be able to pull this blouse on over my head but I made the back placket anyway. I was right and so I won't make the placket next time. This also means that I can cut the back out on the fold too and only have underarm and shoulder seams - so simple! I think I will just sew some buttons right to the placket and not even bother to make buttonholes for this green muslin top.
sample top
Here it is, almost finished. I sewed it up in just a couple of hours, including all the comparing and cutting out parts. I still have to machine sew the bottom hem, press the sleeve hems, sew on the buttons and re-press the neckline but that won't take long. I may even try to make bias strips instead of the facings that the pattern calls for and which I did make for the green top. Even though it is a muslin, I think I will try wearing it under a suit jacket to work at least once. Polyester and my body chemistry do not mix well so it may turn out that I will have "pit issues" wearing it. If that happens, I will wash it and put it in the give-away bag for the Sally Ann. But at least I know the pattern works.