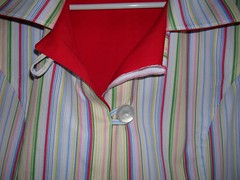
I hung the coat up and pinned a white button to the front and put the loop around it. I am a little trepidacious about how the buttons are going to feel on the inside but what the heck.
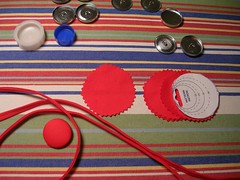
I could NOT find red buttons to suit me so I decided to go with self-covered buttons. Of course, when I went to get the forms, all they had was the "size 45" which is considerably larger than the white buttons I got for the striped side. Oh well. Then I made the red buttons and I really liked the way they looked and so I started second-guessing the white buttons I had already bought. Which started making me crazy because the loops I had made on the striped side were too small for the larger red buttons and therefore wouldn't fit the forms if I bought them for the striped side. I have therefore decided NOT to think about this any more and just go with what I have. I am sure when I am wearing the striped side out, the white buttons will look fine.
So now I have both sets of loops sewn on the coat and therefore, the fronts sewn up. I am really liking this! Yes, the red loops are bigger than the striped loops but when the coat is done up, you will only see one at the neck so I don't think it will matter.
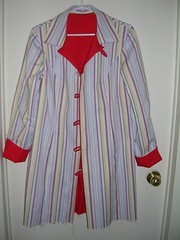
This photo also shows how I am planning to finish the sleeves. I made them as long as the pattern piece and they are a good 2 or 3 inches too long. I usually take sleeve pattern pieces up but I thought I would not do that for the first time I made this pattern. Now I am glad I didn't because I have decided to hem the sleeves extra long like this and fold the cuff up to show the contrasting side. You only see the opposite side of the coat at the neck so I think showing it at the cuffs will look cute too.
6 comments:
Cute! Yes, I think it's good to have cuffs that you can turn up. I always turn up the cuffs on my reversible coats, just because it's so cool that they're reversible.
Bbrug, AND you can make the sleeves extra long when it's extra cold and you forgot your mittens. :)
Thanks Sharon! And it looks cute reversed too, with the striped cuff on the red side. Now I just have to do hems and sew on the buttons and I can start Peter's "Hawaiian" shirt.
this coat is fabulous! i love the stripes on the coat and the ironing board! it's amazing how much patience you have for the little details. the loops were a great choice. what's that wooden thingy you used to press? did you use heat/steam too?
ps i'm making progress on my skirt and will post pics soon! every time i work on it i say to myself, "julia would know what to do here/julia would've done a much better job/julia would have much more patience!" but seriously, you did help me alot and i am very grateful.
What a compliment Miriam, thank you!
The wooden thingy is called a clapper. It is just a chunk of hardwood but it works fabulously. I wouldn't be without it, now that I finally have one. I showed one to my husband and he said he could make me one but after about a month and no clapper, I just bought one. It is very smoothly finished so you can't snag anything. Plus my husband said it probably would have cost him $30 at the lumber yard anyway, never mind all the time to make it, and it only cost me $20.
Miriam, forgot this part - yes I use a steam iron first, to press the garment and then when the area is hot and steamy, I press the clapper on it to make it truly flat.
Post a Comment