
I am so pleased with the way this coat turned out, especially because I had not made the pattern before AND I made it reversible which was not called for in the instructions. It is cute and comfortable. The only thing I might change later is the placement of the buttons, but more on that in a minute.
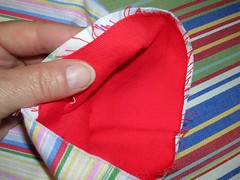
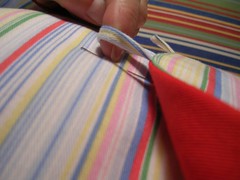
First of all, I hemmed the sleeves. The two sleeves nested inside each other and I just wanted to turn up about a half an inch to tuck in the raw edges.
I decided to literally do just that - tuck in the raw edges. I folded up the striped side and then the red side and put pins all around.
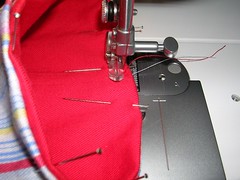
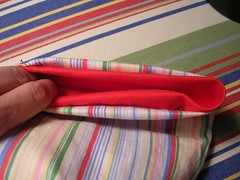
With red thread in the top and white thread in the bobbin, I sewed around the bottom edge of the sleeve with the zipper foot like topstitching. Whenever I wear the coat, I will fold up the cuffs, exposing the contrasting side.
For the hem at the bottom of the garment, I simply ironed up a narrow hem (folding it over twice) and sewed all the way around, switching the threads to red or white, depending on where I was sewing. I folded out the seam allowances at the front edges to reduce the bulk a little there and make it easier to sew.
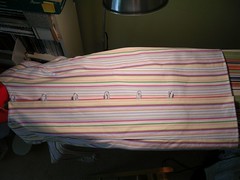
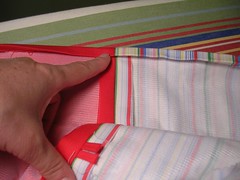
For button placement, I laid the left side of the coat on the ironing board and then wrapped the coat around and overlapped the loop (right) side onto the left side. Then I put pins in at the ends of the loops. On the striped side, I just followed the same stripe all the way down. For the red side, in addition to putting pins in for the location running up and down the front, I also measured from the front edge to make sure the buttons were all the same distance from the front edge.
I tried the coat on at this point, to see how the overlap would work. In this photo, I have the camera under my chin, pointing downwards. I realized that the buttons needed to be much farther away from the front edge than they are with regular button holes but I may have second-guessed myself a little and put them too close to the fronts. It may turn out that after wearing the coat in real life, I will move the buttons a little farther away front the front edge, to provide more overlap. Time will tell.
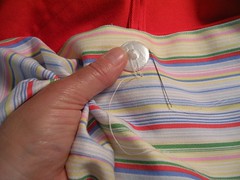
I ended up sewing the button just to the side it matched. I didn't sew right through to the other side. I was concerned that in wearing the coat, the fabric on the one side would get pulled by the button and that it might also not be strong enough, so I considered sewing right through to the contrasting side. If I had done this however, it would have meant seeing the sewing on the contrasting side. For a while, I considered sewing a small button on the opposite side as an anchor as well as to hide the stitching. I decided against that because it would have looked odd and busy, to have a line of six small buttons (or I also considered beads) running down the right-hand side of the coat. If it turns out that the buttons pull or even become loose with the way I have initially sewn them on, I can always go to the anchor button later.

In the end, I also ran a line of topstitching down the front edges, to ensure they would stay nice and flat as I like. I am not anxious for the weather to turn cool enough for me to wear this cute and totally fun coat, but it's ready for the first day the temperature hits single digits!
16 comments:
i love your coat!! i've been following the progress, it looks sooo lovely. is this your own pattern?
Thanks Blossom! It is so comfy, being all cotton and all. I made it from McCall's pattern 5060. One day I might learn to make my own patterns but for now, I use the commercial patterns that other people make. I just alter them and then get a little bit creative - hence the reversability.
Nuha Azam, you are very welcome! I am glad I could help. I am sure your English is 100% better than my other language, which is French, and not very good at all.
I am doing some more sleeves on my very next project, which is another shirt for my husband. I just finished cutting it out and will blog about it tomorrow. Enjoy!
So. Adorable.
I would be grinning all day if i had a coat like that. And the color totally suits you! It goes great with your complexion and your hair.
Thanks Bbrug, I love it too and I haven't even worn it. "They" say red is a neutral so everyone looks good in it but I know I always get compliments when I wear red so it is good for me.
very sharp! i agree it complements you. still loving the details...
What a beautiful coat and such fun colors. I used to have a magenta winter coat and would always get comments because everyone else was wearing boring gray, black or brown. I'm sure this coat will gain many complements when you wear it!
Thank again Miriam! You are braver than I to attempt that fabric on your skirt.
Thanks Sharon. Yes I left the bottom hems loose. I thought it would hang better that way.
Thanks Sandy. A magenta winter coat! Lovely idea. I made one a couple of years ago in a faux fur leopard looking print and every time I wear it, I get compliments. But a bright colour would be great for our long Canadian winters. Hmm, do I need a third winter coat?
Hi. I just kindof stumbled upon your site today. Beyond replacing buttons, I'm a complete dunce when it comes to sewing. I have a sewing machine I hope sometime in the next month or two to figure out how to use. Do you have any suggestions for someone like me who really wants to learn how to make her own clothes? (and in the process, master her sewing machine?) Thanks.
Katherine, you are exactly the audience I had in mind when I wrote the sewing book for which I'm now trying to find a publisher. First of all, you have to get to know your machine and what it can do. Having the manual is really helpful, so you can learn how to thread it (pretty much the most complicated thing). Assuming you have a manual, sit down and spend some quality time with the machine. Get some piece of fabric (an old pillowcase is ideal, nothing too thick), thread the machine, and start running the fabric under the needle. Make different stitches in length and see how it all feels. Once you are comfortable handling the machine, then you can progress to actual sewing. I compare learning to handle the machine with learning to drive. You have to spend time on it before you can become competent. And there's so much more! Come on back to the blog here and maybe get inspired.
Julia, just a quick drop in to tell you that I think your coat is fabulous and fits so well too. Well done!
Heather
Fantastic job on the reversible coat. Really a nice looking coat. You do marvelous work.
Your mother (who doesn't like using computers) says, "Tell those girls to have courage and when things really look wrong, rip out and start again."
The old man's comment is literary, since I don't believe that I have much credibility with a sewing machine. The utility of your sewing blog points out the necessity for generational change. I can achieve a limited amount with my old way of communicating; you have the potential to do so much more with yours. Well done! Good work!
Heather, thanks so much! How are your curtains coming?
Nuha Azam, thank you for such a wonderful compliment. I would love to show what you have written to some publishers so they would see that my book may be worth publishing.
Linda, thanks so much. I think you do great work too! And I love Dress A Day. I click on it obsessively every morning.
Dumb and Mad, you are among my top fans and I love you for it. Keep on reading and later, you can say you knew me "when".
Good Job! :)
Thanks Sven!
Post a Comment