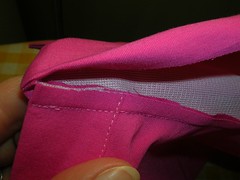
The first thing I show is the inside of the collar, after I have sewn the one side of it onto the shirt. I sewed the collar to the wrong side or inside of the shirt so that I could sew the folded over edge of the collar facing around the outside by machine. In this photo, you are looking at the trimmed seam allowance and the folded under edge of the collar facing.
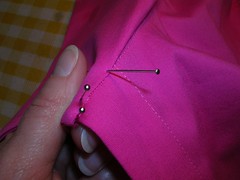
Next, I show the collar facing has been pinned to the shirt, just covering the line of stitching. As I sew this fold down with the zipper foot, I will make sure that the line of stitching is concealed and that I get as close to the fold as possible.
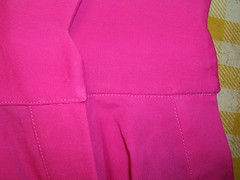
In this next photo, you can see the inside of the shirt (on the right) and the outside (on the left). You can compare them to see the difference. The line of top stitching on the right side (outside, the left part) is just above the fold on the collar facing. On the wrong side (the inside, on the right), you see the bobbin thread has tracked just below the fold of where the collar was sewed to the shirt. You can also see this same difference in the stitching on the front band.
The shirt as it is hanging up needs a good pressing. I have marked with pins where the buttons are going to be sewed on later this evening, while I am watching tv.
My next project will be posted as one big blog entry. I am making something for my husband and while he doesn’t really read this blog, he does notice when I post new pix to Flickr and I want this thing to be a surprise for him. When I am done that, I will make the yellow shirt just like the pink one.

8 comments:
Lovely shirt and love the color. So spring!
Hi Julia,
It has been a long time since I posted. I finally got the pic up in Flickr but don't know how to invite you to see it. My Flickr name is SewSilkKnots.
Heather
Julia here is a link, I hope it works because I still can't figure out how to hook you up to my pic.
http://www.flickr.com/photos/74102394@N00/?saved=1
Hi Julia,
I changed the setting, I didn't know you wouldn't be able to see it with my 'family & friends' setting.
The seam uses the regular 1.5cm allowance. off-set the seams by approx. 0.5cm, overlapping this 0.5cm. Stitch on the edge of the overlapped fold, then fold flat, press and stitch again. A very easy method for making this seam.
When I do curves I first stitch a 0.5cm line along the first edge to be folded, this is my guide and somehow that line of stitching makes it easier to fold over the fabric.
I hope you will find this interesting.
Heather
Heather, thanks for going to all that effort to get the photo up on Flickr and working. That is an interesting way to make a flat fell and maybe more traditional than the way I do it. I am not sure it would work on a curved seam like an armhole and I think I'd be afraid to try it there!
Now that you have a Flickr account working, you should post some pix of your own sewing. Or anything else you like!
Sharon and Linda, thanks for the comments! I think I will work on the lovely yellow shirt (same as the pink) next, perhaps as a decoy for the thing I'm making for my husband. These colours are so nice and bright and fresh.
Hi Julia,
Happy the pic came through. I use this seam on all the shirts I make including armhole seams.
Yes, now that I posted that pic, I hope to show some of my works in the future......too shy...too shy....
Have a good day!
Heather
Once again, terrific detail. Great idea to sew only one side of the collar, then tuck in the other side. Not sure I'd be able to get the stitching so consistent on BOTH sides like you did! PS - I've finally posted new pics to my blog of my new studio! Come and visit!
Post a Comment