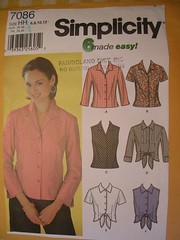
I have made this pattern before but this time, I am using “real” shirt fabric, not that weird ugly stuff I am convinced I may never wear. Never mind.
I have gone back to my stash for fabric. I bought this piece of pale, pale green because I liked the neutral colour and because you could see the weave a little, without it being textured. It was a remnant but I figured I could get a blouse out of it, if I didn’t go for long sleeves. As it turned out, I did get 3/4 length sleeves cut.
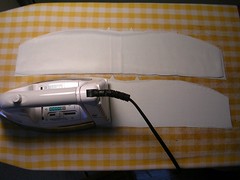
Since it had been sitting in the box for a while, it was wrinkled and I know better than to try to lay out and cut out the pattern on wrinkled fabric. So I ironed it first.
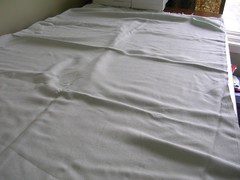
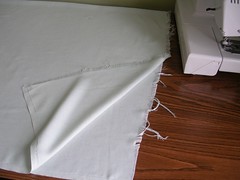
When I laid it on the table after ironing, I noticed that it had been cut crookedly so I didn’t line up the cut ends but instead, lined up the selvages, then held it up by the folded edge and let the grain of the fabric flatten out by itself on the table. The ends are therefore WAY out of register but I know the grain will be straight.
I have noticed that when I blog about a thing I am making, I don’t put in ALL the steps because that is what the pattern instructions are for. Rather, I concentrate a little on one aspect or another. This time, interfacing comes under the microscope. But first, a tailor’s tack. The last time I made this pattern, I didn’t use the cuff facings for the bottoms of the 3/4 sleeves. This time, I am. You have to sew a “V” shape and you can use regular chalk marking along the seam line but I decided to put in a tailor’s tack at the point of the V to make it easier to see, especially with the interfacing in the way. You use a long piece of thread in a contrasting colour and you take a single stitch at the point you want to mark. Pull the thread through leaving a tail about 2 inches long. Now take a second stitch in the same spot, making a thread loop about 2 inches long and leaving the second tail of thread, also 2 inches long.

Once you have unpinned the piece, pull the two pieces apart and clip the long threads in the middle. This ensures both mirror image pieces are marked in the same spot. Even after ironing on the interfacing and sewing everything, you can pull the contrasting threads out, using a pair of tweezers if they seem stuck.
On most shirts these days, I like to interface both sides of the collar (and cuffs). I find it makes for a nicer collar - stiffer and more opaque. Most pattern instructions call for interfacing only one side. Here, I am fusing the interfacing to one half of the collar. You can see it is not fused to the second part of the collar yet.
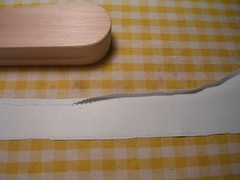
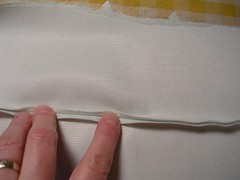
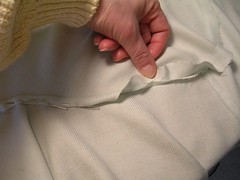
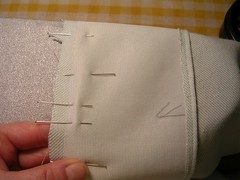
All along, I have emphasized how important pressing is and how the clapper really makes a difference. Here, I have pressed the raw edge of the front facing piece under, in preparation for sewing it down to make a nice, finished edge. (There is also interfacing on the facing.) On the right side, I have used the iron but on the left side (in the photo), I have also used the clapper. You can see the difference!
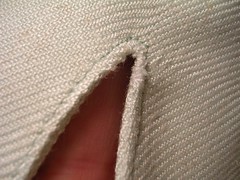
Choosing the right colour of thread was tricky with this pale fabric. I had bought some matching green thread and it seemed to work but I thought I would sew on a scrap of fabric with some white thread too, to see what it would look like. In the end, I decided to go with the green thread but now that I have finished, I know I should have used the white.
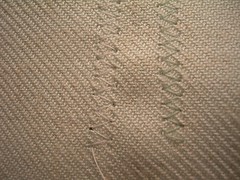
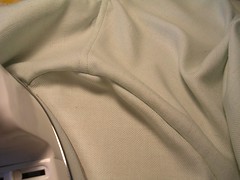
Here is what the underarm looks like with the green thread. Acceptable but it would have been better in white thread.
In the next photo, I have sewed the two pieces of the interfaced collar together. Before I turn it right side out and press it from that side, I press the seam open as far as I can. I know from experience that this little step will give me a much sharper edge when I am done.
After the collar is turned and pressed all over (with liberal use of the clapper), I decided to top stitch it. When you top stitch this close to the edge, it is called edge stitching. Use the zipper foot and be very careful and gentle about guiding the piece under the presser foot and eventually, you will get good at it.
I put in this next picture because it shows all the pieces coming together. I have sewed the collar and the front facings to the shirt body and I am about to sew down the collar facing and tuck all the raw edges inside.
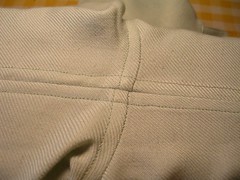
After sewing the sleeves on in the almost usual fashion (if at all possible, I prefer to sew the sleeve on around the armscye first and THEN sew up the underarm and side seam), I press the seam allowances toward the body of the shirt. I use the seam allowance that belonged to the sleeve to fold over and make the flat fell. It is “bigger” and stretches more to cover more than the seam allowance that belonged to the body of the shirt.
After pressing, I trim off the seam allowance that belonged to the shirt body.
Once I start folding over the seam allowance to make the flat fell, it becomes obvious that I have more fabric to work with using this side of the seam allowance. It buckles and folds up in parts. You just have to be patient and re-fold it until it lies fairly flat.
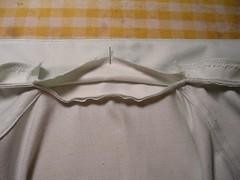
In the next photo, you can see that the folded-over seam allowance wibbles and wobbles a bit but once it is sewed down, it will be fine. It is on the inside after all and its purpose is to encase the raw edge of the seam so it works for me.
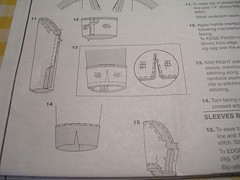
I took a photo of the pattern instructions so you can see where I will be sewing when I get to the sleeve facing.
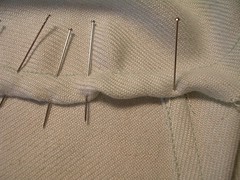
Now that I have a sleeve ironing board, I like to use it when I am doing any work with sleeves. Here I am pinning the facing to the sleeve.
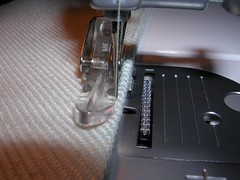
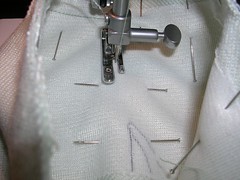
When I started sewing the first cuff, I put it on the narrow sleeve part of the sewing machine, with the machine inside the tube of the sleeve. I forgot that you can’t turn it around sufficiently to sew the “V” part and I had to make allowances for that. So when I sewed the second sleeve, I did it the correct way and took pictures as I went. You sew inside the tube created by the sleeve. In this next photo, I have sewed around the bottom edge of the sleeve and I have just made a right angle turn, sewing UP the sleeve toward the tailor tack mark at the end of the V.
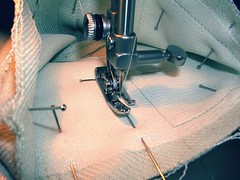
In the next photo, I have sewed up to the end of the V, turned around and am sewing back out to the end of the sleeve, to continue sewing around the circumference of the sleeve. Have another look at the pattern instructions if this is confusing.
Once I trimmed the seams and turned the facing/cuff to the right side, I realized that I had trimmed too close to the point of the V. A tiny bit if the seam had frayed out to the right side.
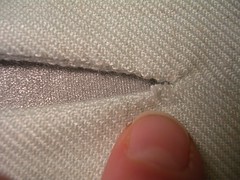
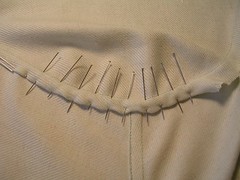
I had planned to edge stitch the cuffs anyway so I proceeded to do that and gave them another good pressing. Then I took some white thread and took a few tiny stitches, catching in the frayed part of the V. Here is my repair which I think is hardly noticeable.
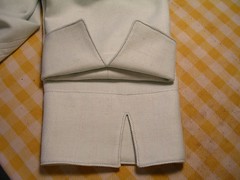
Here are the “cuffs” which I can turn up or leave down, as the mood suits me.
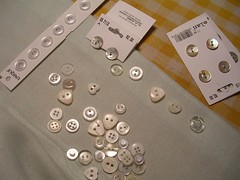
Finally, I have to choose some buttons. I looked at my button stash and here is what I have. Since I need about 6 buttons (I like them closely spaced), I have to use the plain old shirt buttons on the card, otherwise I have to go shopping for buttons. I have enough shell buttons (on a small card in the picture) but I am not convinced they will work as well as the plastic. Other than that, I am done and on to the next project!
7 comments:
terrific! the repair is unnoticeable and the workmanship perfect as usual. every time i see your blog i want to run down and sew but my studio area in the basement is getting finished finally and i am going through serious withdrawal. keep the entries coming - it's the next best thing to sewing!
Hey Sharon. Interestingly, someone else just asked me the same thing and this is what I said in an email to them:
25 years ago, I used to sew "soft furnishings" - drapes, pillows, etc. - and I never did calculate my hourly wage but it was likely around $0.50 per hour when all was said and done. To make a [jean] jacket and charge about $20/hour would end up costing the buyer about $200 in labour costs alone. Who pays $200 for a jean jacket? If I went "couture", there might be a few people who could afford me but then I'd also be dealing with their expectations - whatever they are - and that would take all the fun out of it. No, the only way to make money at clothes is to sell something made with efficiencies and lots of 'em.
It's the time that is the killer. I once saw on Discovery Channel's "How it's Made", a pair of jeans made in 12 minutes! They were obviously low-end jeans but it was the assembly line and specialized tools that made it possible. At English Cut a tailor will make a made-to-measure jacket for $2300 Cdn.
I do on occasion make things for other people as gifts. But only if I think they appreciate it. I am going to be making one of those jean jackets for my niece, after we go shopping and she chooses the fabric. And I make Peter casual shirts.
Miriam, I wasn't going to blog about the next thing I'm making because it's just out of left-overs from my stash box and I've made the pattern before. But since I know you are out there, sewing vicariously, I will blog away! I thought I would stick to blogging about something "new" each time - either a technique or pattern - but now I will just sew as the mood strikes, blog and let the chips fall where they may. Thanks.
Hi Julia, your last 2 projects are really nice. May we see a pic of the finished blouse please? Is it possible to send you a pic? it is a pic of a technique. I am making curtains, six of them and then some more, boring boring.
Heather
Hi Heather, I'm going to post a photo of the finished blouse in the next blog entry. If you want to see it ahead of time, have a look here.
As for sending me pix, I am reluctant to give out my email address. Why don't you have a look around Flickr when you're there at my blouse picture and start yourself up a free account? It is really simple. I started with a free account and you are allowed 200 pix. I went "pro" because I now have over 200 pix with my two blogs that I use pix in. Then you can send me the link in a comment for your pix.
I used to make curtains all the time but haven't for a while.
If you are the Heather who lives in my neighbourhood, then you already know my email address.
Julia, I am the European Heather. The finished product is gorgeous. Did your machine do those buttonholes too? Is it poss. to have a close-up of the buttonholes? I am a buttonhole freak...lol. I will certainly check out the Flickr. Didn't know about it, I will try to get the pics in later. I understand about not wanting to publish your email address.
'til then.
Hi again Heather! I should have known you were not my neighbour - I don't think she sews curtains.
Yes, my Singer automatic buttonholer made those buttonholes. It works very nicely on regular weight fabric but give it anything thick and it skips and sputters. Sometimes I have to make them by hand and that is a lot of work. In fact, I posted a picture of a buttonhole I made by hand here. That was before I got this machine - the old machine wouldn’t make them at all. If you look around in the set, it will show how I didn’t make them perfectly on that pink shirt either.
Do look around Flickr. I really like it and it gives me a chance to post pictures anyone can see. I was having a terrible time getting Blogger to post any photos and this was the answer. Also, if you click on the photo in the Blog, it will take you to Flickr where you can then look at the photo in its original and much larger size, for detail.
Post a Comment