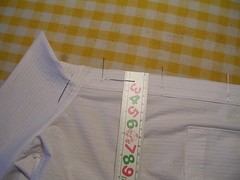
Mark this critical point on the front band and then start measuring up and down the front from there, to determine where the other buttons will go. If the buttons are too far apart, the front will also gape. On this shirt pattern, I place the buttons three inches apart. On a looser shirt, I may go up to three and a half inches apart. On Peter’s shirts, I place the buttons about three and a half inches apart. You have to get a little experience before you get comfortable with this process. If in doubt, place buttons closer together rather than farther apart. Obviously, I like them closer together.
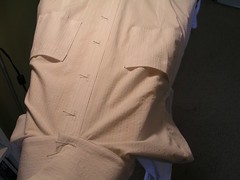
I have made this shirt before so I place the right side of the front of the shirt on the ironing board and use an existing shirt in the same pattern as a template. Another thing to note is that many women’s home made shirts or blouses tend to have the buttonholes sewed horizontally, so that the buttons do not come undone easily. I often do make horizontal buttonholes but on this pattern, because it has front bands that are quite narrow, horizontal buttonholes wouldn’t work. Also, since it is a fairly “tailored” looking shirt, I want it to look more like a purchased man’s shirt than a home made blouse, so I make vertical buttonholes.
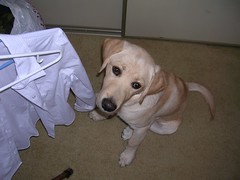
Once in a while, glance down and ensure that your sewing helper is being good.
Don’t forget to mark the buttonholes on the cuffs as well and don’t make the mistake of making them fit too tightly. Put the buttonhole close to the one edge and you can always move the button on the other edge to make the cuffs tighter if you want.
I use a Singer sewing machine that has an automatic buttonholer. It works pretty well although it does NOT like bulky fabric and will skip stitches under those circumstances. Even on something like this shirt, it skips stitches at the neck where there are layers of fabric. I trimmed down all the seams but they still hold the buttonhole attachment up too far and it doesn’t like that. I have learned to press down on the attachment as I am sewing with it but even that is not foolproof.
I like to start with one buttonhole and then, without clipping threads in between, move from one to the next until they are all done, including the cuffs. If you don’t clip the threads in between making buttonholes, the tension is maintained on the thread and you don’t have to worry about loose ends getting sucked into the bobbin (as is one of the banes of my existence).
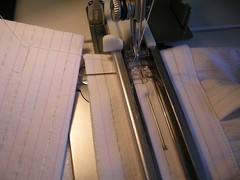
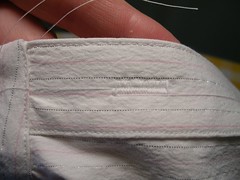
In the next photo, you can see where the stitches skipped on the topmost buttonhole I made after doing the collar. I didn’t lean on the attachment as much as I should have and now I will have to fix this with some hand sewing. (In fact, when I cut the holes open, I did a terrible job and clipped threads all over the place and now I have an entire evening’s worth of hand sewing to do.)
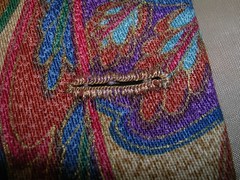
Before I got this machine, I made buttonholes by hand. To do a nice job (especially on a small, lightweight buttonhole) you really have to be patient and picky. The next photo is a buttonhole I made on a vest, to show how that works. Not flawless but pretty good.
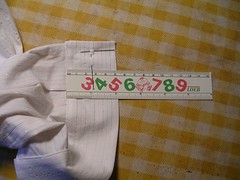
Once you have the buttonholes made and cut open, lay the shirt on the ironing board and line up the two fronts and, using the buttonholes as a guide, mark where the buttons will go.
Now you can sew on the buttons while watching tv and your shirt will be finished!
5 comments:
Hi Jule,
This is really good. The pictures are really helpful.
I wonder if they still teach home ec in high school anymore. If so, maybe they should know about your website.
I love the injection of the picture of your "sewing helper". Somehow it makes the whole process seem friendlier and less intimidating.
Norah! If I had prizes, you’d get one for being the FIRST to comment on this blog! Yay!
When I took that snap of Rocky, he looked so cute I just had to add it to the blog. And no, I don’t know if they teach home ec any more. I wonder.
I am making some oven mitts right now but I won’t blog about them I don’t think. I have discovered that there is NO advantage to making oven mitts over buying them. So far, I haven’t even sewed a stitch and I’ve already spent more time on them than I would have spent money buying some. It’s cutting out three layers for each side of each mitt and then pinning them all together so you can quilt them. Well, maybe aa single blog entry...
Anyway, welcome!
You're right. You did lure me back!
I think you should put the oven mitts on your website for two simple reasons. First, they are a relatively simple thing to do, not nearly as intimidating as a shirt, or in other words, a fathomable project to tackle if you want to have a go at sewing. And second, the oven mitts you can buy in the store are not custom-made. In fact, most oven mitts I've seen aren't very nice. The nicest ones I ever saw were a pair that Mrs. Carncross gave to Mum, which were from Suttles and Seawinds. I can imagine they weren't cheap to produce or to buy but someone bought them, didn't they? If a woman or a man wants a coordinated kitchen (s)he'll probably try to make her (his) own oven mitts or (s)he'll pay someone else to do it for her (him). Either way, someone will want to use your directions, encouragement and inspiration.
Remember, what seems insignificant to you is a miracle to someone else. Think about the way Post-It Notes were invented.
Hi again Norah, I didn’t take pics of the mitts as I sewed them so I am not sure they are going to be blogged. But I hear what you are saying about things being easy for some and not for others. I haven’t even finished those mitts because I have to make bias tape for the raw cuff edge, good grief. I was going to “cheat” and use some purchased white tape I have but it doesn’t look proper so I have to make some out of the fabric I am using for the mitts. It is some of that drapery end stuff that Alison (of Alison and Bill) left me when she moved.
The thing I really don’t like about purchased mitts is they aren’t lined. They just use the mesh back on the quilted fabric on the inside of the mitt. I am lining mine with plain white broadcloth so they will feel much nicer when I am wearing them. So now I might as well blog them but I still won’t because I wanted the blog to be about “projects” and this was just a tossed-off thing because my existing mitts were so awful I just had to wash them but I was afraid they’d disintegrate so I wanted to have some new ones first. It’s like washing a spot on the wall - then you have to do the whole thing. Oh well, next time!
Thanks Zoom! I learned the "one project rule" the hard way. :) I'm impressed that your hats are chick magnets! The only thing I've found to be a chick magnet so far is a Labrador puppy.
Post a Comment