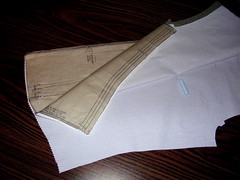
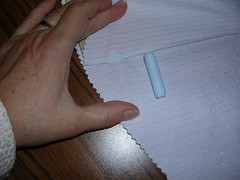
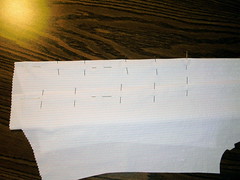
Once everything is cut out, I mark the pieces with the dots and darts. I try to remember to fold the fabric wrong sides together before I lay it out to be cut (in this case, the fabric is the same on each side so that was easy). When the wrong side is facing itself and you open up the fabric to where a pin is marking a dot, you can use chalk to mark both sides, the mirror images, of the fabric at the same time. I find it cuts the marking time in less than half because you don’t have to realign the pattern piece and remark the dots.
Once everything is marked, I usually pin the darts into sewing position right then, in case the chalk rubs off and I can’t find the marks later. I like to start at the wide end of the dart and finish with a little back stitching at the point. I know some books say to tie a knot because backstitching can make a lumpy point but I don’t usually find this a problem, especially if I am really careful once I get to the point. This shirt has four long vertical darts and nothing has to be sewn before they get made so I put those pieces aside.
Next I get out the interfacing and cut out the pieces that require it - the collar, front bands and cuffs. I am using iron-on interfacing even though it sometimes bubbles a little because I have to iron this shirt every time I wash it anyway and I can smooth out the bubbles then. Then I spend the time ironing on the interfacing. It’s a bit tedious but you can listen to the radio while you do it.
2 comments:
Hello Julia,
are you still out there?
are you still updating your blog web site?
are you still sewing?
I was very impressed with your web site, you seem to be much more advanced with sewing skill than I.
Have you sewn men's neck ties? I am having difficulty finding appropriate interfacing, one is too thin, one too thick, the fusibles are too restrictive, and on and on. Can you make any suggestions?
Thank you,
Bev Salisbury
Oregon
Welcome to my sewing blog Bev! I went to your wood site and your things look impressive too. My last update to this blog was Nov. 10, where I finished the shirt and made buttonholes. I just cut out a pair of pants and will be blogging about those soon. But I have a nasty cold and it is keeping me on the couch for a day or two. I also have my puppy and his blog to keep me busy and he gets more updates than sewing (at puppywalking.blogsot.com). Out of curiosity, how did you come to find my blog?
I have looked into making men’s ties but it seems so much more efficient to buy them. You have to buy enough fabric to make one on the bias so you end up with lots left over and it seems such a waste. However, if the interfacing you are looking at is not right (and I would never use fusible on a tie with the bias cut and delicate fabric), try using something like a light cotton broadcloth. Interfacing doesn’t have to be limited to the stuff under the cutting counter at the fabric shop. You could also try a polyester lining fabric, depending on the material you are using for the tie. I only like pure silk ties so I would go with a cotton lining or another piece of silk. In fact, have a look at a purchased tie and see what they use. If memory serves me, sometimes they use a material like cheesecloth. Good luck!
Post a Comment