
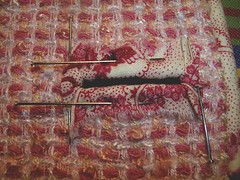
First: the buttonholes.
I realized, especially after thinking about what Lorna wrote about taking a lesson for bound buttonholes, that I was not making "real" bound buttonholes. I made real ones on my faux fur winter coat. You make the tiny welts and turn the welt fabric to the inside of the jacket front, which is inside where the interfacing is, between the front and the facing. Then you finish the buttonhole on the facing in a similar way and bind them together. I sewed the "welts" to my silk jacket, sewing through all layers at once and turning the welts to the inside but where they showed on the facing. The above photo shows one finished buttonhole at the top, from the outside. The second buttonhole has the welt fabric zigzaged to it from the outside. There is a line of basting in dark green thread running down the middle of the welt area. That's where I cut the buttonhole open.
I know I showed this before but here is the buttonhole from the inside - the facing side. I have tucked under the raw edge on the short sides of the "welt" and pinned them down.
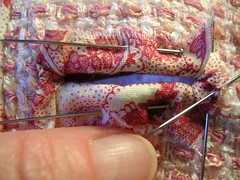
Here, I have sewed the fold on the short ends down to the jacket facing. On your right side, I left the needle in to show the scale and the stitches. The stitches are very small but not invisible. But the silk fabric is very forgiving and doesn't show all sorts of insults. Then I had to tuck under the raw edges on the long sides of the "welt" and sew them down too. You can click on these pix and make them larger at Flickr for detail.

Here it is on Rose last night. I am having an "issue" at the moment with the top button area not wanting to lie flat. I am not sure I will want to button it all the way up to the neck but I should press that and maybe it will work better.

I decided to model it with a yellow t-shirt because, a) I haven't decided what shirt to wear as it is only -2C out there right now and b) the yellow suited the pink because if it's warm background - it is not a blue-pink.
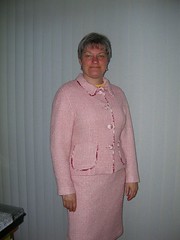
Here it is all buttoned up with the top button "issue".
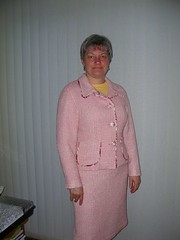
And here she is with the top button undone. Whew. I guess I should make the satin blouse next but I haven't decided.
14 comments:
It is BEAUTIFUL! You did an outstanding job!
Wow, looks great. Well done!
EXECELLENT JOB! CHARLENE
I stand (well, sit, actually) in awe of this jacket. Fabulous! And thank you so much for sharing this.
Thank you all! I wore it too and was it ever nice to wear - comfy with a loose casual feel. I ended up wearing a cotton turtleneck because it was -2C when I left this morning.
Beeyootiful! I started following your blog just when you started to suit, and it's been so much fun to follow your work. So inspiring to a novice sewer!
that is a very beautiful suit and the embellishments are ideal. It looks very neat and ladylike buttoned right up, but it would depend on what shirt or top you plan to wear underneath as to whether you wear it open (which is a more corporate look IMO despite the pink colour).
Thanx Lynnel, it's always nice to be someone's inspiration!
Thanx Kristy. I AM kind of a button-up gal. I don't think it looks SO pink in real life, as it does in the photo. But I might be kidding myself.
Whaaa! It's done and being modelled!
Beautiful job Julia, what a journey...lol...I love it and of course, you are to be envied, no fitting problems.
Now, if only you hadn't worn that yellow t-shirt! See, I had to find something to pick on....lol...
Please make a sleevless top out of the lining fabric if you have more left.
Oh, almost forgot to ask...did you cut the buttonhole fabric strips on the bias and were they interfaced?
Apologies if you blogged on this already, I might have missed it.
I was wondering about that. I've never made bound buttonholes before. Got to check my books.
Julia, give yourself a big hug.
Heather
Beautiful!! Love all the detail work.
Thanks Heather! I DO plan to make a top from the shiny satin lining. I didn't use bias strips on the buttonholes - just straight grain pieces and I didn't interface them. It's not very structured, this jacket and that seemed like overkill especially as I wasn't making them the "correct" way to begin with. I hug you back!
And thanks too Debbie! Now if only I can get started on another project, but the weather is too enticing and I want to be outside.
What a great fit. You must be so pleased! You did a wonderful job and the outfit looks great on you :)
Gorgeous. I'm still way back in awe of how you used contrast material for the piping, but the finished product is amazing. Thanks for sharing the step-by-step!
Thanks Ann and Sarah! I am pretty happy with it too and when I get back from France, I will be making the "real" Chanel jacket... maybe.
Post a Comment