Happily, Mum has started to regain consciousness! We have toe wiggling on command! I'm so looking forward to seeing her this weekend. By then, she'll be way past toes and into eyebrow raising I hope. I thank everybody out there who is wishing her well or praying for her.
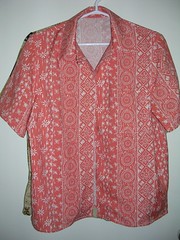
In the meantime, I'm making that camp shirt.
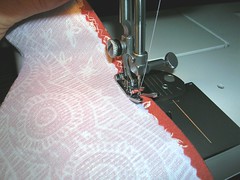
The pattern calls for front facings. I have learned the hard way that if I spend a little time finishing the raw edge, I won't get fraying threads later on after I wash it. I iron on the interfacing and then iron down the free edge. Next, I sew it down with a zigzag stitch.
Sometimes, I use a straight stitch but the zigzag looked okay on this busy print. I know no one sees the inside or wrong side of one of my shirts but me, but still, I like the inside finishing to look nice.
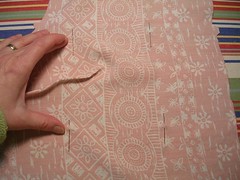
You can't see them in the photo but I marked the four corners of where the pocket goes with blue chalk. Then I put pins in so I'll be able to see the dots on the outside or right side when I turn over the left front piece. In the photo, I haven't ironed down the dart yet either.
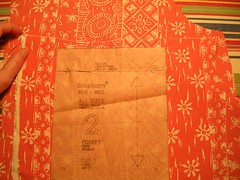
Next, I take a piece of uncut fabric and line up the stripes with the front piece where the pocket is going to go. Then I put the pocket pattern piece on the fabric so it lines up (vertically) with the pocket markings. I usually cut out the pocket piece with pinking shears so I don't have to otherwise finish the raw edges once they are folded to the inside. Check out a store-bought man's shirt and you will see that the raw edges of the pocket are not finished either.
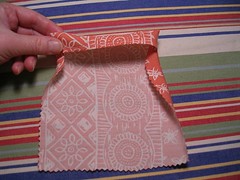
With the pocket itself, first I iron over a little fold of the top raw edge and sew it down. Then I sew the top, right sides together as the instructions indicate, along the sides at the top and turn it right side out.
Then I iron down the top and continue down the sides and across the bottom, to make the pocket look finished. At this point, I also sew down the top fold so that you see one line of stitching on the right side. There are two lines of stitching on the inside of the pocket top because I have already sewed down the little fold. It's over-kill I know but I tell you, my pockets never come apart! :)

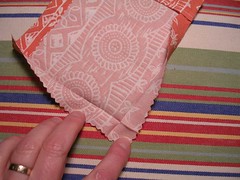
Once I have the folds all ironed, I unfold the bottom corners and turn them into mitered corners. Again, who cares? But I do because I think it makes them neater.
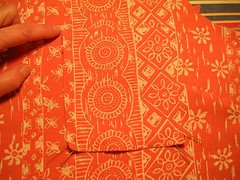
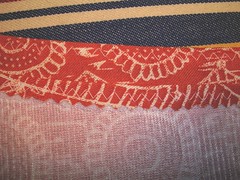
There's that darned yellow cast to the photos again. I think that happens when the flash doesn't go off. Anyway, when it came time for me to place the pocket on the front for sewing, that's when I noticed that, as cleverly as I had lined up the stripes vertically, I had neglected to notice the horizontal pattern! And the pocket therefore doesn't match the shirt front exactly. I could have just made another pocket. But I didn't. And so I decided to rationalize that I like it better this way, where the pocket doesn't entirely disappear into the shirt front. And the reason I did that was because I didn't notice the horizontal issue until
after I had sewed the pocket to the shirt. sigh.