Thursday, February 28, 2008

Cutting the raw silk

cutting the raw silk
It is taking some time to cut all the pieces out properly. Here is the upper collar, which I decided to re-cut. It had to be cut on a fold and even though I was careful about the vertical lines, the horizontal lines of pink didn't line up with the notches. I saw that the collar will look a little bit crooked if I use this piece. Also, there was a substantial flaw, where the pink threads had broken. I was sure it would end up in the seam allowance but because it was crooked anyway, I re-cut it and was done with it.
cutting the raw silk
It's going to be close with the skirt! There is just barely enough in the width to get the front and back pieces cut. Plus I will have to be very careful cutting the front, as it is cut on a fold. I will cut the back pieces out individually to be very sure that the vertical threads are totally straight down the back.

Tuesday, February 26, 2008

A Chanel jacket

I've decided on the Chanel jacket for my next project. I'm going to use an old pattern I have made several times before but not recently.
a Chanel type jacket
It is New Look 6684. I actually never made it with the faux fur accessories and I have never made it with the collar either. At the time, I wanted a short, boxy jacket and it worked well.
a Chanel type jacket
If you look at this Chanel jacket in my Couture sewing book, it looks like it could use this sort of pattern. I won't be using a contrasting fabric for the facing and collar but I will have to go hunting for the right trim. I am thinking piping for the edge of the collar and fronts and using the same piping fabric to trim pockets.
a Chanel type jacket
I am going to use the plainer raw silk I got as a Fabricland bargain. I have two pieces of the raw silk but just enough in the fancier one with the gold thread to make a jacket. In the pink, I have enough for a skirt too. There are all kinds of flaws in the fabric so I will have to be careful cutting. I am going to use a nice pale pink satin for the lining and I think I have enough of that to make a shell or tank type top, as Chanel did for her outfits.
a Chanel type jacket
Here's the jacket in a maple leaf tartan that I made more than 10 years ago. (Note the maple leaf buttons!)
a Chanel type jacket
Here's the back. You can see it has darts to give it a bit of shape and I think I will also incorporate them into the silk jacket, although I may decide against them as I start fitting it.
a Chanel type jacket
And here is the inside. One of my Threads Magazines has an article about putting a thin line of piping down where the lining is stitched to the facing and I may also add that detail to this jacket. So after I cut it out and ponder on it for a while, I will have to go looking for piping materials.

Monday, February 25, 2008

Shirt finished

My parental units were late arriving on Friday and since I was worried, I finished the shirt while I paced! Turns out they just had had a nice long lunch with relatives so it was all good, including finishing the shirt.
striped shirt
As I expected it looked and felt great. Since I had finished it, I decided to wear it on Saturday to my 50th birthday party!
23 Feb 08
I also made the the mauve corduroy jacket in September, 2006. And now, for something completely different. Or not.

Thursday, February 21, 2008

Cotton shirt

cotton shirt
I decided to make up one of the cottons - the stripe with a little bit of Lycra in it. It is such a pleasure to sew with fine fabric. This stuff makes itself, really, especially as I have made the pattern quite a few times. The last time I made it was the peach shirt but there are better pictures back last January when I made it in some candy striped cotton. It is Simplicity 9877.
cotton shirt
I cut each piece out singly so I could make sure the stripes matched and were straight up and down. Also, it is an uneven stripe (just in the thin purple lines) so I wanted the stripes to be the same for the sleeves and fronts.
cotton shirt
Stupidly, with all this matching, I forgot to line up the stripes at the shoulder seams! Ack.
cotton shirt
Anyway, I think it will be fine - who would notice but you and me?

Tuesday, February 19, 2008

The navy wool suit - it's done!

Buttonholes and it IS done!
navy wool suit jacket
These two pix don't do it justice. It is warm and fits wonderfully. In fact, it is almost like a coat because of its length and weight. When I thought of that, I remembered this navy wool coat I bought back in the 80s that I wore until it was worn right out - lining shredded and cuffs frayed. It was a thin wool so I wore the coat more as a jacket. Very 80s in style - I am sure people might laugh at it now - but I loved it. This is different in that it fits more closely and the wool is very different but I hope to wear it right out eventually.
navy wool suit jacket
I bought the buttons from Darrell's at the same time that I bought the wool and he was right - they look terrific. I'll have to get Peter to take a picture whenever I wear it first.

Next? Not sure - it may be some of that lovely cotton for a shirt, although I am longing to get at the raw silk.

The navy wool suit

Sarah asked last time if this fabric was boucle. My immediate reaction was, "lovely, expensive fabric could never be boucle!" and so I went to the dictionary to look up what it meant, exactly. As I discovered, boucle merely means "yarn with loops producing a rough, nubby appearance on woven or knitted fabrics, or a fabric made of this yarn". So why the negative reaction? I would probably have to undergo hypnosis to know exactly, but I bet it came from somewhere in the 70s, when I was told a certain kind of fabric was boucle and the stuff I was looking at was something horrible and polyester. Like double-knit. I suppose there may be decent double-knits now (I don't know) but forever in my mind, it means something oddly coloured and polyesterishly oogey. Likewise with "boucle". (I have discovered over many years that it is part of my unique brain function to adopt weird word definitions that don't always bear a great resemblance to the norm.)
navy wool suit
You can see from this close-up of frayed fabric that the threads in the weave are not uniform. There are bulky, wooly threads every so often that give the fabric its three dimensionality. But they are not loops.
navy wool suit
Back to the skirt which is now finished. I decided to cut off an inch from the bottom and hem it up an inch and a half, to make it hit mid-kneecap. I also decided not to use seam binding on the raw edge. I think I thought it would be more subtle and less noticeable without seam binding, although since no one sees the inside of the hem anyway, I am sure I don't know why I considered this. I zigzag stitched all around the new cut edge on the hem and then turned it up and sewed the hem by hand.
navy wool suit
After I attached the lining to the jacket all around the edges of the lapels and collar, I wanted to make sure the edge was as sharp as possible when I turned it right-side-out. I ironed open the seam first, after I trimmed it. Ironing the seam open pushes the seam itself right to the outside of the fold. Normally, if you just turn a garment right-side-out and try to press the edge of the lapels after it is turned, you will get some of the fabric dipping down into the seam. Then, you have to try to pick that fabric out of the trough formed by the seam. Press first and you won't have to do that.
navy wool suit
When I hemmed the jacket, I first zigzagged the raw edge of the hem and then turned it up. Because the fabric is so loosely woven, it is simple to ease in the excess fabric in the hem, as I pin it to the jacket. After hand sewing and pressing, I don't have any tucks or bumps in the hem.
navy wool suit
I still have to sew the puncture-proof lining to the jacket hem and hem the sleeves in the same way. Buttonholes and it's done!

Tuesday, February 12, 2008

The navy wool suit

Sewing with nice fabric in a pattern you have made before makes for an easy go of it.
navy wool suit
Here is the same pattern, made with some more of Darrell's wool from some years ago. I got two separate compliments on the jacket when I wore it today and I realize that it fits me even better than the other pattern, especially around the shoulders. Plus it doesn't have that curling problem so I'm away to the races.
navy wool suit
Here's the navy wool outside shell. I just have to put it together with the inside shell (which is at the same stage, which is to say, completed) and it's almost done. Those are tailor tacks at the collar, to locate the large dots where the collars come together.

When you have any slightly bulky fabric like this, pressing becomes even more important than usual. And we all know I am a fanatic about pressing. This time, I quadruple pressed the seams.
navy wool suit
First, I press the seam as sewed. I press the seam in its closed position, as it came off the sewing machine. Then I press the other side of it, closed. That's two.
navy wool suit
Then I press it open from the inside. I am using the clapper at this stage too.
Then I press the seam flat and open but from the outside or right side, also using the clapper. That's four presses on one seam.
Next - I finish the skirt and decide how long it should be.

Thursday, February 07, 2008

The navy wool suit

I've had a little extra time just to myself, so work on the navy wool is going very quickly. It is also fast because I have made this pattern several times (never mind how many skirts I have) and I don't have to match plaids.
navy wool suit

I've already put the zipper in the skirt. I basted the opening with bright green thread by hand, because I knew I'd never see the thread to pick it out if it was navy, and the loose weave of the fabric would make it extra difficult to pick stitches out if I machine sewed it.
navy wool suit
The jacket really does look extra long and it is long - mid thigh. But I knew that when I chose the pattern and so far, I think I was right. I may hem the skirt up an inch higher than the plaid I just made.

I am using some polyester for the lining that was not sold as lining. It has body and substance compared with regular lining. But it is also weirdly puncture-proof. Sticking pins in it has been ridiculously difficult and even sewing by machine, I have to hold the fabric taut otherwise it pokes down into the bobbin case as the needle tries to make a dent in it. And when I cut it out with pinking shears, it cut fine but the cut edges stick together almost like they were fused. Once I start to peel them apart, it is fine - they aren't really fused. But getting a purchase on the cut edge to get the two pieces apart is like trying to open a shrink-wrapped CD case.

This jacket pattern has one-piece sleeves so I am going to put the sleeves in at the shoulder first, and then sew up the entire underarm seam. It might not be any easier in reality but it has always seemed easier to me, to put sleeves in this way, rather than setting a tube inside the armhole.

Tuesday, February 05, 2008

And the suit is wearable

IN the beige plaid
It's 6:30 a.m. and although I got dressed, I haven't put makeup on yet. The nicest thing about the outfit is how comfortable it is. I still have to train the bottoms not to curl in (they are doing it again this morning) and I wore a plain white shirt to start. But the shoes go great! They are some camel coloured sling-backs I got last summer.

Monday, February 04, 2008

Plaid wool suit, finished and starting the navy wool

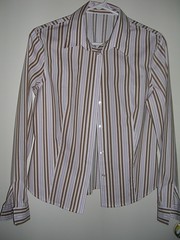
I'll start where I left off, which was on my way to Darrell's to look for buttons. I wanted the buttons for the beige plaid to be subtle yet distinctive, a possibly difficult combination as, if they are too subtle, then they aren't distinctive, and vice versa.
fixings
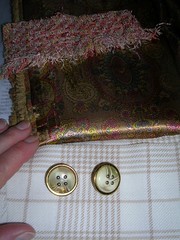
I was totally successful! First, although we were having another huge snow dump, I got downtown by bus and back again with no issues. I even spent a short enough time at Darrell's that I was able to use my original transfer to get home. Cheap I know but sometimes, every penny counts. Second, I had bought some lovely horn buttons ages ago from Darrell and they turned out to be just too large for me so I took them back, just wanting him to have them for someone else, and he gave me a credit for them! [Thank you so much Darrell, I didn't expect that.] Third, he still had some of that wonderful printed lining that I had coveted for the Chanel style raw silk I want to make (one day, I hope soon) and so I bought some of it. And finally, I found just the right buttons for the plaid.
plaid wool suit
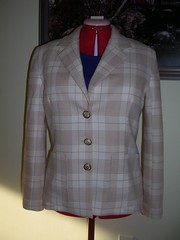
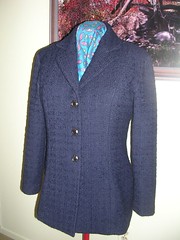
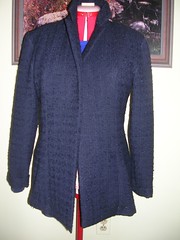
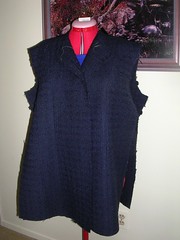
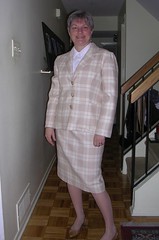
Here is the jacket, completed. It will still require some judicious pressing to train those curly bottoms into line but I also think it will help to wear it a lot, which I plan to do, starting tomorrow.
plaid wool suit
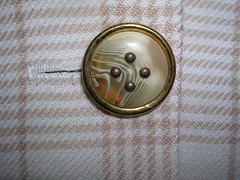
Here is the button in close-up. That red glow is my range-finder, I think. To me, they are perfect. They stand out but they aren't shiny or sparkly. They contrast with the plaid but not too much. Even the slightly green tone is a little contrast to the pink tone of the beige. I like the fact that they are matte in finish and yet have a metal rim.
navy wool suit
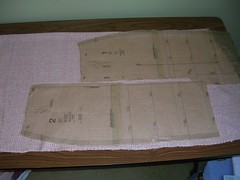
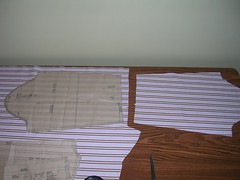
Then it was time to cut the navy wool. I cut each piece out of a single layer of fabric, to make sure everything was all straight.
navy wool suit
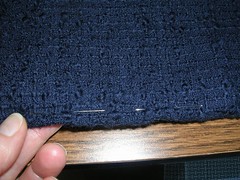
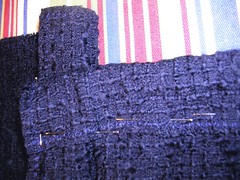
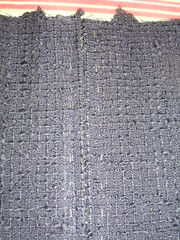
The front panel of the skirt has to be cut on the fold so I ran a line of pins down the fold to make sure the fabric had folded exactly along one of the warp lines.
navy wool suit
And with each pattern piece, I also put pins in the stright-of-grain lines and then turned the pattern to make sure I was straight.
navy wool suit
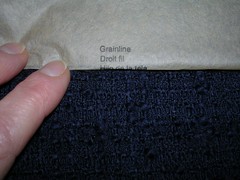
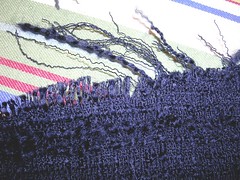
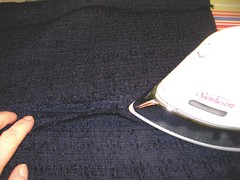
This extreme close-up doesn't do a lot more for you but here it is anyway.
navy wool suit
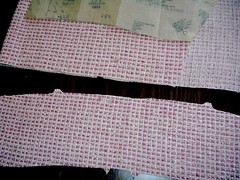
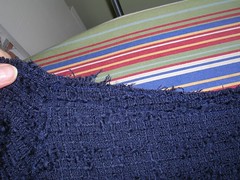
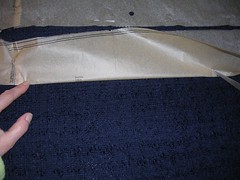
After I had cut everything, I still wondered which side I should use for the right and the wrong side. I don't know how much you can see in this photo, but I chose the left side in the photo as the correct/right side because it is ever so slightly less fluffy than the other side.
navy wool suit
Finally, I settled on sew-on interfacing because the fabric is so nice, I didn't want to take chances with issues associated with iron-on interfacing - bubbles, scorching (not that I've ever had that). I think I will also zigzag stitch around the raw edges of most of the pieces because it is a fairly loose weave and I don't want to risk any unravelling later. I plan to press all seams open and only trim the ones that need it, like shoulders and facings but I plan to wear this suit a lot and for a long time so I want it to be sturdy.