Wednesday, March 29, 2006

Dress halfway done

As usual, I ironed interfacing onto all the pieces that needed it, all in one go. The collar has interfacing on both sides to give it more body.
interfaced pieces
You can try turning pieces right side out and then pressing them but you won’t get as sharp an edge if you do. Instead, press as much of the seams open as you can before turning the piece.
pressing seam open
The dress has small tabs on the sleeves that will turn up and button on the outside - more for decoration than anything. I am in the middle of turning one of the tabs right side out, using just my hands at the moment.
turning tab
To get the corners nice and square, I use a plastic point turner gizmo. I have placed it inside the tube that is the tab and the end that is inside is pointed so I can poke out the corners from the inside. I have poked out one corner and will do the second after I take the picture.
point turner and tab
After turning the tab (or any of the other pieces that needed turning) you have to press it and try to get the seams right on the edge. With interfacing only on one side of the pieces (except for the collar) the drapey fabric doesn’t want to distribute itself evenly. You just have to try your best.
tab turned and pressed
As with all my projects from the stash boxes, I am using up thread colours instead of buying new thread. I have experimented with the white (that I used on Peter’s shirt), a pale blue (which I seem to have a lot of) and a grey which I bought for this other fabric that is languishing in a box somewhere. I decided to use the grey for all stitching that will show.
thread colours
This dress pattern has interest on the bodice back, composed of a yoke and an inverted pleat.
back yoke
The pattern instructions merely say to iron the seam allowance up, toward the yoke. Since I am a big fan of the flat fell, I am trimming the seam allowance that belongs to the yoke and will fold over the seam allowance belonging to the bodice back, press it and sew it down in a fell.
back yoke inside
The instructions also call for a double row of topstitching but I am only doing one row because the fabric doesn’t call for two rows, in my opinion. This is a soft rayon and I think one row will look better.
tabs and carriers topstitched
The instructions also call for sewing the bodice all together before attaching the sleeves. However, it is easier to attach a sleeve before the underarm seam is done up, so that is what I have decided to do. When I laid the pieces on the board to take the picture, I forgot that I always put the sleeve on top when I pin because it has the excess fabric.
sleeve and bodice
Here, I have started to pin the sleeve to the bodice and you can see the excess fabric between the pins. You can also see the tab sewed to the sleeve.
sleeve part pinned
After that, I sewed up all the boring bits - the four skirt seams, the underarm seams and attached the bodice to the skirt. Of course, I also finished all the seams with a flat fell.
half finished dress

Monday, March 27, 2006

A Dress

I have been inspired by A Dress A Day for some time and have now started to make a dress for summer. I found some rayon I had left over after I made Peter a shirt out of it and I thought it would be suitable for a dress. I have a new pattern I have not made before and I want to make this dress in this pink fabric I have. However, I thought instead of making it with a muslin first, I would use this rayon and then, if it doesn’t fit, I won’t be upset about giving it away. Sounds extravagant but really, when the rayon was left over and cheaper than muslin, why not make the prototype in fabric so that if it DOES work, you can wear it?

It is a soft grey rayon that drapes nicely, with small abstract but evenly spaced spots on it. At a distance, you might think it was polka dots (also liked by ADAD). Peter has got quite a bit of wear out of the shirt but I don’t think I will encourage us to wear the two pieces on the same day. I used white thread throughout when making his shirt and have regretted that because it is surprisingly contrasty. I am using some grey thread for the dress which I hope will blend in.

Here’s the pattern - Simplicity 4995 - and I am making the wide skirt in the shorter length with short sleeves. I haven’t decided if I am going to make the belt with the same fabric as even with interfacing, I am not sure it will work with this fabric. I will try it on (if it fits, that is) with one of my regular leather belts and see what it looks like and then make the fabric belt if it is required.
dress pattern
Because I have never used the pattern before, I had to cut all the pieces apart and then iron them. Don’t forget to iron the paper pattern pieces flat with a barely warm iron, otherwise you won’t get an accurate cut.
iron pattern pieces
I had enough fabric to cut out pockets too but when I was unpinning them, I realized that I should have cut the edges of the pocket with pinking shears. Instead, I trimmed them after the fact. The two edges of the pocket are going to be folded over just once and then sewn onto the dress so pinking keeps the future ravelling down. However, once I had sewn the top edge of the pocket to finish it, I realized that this fabric is too drapey to lend itself to this sort of pocket and I am not going to use them after all.
pocket

Friday, March 24, 2006

Shirt and Shell Finished

Based on the order in which my photos are arranged, I must have sewed the sleeves next. After attaching them to the body of the shirt, I trimmed the one seam allowance (belonging to the shirt, not the sleeve) to less than half its width. Then I ironed the seam allowances toward the body of the shirt from the outside, using the clapper to make them flat. Turning the shirt to the inside, I folded over the larger (untrimmed) seam allowance over the trimmed sam allowance, thus making the flat fell. I pinned it down and will take the pins out as I sew.
shoulder flat fell
Here I am sewing down the flat fell around the shoulder.
sewing down the fell
Next, I put the collar and front facings on. When pinning the collar to the shirt neck edge, you often need to make tiny cuts in the neck edge to make sure it stretches out to fit the collar without anything buckling or folding over into wrinkles. I put a ruler in the photo to show how small the cuts are.
neck edge clipped
The pattern instructions say to baste the collar on first, before attaching the facings but I do it all in one go. You can see I have made those tiny cuts to the facing neck edge as well, to stretch it out too.
front facing pinned
With the facings sewed on up to where they stop at the shoulder seams, the next step is to sew the collar to the shirt in between the facings. You can see that I have ironed interfacing on to both sides of the collar, to give it more body. In the photo, I have pinned the collar to the shirt neck edge and I have pinned the “facing” part of the collar (the part that gets folded down over the seam line) up and out of the way.
collar
Here is a close up of where everything meets at the shoulder seam. My thumb is holding the front facing up so you can see under it and the collar “facing” has been folded under and pinned over the seam line. You have to clip the seam allowances after they have been trimmed, right at the point where they have to be tucked under the collar facing. To the left of that point, the seam allowances point in the opposite direction and lie hidden under the front facing.
collar meets facing
In the next photo, I have finished all the topstitching around the neck and down the front. Rather than hand stitch the facings down, I use the machine and very carefully, using a zipper foot, stitch along the seam lines on the outside. You might want to click on this photo to view the large size at Flickr.
topstitching
Then I stitch the shirt together under the arms and do a modified flat fell on those seams. The next photo shows one half of the seam allowance has been folded and pressed under, in preparation for sewing.
underarm flat fell
As I was sewing this shirt and top, I found that my thread broke more often than usual (for me) and I saw I was pulling up lint and things occasionally. When I was finished with the hems, I opened the machine up to clean it out. In the next photo, I have removed the actually bobbin case and you are looking into the bobbin compartment, full of lint.
bobbin case
After brushing out that part, I flipped the machine on its side and removed the bottom cover. I’m holding the cover in my left hand.
under sewing machine
Here’s a close up of the lint.
close up under
I’ve brushed it all away and I am now ready for my next project.
Here is the (almost) finished shirt hanging over the top. I didn’t have any blue buttons so they will have to wait until I have bike to FabricLand, which should be soon as Spring is here. Peter has to pump up my bike tyres first.
shirt top finished

Thursday, March 23, 2006

Shirt and Shell

Rooting around through my fabric pieces, I came across a length of blue polyester I had bought because, a) it was on sale and b) I didn’t have any blue shirts. I was also going through a phase where I thought I needed more plain shirts instead of all the patterned prints I had. I find that plain old polyester isn’t the nicest thing to sew with but since I have this piece and since I made that white skirt with the blue and purple flowers, I thought I would cut this blue fabric up into some sort of top.

I had a pattern I’d never used before, which I bought because it had a tank top (or “shell” as my Mum calls them) which uses bias bands as facings. It is McCall’s 3610.
blouse and top
When I took the pattern pieces out, I measured the side seams and compared those measurements with shirts and tops I already had. I decided to take the pattern up in the body by two inches. I am quite short-waisted so I often have to do this with patterns. I fold the paper pattern along the line indicated for taking up and then fold it again along the dotted line for the maximum adjustment. You can see the fold better in the photo following this one.
pattern adjustment
When I had all the pattern pieces out of the envelope, ironed and adjusted, I started laying them out on the fabric (I had about 2.5 meters of fairly narrow fabric). Because the top front and back pieces were both cut on a fold, I couldn’t get the top AND the shirt out of the fabric the way I tried to initially. I unpinned the pieces and had another look at it. I measured how much fabric I needed to get the top out of one end of the length of fabric and cut that piece off from the rest. Then I folded each selvage into the middle so I had two folds and pinned the front and back pieces of the top to the fabric. That is a line of selvage in the middle of the two pieces in the next photo.
cutting out
In this way, I managed to get the shirt cut out too, once I folded the remainder of the fabric back into its selvages-together/fold-on-one-side configuration. I ironed the interfacing to the collar (both sides) and front facings for the shirt. Then I pinned together as many pieces in one go as I could and started sewing.

In the next photo, I am pinning the sleeve to the shirt. I have it here to illustrate how I put a pin in the ironing board cover and gently pull the armscye out so I can eliminate wrinkles. It also shows how this fabric has already started to fray, a constant complaint of most polyesters.
sleeve
This blog entry is mostly about the bias strips used instead of two inch wide facings, on the top. I have no idea why the colour in the next photo is so off but anyway, I have started to pin the bias strip (it is folded in half lengthwise) around the neck edge of the top. You can see that the strip is longer than the neck edge and so the bias strip will have to be eased into the neck with lots of pins.

Which reminds me that I changed the sewing machine needle for this project to the finest, thinnest needle I had. It has the numbers 55/7 on it - usually I sew with a 80/12 needle. Polyester also snags very easily so I made sure the needle was brand new and didn’t have any flaw on the point AND I am removing every pin as I sew, to make sure the needle never comes in contact with metal.
neck bias facing
Here, I am sewing around the armhole and you can see that the bias strip has more fabric in it than the armhole edge, in that it is buckling up.
bias facing with wrinkle
Now you can see that as I sew, I am gently pulling the armhole so that the bias strip fits. I have my right hand on the camera for the photo, but usually it is gently pulling the material behind the needle. It doesn’t matter which hand goes in front or behind - just don’t get your fingers caught under the needle! I have heard of people who have done that but in 30 years of sewing, I have never sewed my finger to the garment. I have certainly stabbed myself with pins and even cut myself with the scissors but I haven’t been run through by the machine needle.
stretch facing
At one point, I left the room and when I got back, the dog had decided under the ironing board was a good place for a nap. Not wanting to disturb him, I worked around the body.
working around the dog
After sewing the bias strip facings on, they have to be trimmed.
trim facing
Then you have to press them, starting with pressing the facing away from the top.
press facing open
Then you press the facing in a fold, over the raw (and now fraying) edge of the armhole or neck edge.
fold facing over
Finally, you sew the facing down, from the wrong side of the garment to make sure you catch the edge of the facing, using a zipper foot to get close to the edge. You can also see that I have done a modified flat fell on the shoulder seam for the top.
sewing down the facing

Monday, March 20, 2006

Sleeveless blouse

Today is the first day of Spring - but only because it is the equinox. It continues to be nastily cold here (-9C with a windchill of -18C in Ottawa this morning) and although I washed my winter coat last week in anticipation, I am wearing it again to walk the dog. Along with a hat, scarf and mitts. I write about making Summer clothes while sitting in my usual Winter outfit of turtleneck, pullover and cardigan (yes, that’s three layers).

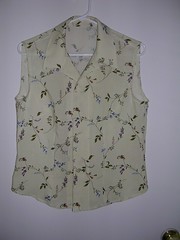
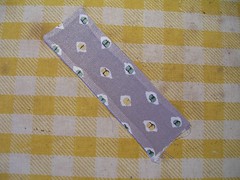
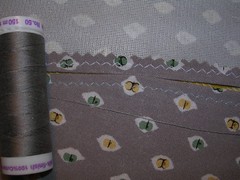
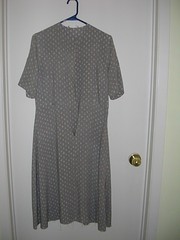
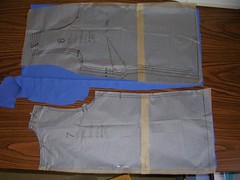
So. Going through the lightweight fabrics in my stash, I ran across this piece of rayon. I had made it into a cute dress (using Vogue pattern 7889) with a full skirt and a pleated midriff band. I have got a lot of wear out of the dress and really like the fabric. This remnant was a little over a meter (yard) long but it was also about 150 cm (60 inches) wide so I was able to get a sleeveless blouse cut out of it.

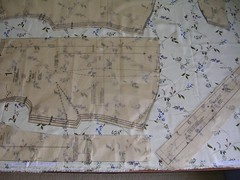
I’m using McCall’s pattern 3622. It’s just like some of my other blouse patterns but this one uses bias bands instead of the larger facings around the armholes. Facings are a bit of a pain to wear because they tend to fold out and stick out around the arms. I sew them down along the shoulder and underarm seams but you still have to be careful putting the blouse on. Once it’s on, they stay in their place. Anyway, I decided to go with the bias bands for this one.
pattern laid out
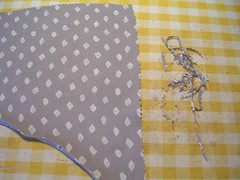
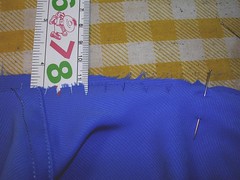
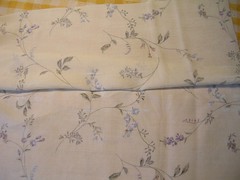
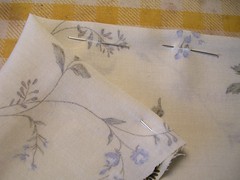
Here is how I mark things like darts on the fabric. In this case, I have the wrong sides of the fabric folded in and lying next to each other, with the right side on the outside. When you put a pin in where there is a dot you want to mark, and then you pull the fabric piece apart, you are looking at the wrong side of the fabric and you can use your chalk with abandon to mark dots and all the marks will be on the inside when you are done.

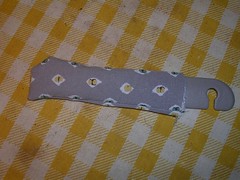
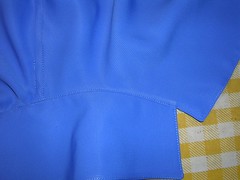
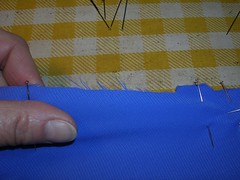
In the photo, I have put pins in from the outside, through the paper pattern piece which is still attached to the fabric. I have marked one side of the long vertical dart down the front and have taken that line of pins out and you can see the pale blue chalk marks where the pins were (you might have to go to Flick by clicking on the photo and going to the large size in order to see detail, which of course, you can do with all the photos).
marking dart
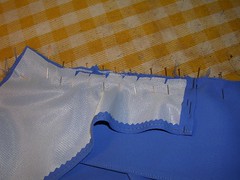
In the next photo, I have left a pin in and I am spreading the fabric apart so you can see how I drag the chalk across the bump that the pin makes in order to get a substantial mark on the fabric. This means that I am going to get almost identical marks on the mirror image pieces of fabric and so the two front darts will end up in the same location on the two front sections of the blouse. However, on one piece, the marks will show where the middle piece of the pin was and on the other piece, the chalk will show up on the ends of the pin. Doing it this way also shows you the linear direction of the dart.
dart marking close up
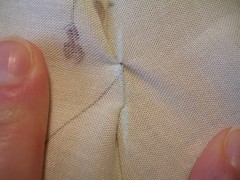
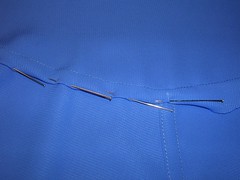
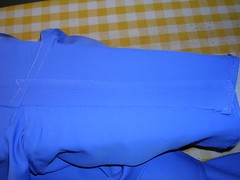
Next, I pin the dart, using the markings I made with chalk as a guide for both location and direction. Here, I’ve put pins in down the length of the dart. I can reposition them perpendicularly to the dart when I want to sew it or I can just remove then as I sew. After I have folded the fabric roughly where I think the dart will go, I stick a pin into the fabric where the chalk mark is. Then I turn it over and see if the pin is going through the chalk marks on the opposite side. In the photo, I have turned the bottom of the dart over to show how the pins and markings look on both sides.
dart marked and pinned
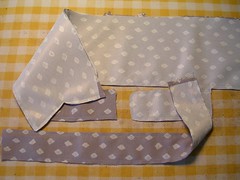
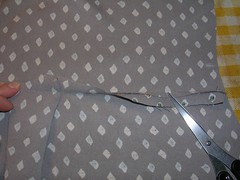
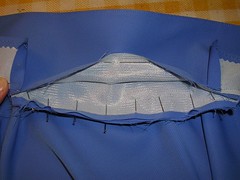
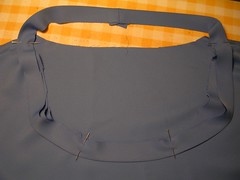
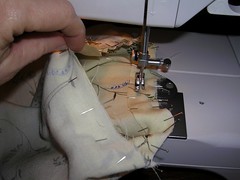
I have a mental block about doing armholes. There are people who can just cut a long strip of bias fabric and make it work around the armscye. I feel like I have to have the right size pattern piece, otherwise it won’t work. That’s why I am using this pattern for a sleeveless blouse - because it comes with the right sized pattern piece for the bias. I am also following the instructions that call for sewing up the underarm seam first and then applying the bias. In the next photo, I have started to pin the bias onto the armscye. You can see that I have pinned on one side, from the notch to the underarm seam. On the left side, I have put a pin in at the notch and there appears to be excess fabric in the piece of bias “facing”. This all fits into the armscye as you pin and slightly stretch the body of the blouse to make it fit, as I have already done on the right side.
armhole facing pinned
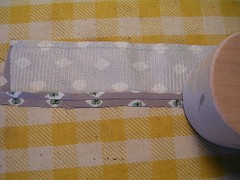
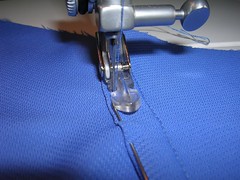
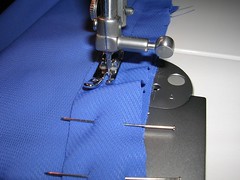
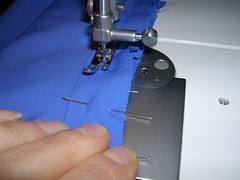
Now I am sewing the band onto the armscye. You can turn the garment the other way out and sew around the outside. I have decided to sew around the inside of the circle. I don’t think it makes any difference - it’s more a matter of preference.
armhole facing sewed
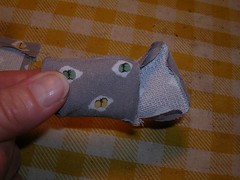
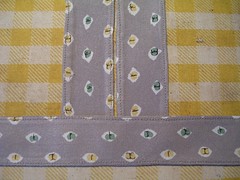
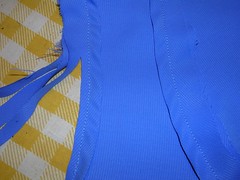
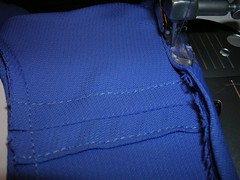
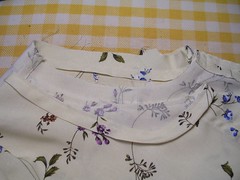
In the next photo, I have laid both armholes out so you can see that the top-most one has been trimmed and the bottom one is not yet trimmed (you can still see the notches). After trimming the seam allowance to narrower than the bias tape that will be folded over, then you iron the bias tape, first out flat and then folded over the raw seam allowance. Once it has been ironed into its final position, you sew the bias fabric down to the armscye, thus finishing the armhole.
armholes trimmed
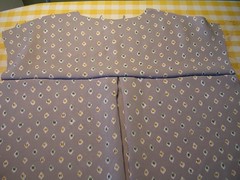
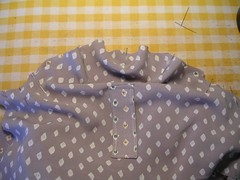
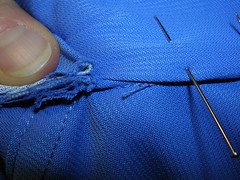
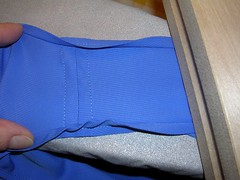
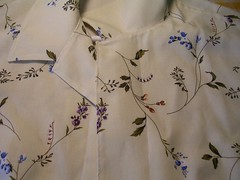
I often find that the front facings also fold outwards so I have recently taken to sewing them down as well. I laid the mostly finished blouse out on the ironing board so it was nice and flat. Then I pinned the front facing down and sewed a straight line from collar to hem. I didn’t sew around the shape of the facing. I wanted it to look more like a front band than a facing.
front facings
Finally, again except for the buttons, here is the finished blouse. I am just going to use plain old shirt buttons again on this one.
blouse finished

Friday, March 17, 2006

Another 8 panel skirt

By popular request, here is the finished pale green shirt:
finished blouse
Not bad. Today is St. Patrick’s day but since it is so cold still, I am wearing green fleece over a turtleneck and not this thin shirt. I may even put on a cardigan before the hour is over.

Rooting through my stash boxes, I discovered a huge length (for leftovers, it was almost 2 yards) of some fabric I had made a shirt out of about 6 or even 7 years ago. I have worn the shirt quite a lot but I discovered after I made it that it must have a tiny bit of wool in it because after a couple hours of wearing, I start to itch. However, I decided the leftovers would make a nice skirt. Imagine that! Another skirt!
paisley fabric for skirt
I’m using the same McCall’s pattern 3518 that I have used before. It offers 6 and 8 panel skirt options and I decided on the 8 panels for this busy fabric to cut it up even more.
skirt pattern
When you have 8 panels on a skirt, you have to come up with some means of telling them apart so you can put them together in the right order. I cut around the notches and so I know that the back panels have the triple notch and the front panels have the double. But there are still 4 different side panels. What I also like to do is keep the pattern pieces lying on the fabric pieces until it is time to pin them together. It is easier to glance at the writing on the pattern piece that it is to try to discern which notch might be triple and which is double.
skirt pieces (8 panels)
I sewed the front 4 panels and the back 4 panels together and then got ready to install the zipper on the left side. In the next photo, you can see the front and back and I have not yet ironed the seams.
skirt front and back with zipper
Here, I am showing how the marked dot for the bottom of the zipper doesn’t always fall exactly where you want the bottom of the zipper to go. It is good to lay the zipper on the seam and mark exactly where you want to stop stitching, rather than just rely on the dot.
skirt zipper length
Because of the many colours in this fabric, I had to decide what thread I would use. I was taught that if in doubt, go darker and this rule works on this fabric as you can see from the next photo. The zigzag stitch is on the edge of the seam allowances for where the zipper goes.
thread contrast
As usual, I flat felled all the seams and finished the bottom with a narrow, machine sewn hem. I decided I didn’t need to line this skirt as the fabric is dense and I have a black half slip that I can wear under it. If the fabric is more loosely woven, I will use lining to give it shape and support.
paisley skirt finished